background image

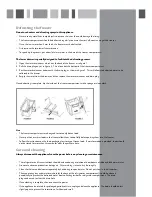
Changing the light bulb

Disconnect the appliance from the power.

•  

Remove the light cover by pressing on the hooks on both sides of the cover.

•  

Unscrew the light bulb to remove it and replace with a new bulb (not more than 15W).

•  

Replace the light cover and reconnect the power.

This appliance must never be installed close to heat sources, e.g. heating elements, cookers or in damp places.

•   

The plug should be fully accessible at all times.  

•  

To ensure the appliance is level, you should use the height adjustable feet at the front of the appliance.

•  

The cooling system at the rear of the appliance must not touch the rear wall. 

•  

The appliance must be installed with adequate ventilation.  Ensure that there is 15 cm clearance above the appliance,  


and that there is space between the rear of the appliance and the wall.  

Troubleshooting

If you have any problems with your appliance, you should check the troubleshooting prior to calling CDA Customer Care 
to prevent unnecessary service calls and potential cost.

If the appliance is not working

•  

Check there is power to the appliance:

•  

The green light on the control panel is lit

•  

The house fuses are intact and the fuse in the plug has not blown.

•  

The thermostat is not set to 0

•   

The plug socket is functioning fine.  To check this, plug another electrical appliance in to see if the socket is working. 

The appliance is working, but not very well 

•  

The appliance is not overloaded

•  

The thermostat is set to an appropriate temperature

•  

The doors are closing properly

•  

The cooling system at the rear of the appliance is clean and free of dust, and not touching the rear wall.

•  

There is enough ventilation at the side and rear walls 

The appliance is noisy

•  

The appliance is level and stable

•  

The side and rear walls are clear, and there is nothing resting on the appliance

•  

The cooling gas in the refrigerator will make a slight bubbling noise, even when the compressor is not running. 

There is water in the lower part of the refrigerator compartment

•  

The drain hole in the channel at the back of the compartment is clear

Summary of Contents for FF850

Page 1: ...Group Ltd Harby Road Langar Nottinghamshire NG13 9HY T 01949 862 012 F 01949 862 003 E service cda eu W www cda eu Passionate about style FF850 freestanding combination fridge freezer Manual for Inst...

Page 2: ...EEC Low voltage and requirements of EMC Directive 2004 108 EEC This appliance has been manufactured to the strictest standards and complies with all applicable legislation including Electrical safety...

Page 3: ...quired level recommended between 2 4 and switch off the fast freeze function Please note The appliance will work continuously until it comes down to the correct temperature If the appliance is switche...

Page 4: ...freeze function should be switched off when not required If the ambient temperature is less than 10 then the fast freeze function can be used continuously to improve the performance of the appliance...

Page 5: ...lean cloth Use The freezer compartments are designed to store only frozen food Never put hot or warm foods in the freezer allow them to cool fully before putting them into the freezer Follow the instr...

Page 6: ...ng CDA Customer Care to prevent unnecessary service calls and potential cost If the appliance is not working Check there is power to the appliance The green light on the control panel is lit The house...

Page 7: ...S 1363 should be used As the colours of the wires in the mains lead of this appliance may not correspond with the coloured markings identifying the terminals in your plug proceed as follows The wire w...

Page 8: ...roup Ltd Harby Road Langar Nottinghamshire NG13 9HY T 01949 862 012 F 01949 862 003 E service cda eu W www cda eu Passionate about style To contact our Customer Care Department or for Service please c...

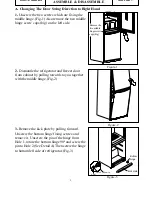
Page 9: ...nscrew the bottom hinge fixing screws and remove it Unscrew the pin of the hinge from Hole 1 rotate the bottom hinge 900 and screw the pin to Hole 2 See Detail A Then screw the hinge to bottom left si...

Page 10: ...Unscrew the pin of the top hinge Fig 5 Detail A and screw it to the left hinge Fig 5 Detail B Refrigerator Door Left catcher Right catcher 6 Replace the top bushing and top bushing cap Fig 6 Remove th...

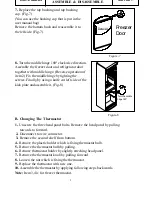
Page 11: ...r which is fixing thermostat bulb 5 Remove the thermostat bulb by pulling 6 Remove thermostat holder by slightly streching head panel 7 Remove the thermostat knob by pulling forward 8 Loosen the nut w...

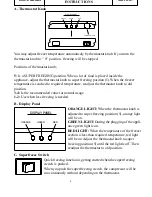
Page 12: ...4 Is the recommended value for normal usage 1 2 Use when less freezing is needed GREEN DISPLAYPANEL RED ORANGE ORANGE LIGHT When the thermostat knob is adjusted to super freezing position 5 orange lig...

Reviews: