background image

5

Before first use

You must allow the fridge to settle for at least twenty four hours 
prior to switching the power on.

It is recommended that you clean the interior of the appliance prior to 
first use, using a solution of bicarbonate of soda and warm water and 
then thoroughly drying the interior.

The fridge may have an odour to it at first use. This will disappear as 
the appliance cools.

Please note:

The appliance will work continuously until it comes down to the 
correct temperature.

The temperatures are preset at the factory to 5 for the fridge and -18 
for the freezer.

It takes two to three hours for the fridge and freezer to reach 
temperatures appropriate to store food. 

If the appliance is switched off, you should allow five minutes 
before switching it on again to prevent unnecessary damage to the 
compressor.

Summary of Contents for FW951

Page 1: ...rtment The Group Ltd Harby Road Langar Nottinghamshire NG13 9HY T 01949 862 012 F 01949 862 003 E customer care cda eu W www cda eu FW951 Integrated Frost Free fridge freezer Manual for Installation U...

Page 2: ...erience or knowledge about it unless they have had supervision or instructions on how to use the appliance by someone who is responsible for their safety Under no circumstances should any external cov...

Page 3: ...n system contains insulating gases and refrigerants which require specialised waste disposal The valuable materials contained in this appliance can be recycle It must be taken to a special local autho...

Page 4: ...ence or other accidents do not place a microwave oven on top of the refrigerator or use any electric appliance inside the refrigerator Do not allow children to play with or near the appliance The inte...

Page 5: ...may have an odour to it at first use This will disappear as the appliance cools Please note The appliance will work continuously until it comes down to the correct temperature The temperatures are pr...

Page 6: ...ng into the fridge This will help prevent the loss of moisture keep food fresh and avoid unpleasant odours Sort foods prior to storing Any foods to be used soon should be stored at the front of the sh...

Page 7: ...To stop the wrapping sticking together ensure it is dry Label the food before freezing with information including type of food and dates of storage and expiry Once food is thawed it must not be refro...

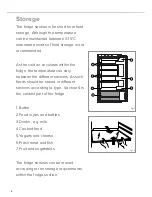
Page 8: ...mperature can vary between the different sections As such foods should be stored in different sections according to type Section 6 is the coldest part of the fridge 1 Butter 2 Food in jars and bottles...

Page 9: ...ed with a humidity control to ensure fruit and vegetables last longer This can be adjusted by the slider at the front right of the salad crisper Fully opening the slider control to high humidity restr...

Page 10: ...this dial The thermostat can be set between fully anticlockwise super cool function and fully clockwise least cold The super cool function can be used when introducing large quantities of fresh food...

Page 11: ...ssible To switch on the super freeze function turn the freezer thermostat dial to super freeze Once the food is frozen turn the thermostat dial back to the previous setting IMPORTANT Do not use the su...

Page 12: ...a solution of bicarbonate of soda and lukewarm water Do not use abrasive products or detergents After washing rinse and dry thoroughly Clean the shelves and balconies separately by hand with soap and...

Page 13: ...is required Defrosting the freezer The freezer is frost free and as such is designed not to require defrosting To switch off the compressor for a short period of time and so to force a defrost cycle p...

Page 14: ...at is not set to off The plug socket is functioning fine To check this plug another electrical appliance in to see if the socket is faulty The appliance is working but not very well The appliance is n...

Page 15: ...rs or in damp places To ensure the appliance is level you should use the height adjustable feet at the front of the appliance The cooling system at the rear of the appliance must not touch the rear wa...

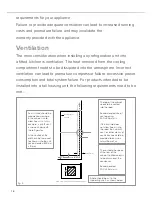
Page 16: ...ts need to be met 300 300 plan view of cut out and ventilation gaps The top of the cabinet needs to be vented into the room Recommended size of vent opening 500 x 35mm min If the furniture does not al...

Page 17: ...g unit is not blocked off A channel depth of 40 50mm is normal with most units A hole is shown in the base shelf of the unit this allows air to be drawn over the compressor heat exchange Some installe...

Page 18: ...he top fixing brackets Secure the two top fixing brackets to the top of the product using two screws for each bracket as shown in fig 7 a 3 Fitting the front shelf trim The front shelf trim fits to th...

Page 19: ...tween 50 and 75mm Not important as long as the machine is stable We recommend that you seek the help of another individual when handling this product 6 Fitting the width spacers For cabinets with 15mm...

Page 20: ...right 9 Positioning the product in the housing At this stage the product can be pushed into the housing unit ensuring that the two guide pieces are fitted in the hinges and the guide is fitted to the...

Page 21: ...ower guide piece in place slide the lower bracket against the housing unit and tighten the two screws to lock the bracket in position use a good quality screwdriver of the correct size for this When d...

Page 22: ...e door in the required position with respect to the cabinet figure 14 2 Without moving the fitting guides remove the upper fixing plate on the door by removing the fixing plate securing nuts figure 15...

Page 23: ...ia door assembly to the refrigerator onto the height adjustment screws and loosely fit the securing nuts At this stage the final vertical and horizontal position of the fascia assembly may need adjust...

Page 24: ...cabinet and or the upper fascia fixing plates are incorrectly positioned Horizontal adjustment Y 1 Loosen the upper fixing plate nuts B 2 Slide the plate left or right as required this gives approxim...

Page 25: ...re correct before adjusting the depth 1 Loosen the depth adjustment screw C 2 Move the fascia in or out as required this gives an adjustment of approximately 3mm the lower fascia brackets are slotted...

Page 26: ...securing them in position 3 Line up the fascia panel against the housing unit to determine where they need to be when installed and position the guides to the top of the fascia panel Once this has be...

Page 27: ...oser to or further away from the door The left right and vertical position can be set using this screw Insert a screwdriver in the slot at the top and move up anti clockwise or down Clockwise Simply s...

Page 28: ...r and fuse 2 Fit replacement 13A fuse ASTA approved to BS 1362 type into the fuse cover 3 Replace fuse cover Important Do not use the appliance without the fuse cover in position How to connect an alt...

Page 29: ...and YELLOW The wire which is coloured BLUE must be connected to the terminal which is marked with the letter N or coloured BLACK The wire which is coloured BROWN must be connected to the terminal whi...

Page 30: ...30...

Page 31: ...31...

Page 32: ...tact our Customer Care Department for Service on the details below Customer Care Department The Group Ltd Harby Road Langar Nottinghamshire NG13 9HY T 01949 862 012 F 01949 862 003 E service cda eu W...

Reviews: