background image

6

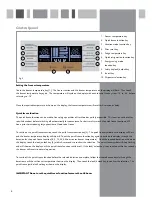
fig. 2

Control panel

Setting the freezer temperature 

Touch the freezer temperature key (1).  The freezer section and the freezer temperature on the display will flash.  Then touch 
the freezer temperature key again.  The temperature will cycle on the display with each touch of the key from -16° to -24° before 
returning to -16°.  

Once the required temperature is shown on the display, the freezer temperature will set after five seconds’ delay. 

Quick freeze function

The quick freeze function can be used to freeze large quantities of fresh food as quickly as possible.  This function can be set for 
specific durations before switching off automatically for convenience. For best results, switch the quick freeze function on 12 
hours prior to introducing large quantities of food to be frozen

To switch on the quick freeze function, touch the quick freeze function key (2).  The quick freeze symbol on the display will flash 
and the freezer temperature display will show 6.  Touch the quick freeze function key again to cycle on the display through the 
duration for the quick freeze function (6, 8, 12, 24, 48 hours or set freezer temperature).  Once the required duration is shown on 
the display, touch the lock/unlock key (8) within five seconds to confirm the selection.  The quick freeze symbol will stop flashing 
and will show on the display until the quick freeze function switches off.  If the lock/unlock key is not touched within five seconds, 
the freezer will revert to normal operation.

To switch off the quick freeze function before the selected duration is complete, follow the steps above and cycle through the 
durations until the set freezer temperature shows on the display.  Then touch the lock/unlock key to confirm the selection.  The 
quick freeze symbol will no longer show on the display.

IMPORTANT Do not use the quick freeze function for more than 48 hours

1.   Freezer temperature key

2.   Quick freeze function key

3.   Vacation mode function key

4.   Filter reset key

5.   Fridge temperature key

6.   Quick refrigeration function key

7.   Energy saving mode    
 

function key

8.   Safety key lock/unlock key

9.   Ice off key

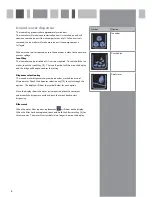
10.  Dispenser selection key

1

10

2

3

4

5

6

7

8

9

Summary of Contents for PC70

Page 1: ...nt The Group Ltd Harby Road Langar Nottinghamshire NG13 9HY T 01949 862 012 F 01949 862 003 E service cda eu W www cda eu Passionate about style PC70 American Style Fridge Freezer Manual for Installat...

Page 2: ...2006 95 EEC Low voltage and requirements of EMC Directive 2004 108 EEC This appliance has been manufactured to the strictest standards and complies with all applicable legislation including Electrical...

Page 3: ...r closed as much as possible to maintain the internal working temperature Should the power failure continue for a prolonged period you should take steps to protect the contents of the appliance agains...

Page 4: ...t reaches the required temperature Please note The appliance will work continuously until it comes down to the correct temperature If the appliance is switched off you should allow five minutes before...

Page 5: ...in the freezer allow them to cool fully before putting them into the freezer Follow the instructions on the food packaging for storage of frozen food If no information is provided foods should not be...

Page 6: ...uick freeze function key again to cycle on the display through the duration for the quick freeze function 6 8 12 24 48 hours or set freezer temperature Once the required duration is shown on the displ...

Page 7: ...ol will stop flashing and will show on the display until the quick refrigeration function switches off To switch off the quick refrigeration function touch the quick refrigeration function key Then to...

Page 8: ...bol will show on the display and the fridge will beep to confirm the setting Dispenser selection key The ice and water dispenser can provide ice cubes crushed ice or cool filtered water Touch the disp...

Page 9: ...rranty provided with the product Ensure ventilation openings are kept clear Do not use a multi purpose socket alongside other appliances Do not tilt the fridge beyond 45 Do not exert excessive pressur...

Page 10: ...ion of mildew and smell This appliance must never be installed close to heat sources e g heating elements cookers or in damp places The plug should be fully accessible at all times To ensure the appli...

Page 11: ...stable The side and rear walls are clear and there is nothing resting on the appliance The cooling gas in the refrigerator will make a slight bubbling noise even when the compressor is not running It...

Page 12: ...f the wires in the mains lead of this appliance may not correspond with the coloured markings identifying the terminals in your plug proceed as follows The wire which is coloured GREEN and YELLOW must...

Page 13: ...13...

Page 14: ...14...

Page 15: ...15...

Page 16: ...Group Ltd Harby Road Langar Nottinghamshire NG13 9HY T 01949 862 012 F 01949 862 003 E service cda eu W www cda eu Passionate about style To contact our Customer Care Department or for Service please...

Reviews: