background image

28

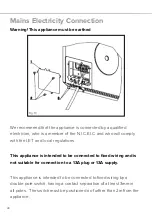
Mains Electricity Connection

Warning! This appliance must be earthed

We recommend that the appliance is connected by a qualified 
electrician, who is a member of the N.I.C.E.I.C. and who will comply 
with the I.E.T. and local regulations.

This appliance is intended to be connected to fixed wiring and is 
not suitable for connection to a 13A plug or 13A supply.

This appliance is intended to be connected to fixed wiring by a 
double pole switch, having a contact separation of at least 3mm in 
all poles.  The switch must be positioned no further than 2m from the 
appliance.

fig. 8

Fig. 13

Summary of Contents for SK651

Page 1: ...are Department The Group Ltd Harby Road Langar Nottinghamshire NG13 9HY T 01949 862 012 F 01949 862 003 E customer care cda eu W www cda eu www cda eu SK651 Single Pyrolytic Oven Installation Use and Maintenance ...

Page 2: ...t installation or misuse of the appliance User information Ovens become hot during and immediately after use Ensure you do not touch the heating elements located inside the appliance The oven door can become very hot during operation After use please ensure that the appliance is switched off Keep children away from the appliance when in use and immediately after use Keep the oven door closed when ...

Page 3: ...act with food conform to EEC 89 109 4 IMPORTANT INFORMATION FOR CORRECT DISPOSAL OF THE PRODUCT IN ACCORDANCE WITH EC DIRECTIVE 2002 96 EC At the end of its working life the product must be taken to a special local authority waste collection centre or to a dealer providing appliance recycling services Disposing of a household appliance separately avoids possible negative consequences for the envir...

Page 4: ...n t touch the heating elements inside the oven During the oven operation the front is heated as well consequently keep children clear of the oven especially during self cleaning Parents and adults should pay particular attention when using the product in presence of children Children should be overseen so as to ensure that they don t play with the equipment Keep children under age 8 away unless co...

Page 5: ...s closed properly Ensure the oven is cool and power to the oven has been turned off before removing the door Failure to do so could result in electrical shock or burns Read the user instructions carefully before using the oven for the first time Follow the instructions for first use of the oven Clean the oven regularly Remove spills as soon as they occur Always use oven gloves when removing shelve...

Page 6: ...w vinegar coffee milk saltwater lemon or tomato juice to remain in contact with enamel parts The oven can require increased ventilation on pyrolytic programmes This can be achieved either from an open window or the use of a fan Fig 1 below shows correct placement of grills Fig 1 ...

Page 7: ...ion the oven racks before turning on the oven Make sure that the racks are level once they are in position The racks are designed to stop when pulled forward to their limit To remove a rack from the oven 1 Pull rack forward 2 Lift rack up at front and then pull further forward to remove it To replace an oven rack 1 Place rear of rack between rack level guides 2 While lifting front of rack slide ra...

Page 8: ...rol Panel Fig 3 Fig 4 Temperature control Digital Display Function control Door lock LED Time LED Heating LED Timer indicator Temperature LED Auto timing indicator Auto cooking indicator Digital Display in Detail ...

Page 9: ...9 Fig 5 Function Control Knob in Detail Defrost Conventional oven Fan with lower heat Light Fan oven Fanned half grill Off Conventional Eco oven Half grill Full grill Pyrolytic clean ...

Page 10: ...4 hour format Note The Time LED is lit whenever the digital display is showing a time value Setting the clock In order to set the time of day the Function control knob must first be in the Off position Turn the Temperature control knob clockwise or anticlockwise and let it return to its rest position The hours flash Modify the flashing hours value by turning the Temperature control knob clockwise ...

Page 11: ...isplay is showing a temperature always C To turn the oven on Turn the Function control knob to the required programme The display will briefly show On then show the temperature preset for the programme and cooking will start immediately To change the temperature turn the Temperature control knob clockwise or anticlockwise until the required temperature shows on the display The Heating LED will fla...

Page 12: ...en a cooking programme is selected it stays off during pyrolytic cleaning Defrost Turn the Function control knob to the Defrost position The defrost programme uses the the fan to circulate air for defrosting This is not a cooking programme The display shows Def Conventional oven Turn the Function control knob to the Conventional oven position The cooking temperature defaults to 210 C and can be se...

Page 13: ...s just as you would in a traditional oven The cooking temperature defaults to 190 C and can be set between 50 250 C in 5 C increments by turning the Temperature control knob After setting the temperature can be changed at any time by turning the Temperature control knob again Fan with lower heat Turn the Function control knob to the Fan with lower heat position The fan with lower heat programme us...

Page 14: ...e Function control knob to the Half grill position The half grill programme uses just the centre grill element to provide top heat for grilling or browning foods The rack should be placed in as high a position as possible to bring the food close to the element The food needs to be turned over during cooking to ensure both sides are cooked The grill should be preheated for approximately two minutes...

Page 15: ... in 5 C increments by turning the Temperature control knob After setting the temperature can be changed at any time by turning the Temperature control knob again Pyrolytic clean This oven can clean itself by a process known as pyrolysis heating the cavity to a temperature of approximately 475 C This will burn off the residue from spattering and spillages caused by cooking Pyrolytic programmes shou...

Page 16: ...P1 30 the preset time of one hour and thirty minutes Also the Auto timing indicator is activated The Door lock LED shows the status of the door lock at any time Off Door unlocked Flashing Door being locked unlocked Full on Door locked The time for pyrolysis defaults to 90 minutes and can be set between 60 180 minutes in 15 minute increments To change the time after setting the Function control kno...

Page 17: ...eared when the Function control knob is turned to the off position The door remains locked until the inside of the oven drops below the safety threshold When the oven is cool Disconnect the appliance from the power supply Use a damp cloth to remove the white ashes from within the oven The oven is ready for use once the power supply is reconnected ...

Page 18: ...nd and the setting for the cooking end time Note if the Temperature control knob is not touched for approximately ten seconds the display will revert back to showing the current time Programming the oven Any timer functions required should be set after the relevant cooking programme has been set Timer Cooking time Press the Temperature control knob twice The display then shows the word dur Turn th...

Page 19: ...ure control knob clockwise or anticlockwise and let it return to its rest position The hours flash Modify the flashing hours value by turning the Temperature control knob clockwise or anticlockwise then let it return Push the Temperature control knob to switch to setting the minutes The minutes flash Modify the flashing minutes value by turning the Temperature control knob clockwise or anticlockwi...

Page 20: ...ful for timing actions that are unrelated to this appliance for example timing eggs on the hob Press the Temperature control knob once The display then shows Turn the Temperature control knob clockwise or anticlockwise to select the time required This defaults to 30 minutes and can be set to any time in the range 0 240 minutes After approximately fifteen seconds the display reverts back to showing...

Page 21: ...r Fig 6 item 1 by unscrewing it Carefully remove the old bulb Fig 6 item 2 and insert a new bulb suitable for high temperatures 300ºC having the following specifications 230 240V 50Hz 25W Insert the new bulb taking care not to touch the glass with your hands as contamination from your fingers can cause premature failure Always use a clean cloth or gloves Reattach the glass cover by screwing it bac...

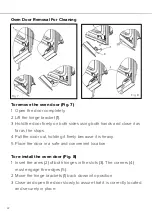
Page 22: ...he stops 4 Pull the door out holding it firmly because it is heavy 5 Place the door in a safe and convenient location To re install the oven door Fig 8 1 Insert the arms 2 of both hinges in the slots 3 The corners 4 must engage the edges 5 2 Move the hinge brackets 1 back down into position 3 Close and open the door slowly to assure that it is correctly located and securely in place Fig 8 Fig 7 ...

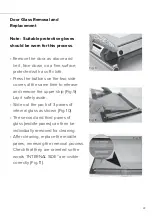
Page 23: ...ide covers at the same time to release and remove the upper strip Fig 9 Lay it safely aside Slide out the pack of 3 panes of internal glass as shown Fig 10 The second and third panes of glass middle panes can then be individually removed for cleaning After cleaning replace the middle panes reversing the removal process Check that they are oriented so the words INTERNAL SIDE are visible correctly F...

Page 24: ...etary stainless steel cleaners are available We recommend the CDA E Cloth available from the CDA Sales Team for cleaning stainless steel surfaces Enamelled parts All enamelled parts must be cleaned with a sponge and soapy water only or other non abrasive products Suitable proprietary chemical cleaners may be used after first consulting with the manufacturer s recommendations and testing a small sa...

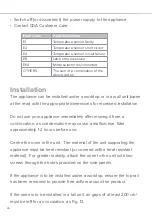
Page 25: ...correctly installed your product meets all safety requirements laid down for this type of product However special care should be taken around the rear or the underneath of the appliance as these areas are not designed or intended to be touched and may contain sharp or rough edges that could cause injury Display and Failure Codes Your oven is equipped with diagnostic systems which monitors its perf...

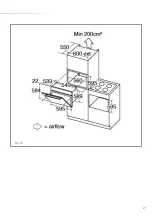
Page 26: ...iance must be heat resistant or covered with a heat resistant material For greater stability attach the oven to the unit with two screws through the holes provided on the side panels If the appliance is to be installed under a worktop ensure the top rail has been removed to provide free airflow around the product If the oven is to be installed in a tall unit air gaps of at least 200 cm2 must be le...

Page 27: ...27 Fig 12 ...

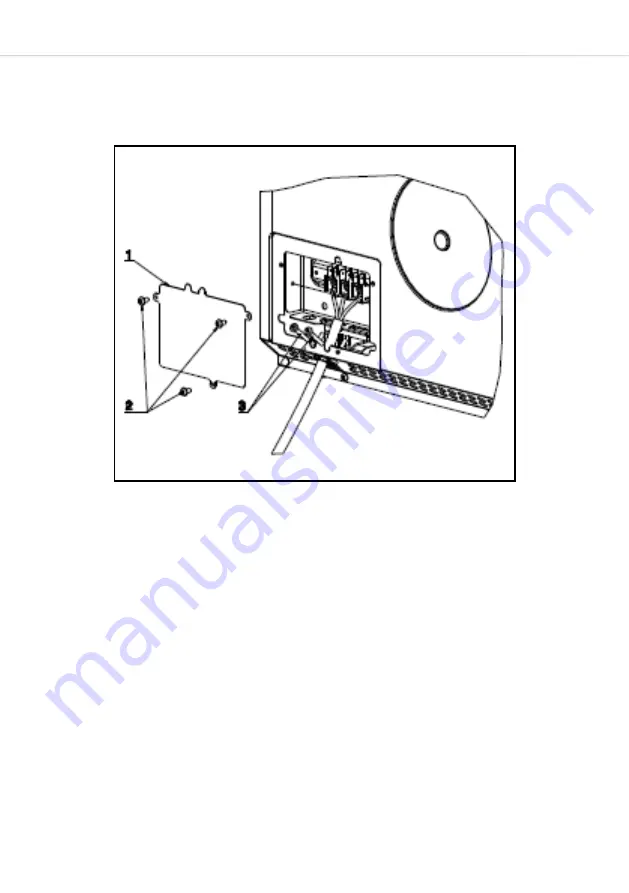
Page 28: ...ll comply with the I E T and local regulations This appliance is intended to be connected to fixed wiring and is not suitable for connection to a 13A plug or 13A supply This appliance is intended to be connected to fixed wiring by a double pole switch having a contact separation of at least 3mm in all poles The switch must be positioned no further than 2m from the appliance fig 8 Fig 13 ...

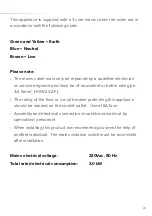
Page 29: ...lent or better rating i e 3x1 5mm2 HO5V2V2 F The rating of the fuse or circuit breaker protecting this appliance should be marked on the socket outlet Use a 16A fuse Assembly and electrical connection should be carried out by specialised personnel When installing this product we recommend you seek the help of another individual The mains isolation switch must be accessible after installation Mains...

Page 30: ...30 NOTES ...
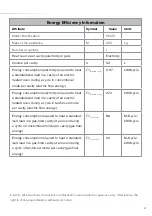
Page 31: ...ring a cycle in conventional mode per cavity electric final energy ECElectric cavity 0 97 kWh cycle Energy consumption electricity required to heat a standardised load in a cavity of an electric heated oven during a cycle in fan forced mode per cavity electric final energy ECElectric cavity 0 72 kWh cycle Energy consumption required to heat a standard ised load in a gas fired cavity of an oven dur...

Page 32: ...2 F 01949 862 003 E customer care cda eu W www cda eu www cda eu Please contact our Customer Care Department for Service on the details below Customer Care Department The Group Ltd Harby Road Langar Nottinghamshire NG13 9HY T 01949 862 012 F 01949 862 003 E customer care cda eu Copyright CDA 2015 ...

Reviews: