background image

Using your oven

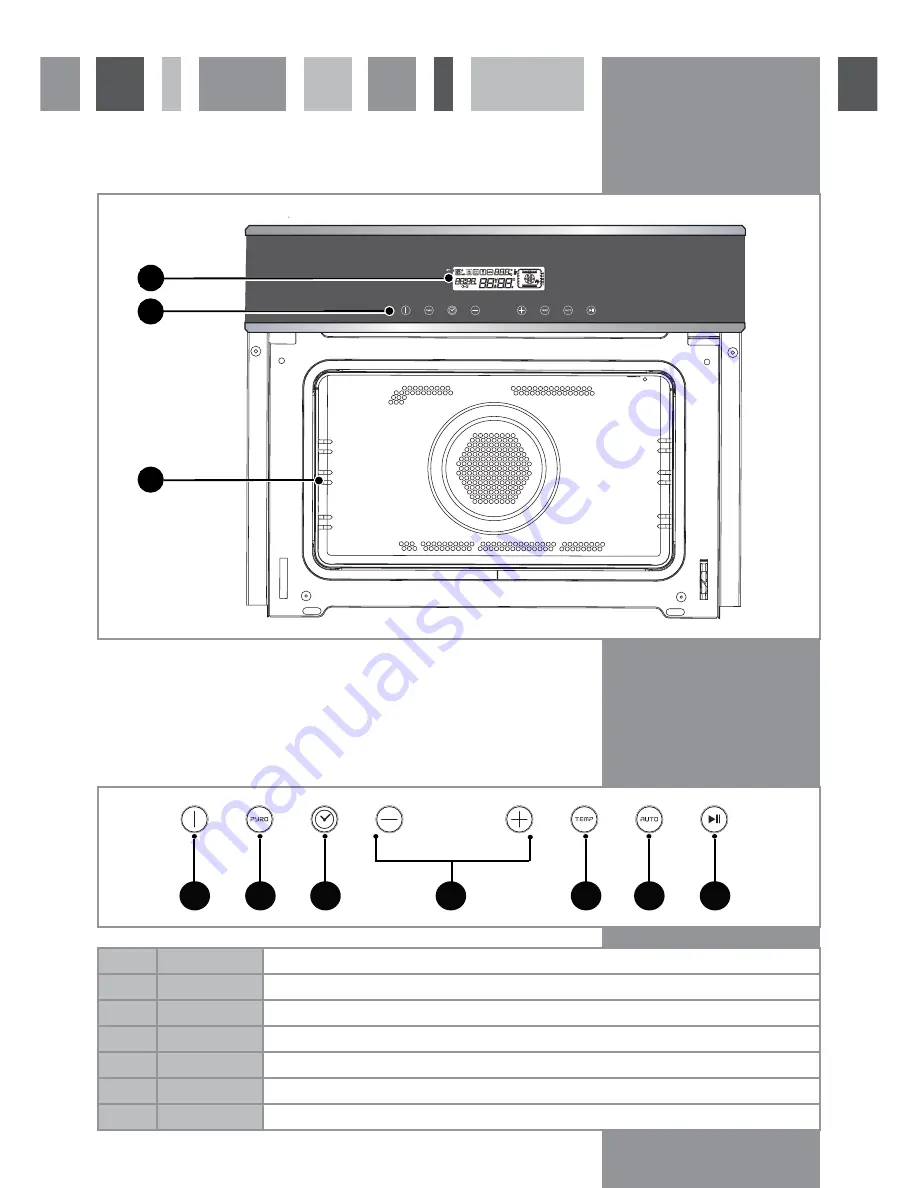
A   Display

Control panel

Shelf supports

The Control Panel and Display

3

Fig.2

C

B

A

Fig.3

A

Power

This key switches on the oven or cancels the programme

B

Pyro

This key activates the pyrolytic cleaning programmes

C

Clock

This key activates the timer selection

D

Plus and Minus

These keys select the programme type, increase or decrease the times and temperatures.

E

Temperature

This key activates the temperature selection.

F

Auto

This key activates the automatic cooking programmes.

G

Start/Pause

This key starts and pauses cooking, and also switches the childlock on and off.

A

B

C

D

E

F

G

Summary of Contents for SV470

Page 1: ...Department The Group Ltd Harby Road Langar Nottinghamshire NG13 9HY T 01949 862 012 F 01949 862 003 E service cda eu W www cda eu Passionate about style SV470 Compact Oven Manual for Installation Use and Maintenance ...

Page 2: ... the event of a fault with your appliance and to register your appliance for guarantee purposes Appliance Model Serial Number CE Declarations of Conformity This oven has been designed constructed and marketed in compliance with safety requirements of EEC Directive 2006 95 EEC Low voltage and requirements of EMC Directive 2004 108 EEC This appliance has been manufactured to the strictest standards ...

Page 3: ...ot use the oven tray for roasting Do not perform maintenance or cleaning of the oven without first switching off the electricity supply If the oven has recently been used allow to cool Do not use steam cleaners to clean the oven Do not place hot enamel parts in water Leave them to cool first Do not allow vinegar coffee milk saltwater lemon or tomato juice to remain in contact with enamel parts Do ...

Page 4: ... pyrolytic cleaning programmes C Clock This key activates the timer selection D Plus and Minus These keys select the programme type increase or decrease the times and temperatures E Temperature This key activates the temperature selection F Auto This key activates the automatic cooking programmes G Start Pause This key starts and pauses cooking and also switches the childlock on and off A B C D E ...

Page 5: ...olytic cleaning programmes C Automatic programme D Booster E Clock display F Temperature weight of food G Temperature indicator H Oven function display I Shelf support indicator J Timer display K Delayed programme set L Cooking time set A B H F E J L K C D G I ...

Page 6: ... the childlock on or off touch and hold for approximately three seconds until the oven beeps twice to confirm the selection When the childlock is on shows in the display and will flash if any key is touched Contrast adjustment To adjust the contrast on the display touch and then touch and hold for approximately seven seconds until CO shows on the display Touch or until the contrast is at the requi...

Page 7: ...t the programme To set a delayed programme the cooking starts and finishes at a programmed time touch twice to activate timer selection so the timer display shows and the time the programme is due to end current time cooking time touch or until the required time shows on display then touch to confirm the timer selection The timer display will then show the set end time Finally Touch When a delayed...

Page 8: ...y This function is also recommended for dishes that rise e g cakes and soufflés where a crust on the top is not required 4 Half Grill preset 230 range available 100 275 Recommended shelf level 2 or 3 This function radiates the heat from the grill element The fully temperature variable grill in the half grill function is ideal for small amounts of food 5 Full Grill preset 210 range available 100 27...

Page 9: ...e heat around the oven to give an even temperature throughout This function is recommended for quiches and pies baked in a metal preferably non stick dish FOR EACH GRILL FUNCTION PLEASE NOTE Always grill with the oven door closed Put the grill pan as close to the grill as possible You are recommended not to grill for more than 30 minutes at a time Preheat the grill for approximately five minutes w...

Page 10: ...o confirm the selection The cooking time adjustment will flash on the display You can adjust the cooking time for the auto cook programmes by touching or until the required adjustment shows on the display according to the table below then touch to confirm the selection The oven will automatically set the cooking mode and time and the programme will start To set a delayed programme follow the steps...

Page 11: ... 5 2 Fan oven with booster 200 2 12 6 Langoustines 1 1 0 5 2 Fanned grill with booster 240 3 5 7 Roast pork 1 5 0 5 2 5 Fanned grill 210 1 1h15 8 Roast lamb 1 0 0 5 2 5 Fanned grill 200 1 1h 9 Roast veal 1 5 0 5 2 5 Fan oven 190 1 1h03 10 Roast game 1 2 0 5 2 5 Fan oven 210 1 35 11 Roast chicken 1 3 0 5 2 5 Fanned grill 210 1 1h 12 Traditional biscuits no preset weight Conventional oven 170 1 35 1...

Page 12: ...yed programme Please note Before any pyrolytic programme remove all shelves trays and other accessories from the oven and clean up any major spills The side grills and grill pan tray are specially coated in pyrolytic enamel and are safe to leave in the oven during pyrolysis Touch Touch once for Pyrolysis twice for Pyrolysis ECO or three times for Optimum Pyrolysis The programme selected will flash...

Page 13: ... cleaners are available We recommend the CDA E Cloth available from the CDA Sales Team for cleaning stainless steel surfaces Enamelled parts All enamelled parts must be cleaned with a sponge and soapy water only or other non abrasive products Suitable proprietary chemical cleaners may be used after first consulting with the manufacturer s recommendations and testing a small sample on the oven cavi...

Page 14: ...s shown in figure 7 Then insert the other two red stoppers in the A slots as shown in figure 8 Lever the stoppers to lift the frame and the glass from the door as shown in figure 9 Remove the inner frame and the panes of glass as shown in figure 10 ensuring you put them on a soft flat surface to prevent damage A Fig 8 Fig 9 Fig 10 Fig 7 13 ...

Page 15: ...he glass to shatter Rinse with clean water and dry off with a lint free cloth Replace the clean panes in the door taking care to slot the frame under the spigot next to the hinge as shown in figure 12 Reattach the frame by tightening it against the door until the frame clicks into place Do not push down on the door itself as this may damage your oven Finally remove the red stoppers from the hinge ...

Page 16: ...not properly closed Close the door completely Door lock system fault Call CDA Customer Care The oven starts beeping during cooking The oven is at the required temperature The oven starts beeping at the end of the cooking programme The programme has finished The cooling fan continues to run after the programme ends The fan will run up to one hour after cooking or when the oven temperature is above ...

Page 17: ... oven and adjacent furniture doors Lift the oven carefully into position on the shelf taking care NOT to lift it by the door handle If you open the oven door you will see 2 screw holes 1 on each side of the oven The oven should then be secured to the housing by fitting screws into these holes Remember the housing should not be free standing but be secured to the wall and or adjacent fittings How t...

Page 18: ...han 2m from the appliance This appliance is supplied with a 3 core mains cable the wires are in accordance with the following code Green and Yellow Earth Blue Neutral Brown Live Please note The mains cable must only be replaced by a qualified electrician or service engineer and must be of equivalent or better rating i e 1 5mm2 HO5V2V2 F The marking of the current rating of the fuse or circuit brea...

Page 19: ...18 ...

Page 20: ...Group Ltd Harby Road Langar Nottinghamshire NG13 9HY T 01949 862 012 F 01949 862 003 E service cda eu W www cda eu Passionate about style To contact our Customer Care Department or for Service please contact us on the details below ...

Reviews: