background image

Before Using the Warming Drawer

When using the appliance for the first time, clean it as follows:

  Clean the surface with a damp cloth, then dry.

  Preheat the empty drawer for at least 2 hours: turn the temperature knob to the max. position in order to eliminate  


any manufacturing residuals (grease, oil or resins) which could cause unpleasant odours during cooking. Air the room.

  After carrying out this simple operation, the appliance will be ready for first use.

  Before using the appliance, remove:

  Stickers on the front and warming drawer door, except the rating plate;

  Cardboard protection and protective plastic film from all the aesthetic parts, if present. and from the front panel  


controls and other parts of the warming drawer;

  Any stickers from the accessories if present.

Installation

Important :

 The warming drawer must be immediately fixed to the 

cabinet, complying with the following instructions. Do not install the 
combined electrical appliance provided for, before fixing the warming 
drawer to the cabinet.

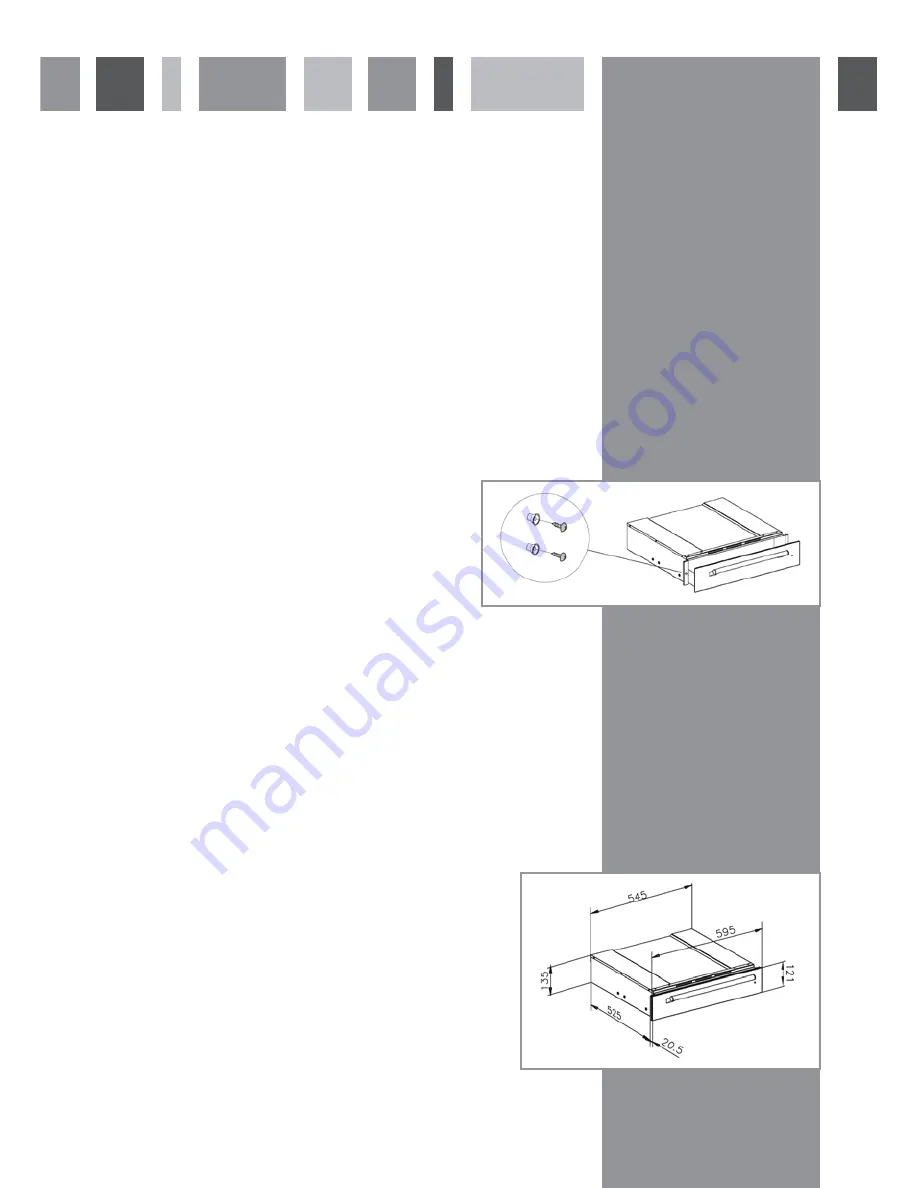
Spacers :

 fix the drawer as shown opposite.

Note :

 should it be necessary to align the appliance aesthetically with 

other combinations of product, the drip tray at the bottom can be 
removed and eliminated by unfastening the two fixing screws.

  Before connecting the appliance to the power supply, compare the connection data (voltage and frequency) given on 


the dataplate with that of the electrical mains.

  The data must match, otherwise the appliance could become damaged.

  In case of doubt, contact a qualified technician.

  Make sure the socket can be easily accessed even after the appliance has been fitted.

  The warming drawer can only be fitted in combination with other appliances not weighing more than 40 kg and  


provided with adequate cooling ventilation. Otherwise, the right to the warranty is invalidated, since correct use cannot  


be guaranteed.

  For combined appliance installation comply with the instructions given in the relevant use and installation handbook.

  Fitting  and  installation  of  this  appliance  must  only  be  carried  out  by  qualified  personnel  who  guarantee  that  the  


requirements for safe use are met.

Measurements

  All measurements are given in mm.

Summary of Contents for SVW140

Page 1: ...epartment The Group Ltd Harby Road Langar Nottinghamshire NG13 9HY T 01949 862 012 F 01949 862 003 E service cda eu W www cda eu Passionate about style SVW140 Warming Drawer Manual for Installation Use and Maintenance ...

Page 2: ... is modified an appliance fault may occur when it is used If the installation maintenance or repair works are not carried out correctly there may be risks for the user The Manufacturer declines any liability for damage or injury in such cases During the warranty period repairs must only be carried out by the authorised technical service otherwise the warranty will be invalidated Installation repai...

Page 3: ...he warming drawer to the cabinet Spacers fix the drawer as shown opposite Note should it be necessary to align the appliance aesthetically with other combinations of product the drip tray at the bottom can be removed and eliminated by unfastening the two fixing screws Before connecting the appliance to the power supply compare the connection data voltage and frequency given on the dataplate with t...

Page 4: ...efore removing the warmed dishes Selecting the Temperature The temperature knob enables a temperature adjustment of between approx 30 C and 85 C Turn the temperature knob all the way clockwise to max and then anticlockwise Do not force it past the stop otherwise the thermostat will be damaged The temperature scale does not indicate the absolute temperature values in C but gives symbols that repres...

Page 5: ...y with a dry cloth Do not use corrosive or abrasive detergents as they can create dull areas If any of these products accidentally comes into contact with the warming drawer immediately clean the appliance with a damp cloth Slight colour differences on the front of the appliance are due to the use of different materials such as glass plastic and metal Front panel Use a mild detergent and a soft wi...

Page 6: ...rawer by carefully lifting it upwards pic 5 and put it down The inside of the appliance can now be cleaned using water and detergent Do not place the drawer in water once it has been removed Refitting the Warming Drawer To refit the drawer carry out the removal procedure in reverse order To do this place the drawer off the guides NB There is a fixing hook on the left and right side under the warmi...

Page 7: ...the appliance is switched on the switch control light is faulty If the fault persists after the above checks contact CDA Customer Care Always specify a brief description of the fault the type and exact model of the warming drawer the Service number number after the word Service on the rating plate located on the outer right edge of the drawer slide your full address your telephone number If any re...

Page 8: ...he bottom of the warming drawer with aluminium foil or other objects The drawer seals must be kept clean to ensure that it closes properly Never pour water directly in warming drawer The juices of fruit dripping from the pan may leave permanent stains It is advisable to clean the warming drawer before reusing it To avoid scratching do not drag dishes on the bottom of the warming drawer Use suitabl...

Page 9: ...isposal of the product the user can help prevent potentially negative consequences for the environment and the health of persons The symbol on the product or on the accompanying documentation indicates that it should not be treated as domestic waste but must be taken to an appropriate collection centre for the recycling of electrical and electronic equipment Scrap the appliance in accordance with ...

Page 10: ...Notes ...

Page 11: ...Notes ...

Page 12: ...Group Ltd Harby Road Langar Nottinghamshire NG13 9HY T 01949 862 012 F 01949 862 003 E service cda eu W www cda eu Passionate about style To contact our Customer Care Department or for Service please contact us on the details below ...

Reviews: