background image

11

Installation

Check the measurements on Fig. 
1 to confirm the requirements for 
your installation. Please note, 
the oven dimensions show a 
CDA compact oven and will vary 
depending on the appliance 
being installed above the 
warming drawer.

1. Run the mains lead to the 
switched fused spur outlet to be 
used and connect to the mains
electrical supply.  Do not switch 
on until installation is complete.

2. Locate the product centrally on the supporting shelf and fix into
position using the fixing screws supplied.

3. Carefully fit the appliance on top of the warming drawer, taking
care not to scratch the top stainless edge of the drawer unit.
Ensure that the mains connection lead is located near to the power
outlet to avoid having to remove the product again to connect the
mains electrical supply.

4. Secure the oven into the housing using appropriate fixing screws.

The casing of this appliance will get hot.  Ensure that any cables that

132.5

595

21.5

560

8.5

555

19

455

432

595

564

588 min

141

Fig. 1

Summary of Contents for VW152

Page 1: ...er Care Department The Group Ltd Harby Road Langar Nottinghamshire NG13 9HY T 01949 862 012 F 01949 862 003 E customer care cda eu W www cda eu www cda eu VW152 Warming Drawer Installation Use and Maintenance ...

Page 2: ...stances should any external covers be removed for servicing or maintenance except by suitably qualified personnel User information Warming drawers become hot during and immediately after use Ensure you do not touch any of the internal components The drawer can become very hot during operation Wear oven gloves or suitable hand protection where appropriate After use please ensure that the appliance ...

Page 3: ...12 19 EU At the end of its working life the product must not be disposed of as urban waste It must be taken to a special local authority differentiated waste collection centre or to a dealer providing this service Disposing of a household appliance separately avoids possible negative consequences for the environment and health deriving from inappropriate disposal and enables the constituent materi...

Page 4: ...uids To avoid scratching do not drag dishes on the bottom of the warming drawer Use suitable containers or crockery Residual condensation could eventually damage the warming drawer and surrounding cabinets It is advisable to dry any wet parts when the warming drawer is cold Do not store plastic or flammable objects in the warming drawer We recommend the use of oven gloves or adequate protection wh...

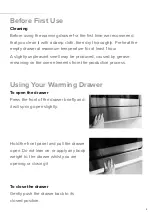
Page 5: ...pleasant smell may be produced caused by grease remaining on the oven elements from the production process Using Your Warming Drawer To open the drawer Press the front of the drawer briefly and it will spring open slightly Hold the front panel and pull the drawer open Do not lean on or apply any body weight to the drawer whilst you are opening or closing it To close the drawer Gently push the draw...

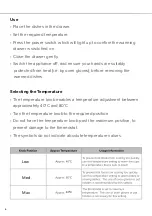
Page 6: ...ds are suitably protected from heat i e by oven gloves before removing the warmed dishes Selecting the Temperature The temperature knob enables a temperature adjustment between approximately 40 C and 80 C Turn the temperature knob to the required position Do not force the temperature knob past the maximum position to prevent damage to the thermostat The symbols do not indicate absolute temperature...

Page 7: ...d Arrangement of dishes in the drawer Temperature setting Therefore exact warming times cannot be provided With use experience will demonstrate optimal warming times and temperature settings Warming drawer capacity The capacity of the warming drawer is 20kg The number of items this includes depends on the size and thickness of your crockery ...

Page 8: ... a damp cloth If it is very dirty add a few drops of dish washing detergent to the water Dry with a dry cloth Do not use corrosive or abrasive detergents as they can create dull areas If any of these products accidentally comes into contact with the warming drawer immediately clean the appliance with a damp cloth Slight colour differences on the front of the appliance are due to the use of differe...

Page 9: ...ning is easier Use a clean cloth absorbent paper and dish hand wash detergent or specific products for cleaning the vitroceramic top Remove stubborn cooking grime with specific products Remove any food residuals left on the vitroceramic top do not leave to harden Foods with a high sugar content coffee fruit juice jam etc that have boiled over or any sugar stains due to cooking must be immediately ...

Page 10: ...product However special care should be taken around the rear or the underneath of the appliance as these areas are not designed or intended to be touched and may contain sharp or rough edges that could cause injury Troubleshooting If the dishes are not warm enough make sure The appliance is on The right temperature has been set The heat openings are not covered by large dishes or soup plates The d...

Page 11: ...2 Locate the product centrally on the supporting shelf and fix into position using the fixing screws supplied 3 Carefully fit the appliance on top of the warming drawer taking care not to scratch the top stainless edge of the drawer unit Ensure that the mains connection lead is located near to the power outlet to avoid having to remove the product again to connect the mains electrical supply 4 Sec...

Page 12: ...wiring and is not suitable for connection to a 13A plug or 13A supply This appliance is intended to be connected to fixed wiring by a double pole switch having a contact separation of at least 3mm in all poles The switch must be positioned no further than 2m from the appliance This appliance is supplied with a 3 core mains cable the wires are in accordance with the following code Green and Yellow ...

Page 13: ...ket outlet 3A Assembly and electrical connection should be carried out by specialised personnel When installing this product we recommend you seek the help of another individual The mains isolation switch must be accessible after installation Appliance rated electrical power 440W 5 0 37 4 FUSE SPUR OUTLET USE A 3 AMP FUSE ...

Page 14: ...14 Notes ...

Page 15: ...15 Notes ...

Page 16: ...epartment The Group Ltd Harby Road Langar Nottinghamshire NG13 9HY T 01949 862 012 F 01949 862 003 E customer care cda eu W www cda eu www cda eu Please contact our Customer Care Department for Service on the details below Customer Care Department The Group Ltd Harby Road Langar Nottinghamshire NG13 9HY T 01949 862 012 F 01949 862 003 E customer care cda eu Copyright CDA 2017 ...

Reviews: