background image

1

2

3

*Pour une fixation sur pied voir rappel et recommandation (P9).

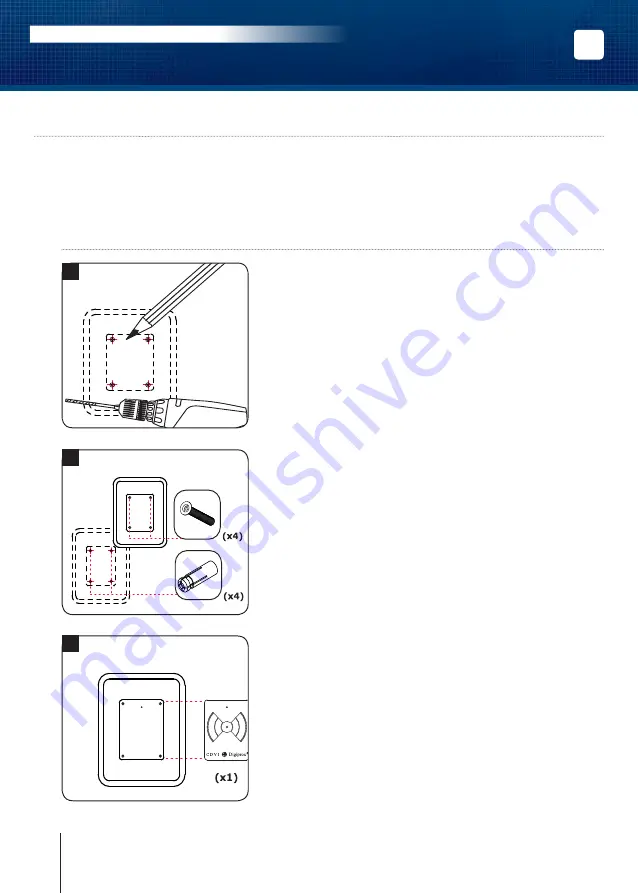
A l’aide du lecteur, prenez les marques pour fixer le produit.


Percez 4 pts de fixation pour vis DIAX

® 

M5 sur le support 

de montage au niveau des marques. 

(Diamètres de perçage préconisés : 

plaque de fixation = 4 mm et lecteur = 6 mm). 

Grâce à votre schéma de câblage, prévoyez la sortie 

des câbles, cachés dans la surface ou à l’extérieur (moulure).

Placez les chevilles métal dans les trous, connectez les fils 

aux borniers (voir schéma de câblage page 10), puis fixez 

le lecteur avec les quatre vis DIAX

®

 grâce à l’outil DIAX

®

Positionner l’autocollant dans son logement pour cacher les vis.

Après avoir vérifier que le kit de montage est complet, vous allez pouvoir 

procéder à l’installation finale de votre lecteur. Réunissez le materiel approprié 

(Perçeuse, tournevis, mètre,...) et suivez les recommandations de montage 

qui correspondent au lecteur que vous allez installer.

4 ] Montage

Ref : 

DGLP60WLC*

10

cdvigroup.com

FR

DGLP60WLC 

Lecteur Proximité Main Libre - Wiegand

  MANUEL D’INSTALLATION

Summary of Contents for DGLP60WLC

Page 1: ...The installer s choice cdvigroup com ENGLISH EN FRANCAIS FR DGLP60WLC Hands Free Proximity Card Reader Wiegand Lecteur Proximité Main Libre Wiegand ...

Page 2: ...ductor a conductor in the form of a close loop a metal plate then make sure to keep a cleared area around the reader of 1M on both sides and 1M at the back 4 In some cases put 0V to earth Mounting on a post Avoid all conducting metals Do not install the reader in a closed conductor frame Recommended wiring 4 pairs 6 10th or AWG24 cable Environment If you install these readers in a marine salt envi...

Page 3: ... metal etc Check the connections and the wiring Check the voltage on the power supply and the voltage on the terminal block on the reader Test the reader in a different configuration from the one initially intended Move the reader Change its orientation 2 If the reader works better in a different configuration or position it means that the initial position is not optimal and then should be changed...

Page 4: ... with the DIAX screws Leave an area to access the cable complete the wiring Make sure that the varistor is connected on the lock refer to page 2 Recommendations Place the sticker on the designated area to hide the fixing screws After checking that the mounting kit is complete you can proceed with the final installation of your reader Prepare the appropriate tools Drill screwdriver measuring tape e...

Page 5: ...ivate the LED and the buzzer Important Dip 3 is set as soon as power is applied Dip 4 Pull ups 12V or 5V Open collector outputs Select the output voltage according to the installation Dip 1 and 2 Setting wiegand output There are 3 types of Wiegand output Wiegand 26 bit output Wiegand 30 bit output Wiegand 44 bit output 5 PRODUCT PRESENTATION The hands free reader should not be installed on a metal...

Page 6: ... to bit 25 Bit 26 Even parity on bit 2 to bit 23 Data 24 bits Odd parity on bit 14 to bit 25 Example code of the badge is 0108166A37 1 0001 0110 0110 1010 0011 0111 0 Parity 1 1 6 6 A 3 7 Parity 2 The code transmitted is in hexadecimal format 166A37 Parity 1 0 if the number of 1 in bit 2 to bit 13 is even 1 if the number of 1 in bit 2 to bit 13 is odd Parity 2 0 if the number of 1 in bit 14 to bit...

Page 7: ...transmitted is in hexadecimal format 8166A37 Parity 1 0 if the number of 1 in bit 2 to bit 15 is even 1 if the number of 1 in bit 2 to bit 15 is odd Parity 2 0 if the number of 1 in bit 16 to bit 29 is odd 1 if the number of 1 in bit 16 to bit 29 is even 44 bits Wiegand Format Output 44 bits hexadecimal format 1 Data 10 digit code number hexadecimal MSByte first Each hexadecimal digit 4 bit MSBit ...

Page 8: ...rt métallique ou conducteur sous forme de boucle fermée Installation à proximité d une masse métallique conductrice dans ce cas de figure respecter un écart minimum de 1 m sur les cotés et de 1 m à l arrière 4 Dans certains cas mettre 0V à la terre Câble préconisés Câble 4 paires 6 10ème Fixation sur pied 1 Eviter tout matériaux métallique conducteur 2 Ne pas installer le lecteur dans un cadre con...

Page 9: ...rturbations éventuelles rayonnements métal Vérifier les connections et le câblage Vérifier la tension d alimentation et le courant aux bornes du lecteur Tester le lecteur dans une configuration différente de celle initialement prévue Déplacer le lecteur Changer son orientation 2 Si le lecteur fonctionne mieux dans une configuration ou un emplacement différent cela signifie que l environnement de l...

Page 10: ...hevilles métal dans les trous connectez les fils aux borniers voir schéma de câblage page 10 puis fixez le lecteur avec les quatre vis DIAX grâce à l outil DIAX Positionner l autocollant dans son logement pour cacher les vis Après avoir vérifier que le kit de montage est complet vous allez pouvoir procéder à l installation finale de votre lecteur Réunissez le materiel approprié Perçeuse tournevis ...

Page 11: ...en compte à la mise sous tension Dip 4 Pulls up 12 V ou 5V Pour les sorties à collecteur ou vert il y a deux niveaux de sorties possibles Ce strap permet à l utilisateur de choisir la tension de sortie en fonction de l installation Dip 1 et 2 Sélection de sortie Wiegand Il y a 3 types de sorties Wiegand Sortie Wiegand 26 bit Sortie Wiegand 30 bit Sortie Wiegand 44 bit 12V 5V ON ON ON ON ON ON 5 PR...

Page 12: ...bits Parité impaire sur bit 14 à bit 25 Exemple pour un badge dont le code hexadécimal est 0108166A37 1 0001 0110 0110 1010 0011 0111 0 Parité 1 1 6 6 A 3 7 Parité 2 Le code émis est 166A37 en hexadécimal Parité 1 0 si le nombre de 1 dans bit 2 à bit 13 est paire 1 si le nombre de 1 dans bit 2 à bit 13 est impaire Parité 2 0 si le nombre de 1 dans bit 14 à bit 25 est impaire 1 si le nombre de 1 da...

Page 13: ...t 2 à bit 15 est paire 1 si le nombre de 1 dans bit 2 à bit 15 est impaire Parité 2 0 si le nombre de 1 dans bit 16 à bit 29 est impaire 1 si le nombre de 1 dans bit 16 à bit 29 est paire Format Wiegand 44 bits Format 44 bit hexadécimal Données 10 chiffres hexadécimaux octet de poids fort en premier Chaque chiffre hexadécimal 4 bit bit de poids fort en premier LRC 4 bit OU exclusif entre les chiff...

Page 14: ...7 NOTES 14 cdvigroup com FR DGLP60WLC Lecteur Proximité Main Libre Wiegand MANUEL D INSTALLATION ...

Page 15: ...15 cdvigroup com FR DGLP60WLC Lecteur Proximité Main Libre Wiegand MANUEL D INSTALLATION ...

Page 16: ...1 21 CDVI FRANCE EXPORT Phone 33 0 1 48 91 01 02 Fax 33 0 1 48 91 21 21 CDVI AMERICAS CANADA USA Phone 1 450 682 7945 Fax 1 450 682 9590 CDVI BENELUX BELGIUM NETHERLAND LUXEMBOURG Phone 32 0 56 73 93 00 Fax 32 0 56 73 93 05 CDVI TAIWAN Phone 886 0 42471 2188 Fax 886 0 42471 2131 CDVI SUISSE Phone 41 0 21 882 18 41 Fax 41 0 21 882 18 42 CDVI CHINA Phone 86 0 10 62414516 Fax 86 0 10 62414519 CDVI IB...

Reviews: