background image

14   

|

   CONGA HOME 2000

ENGELSK

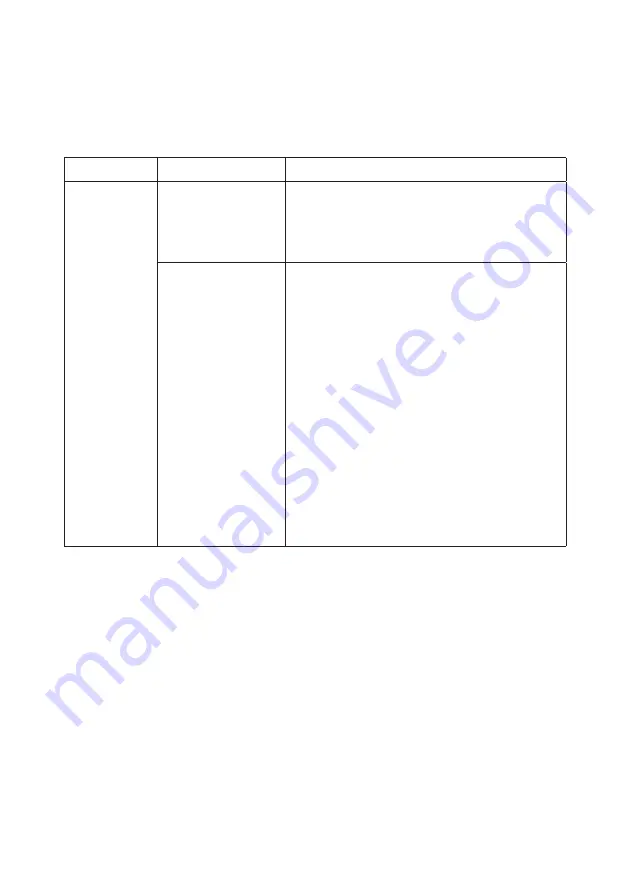
5. TROUBLESHOOTING

The LED indicator shows the product status on the front of the unit or on 

the APP:

LED indicator

Common problem

Solution

Orange

oscillating

indicator light

Dirt bag missing,

fan does not start

or other faults

1. Check if the dirt bag is missing. If so, insert one.

2. Check that the dirt bag is installed correctly. 

3. Frequent emptying may cause overheating or 

fan failure. Wait 30 minutes before starting a 

new emptying.

Dirt bag full or

blocked

1. Replace the dirt bag with a new one.

2. Make sure that the cover of the unit is properly 

closed and sealed. If the robot vacuum cleaner 

is charging in the unit, you can try turning the 

unit on to perform an autoclean. Follow these 

steps to initiate an autoclean manually: Press 

the power button on the robot to start it. Then 

press any button to pause the robot after it 

has left the auto empty base. Press ”Recharge” 

on the robot to return it to the autoclean base. 

Automatic charging will start when auto emp

-

tying is finished.

3. Remove dirt from the suction inlet at the bot

-

tom of the robot and on the autoclean base.

4. Switch off the autoclean base. Rotate the unit 

to check if there is a blockage in the trans

-

parent cover. If so, remove the screws with a 

screwdriver. Then open the transparent cover 

and remove the lock.

6. TECHNICAL SPECIFICATIONS

Product reference: 05662

Product: Conga Home 2000

Size: 321 X 270. X 174 mm

Rated power: 650 W

Nominal input: 220-240 V~ 50/60 Hz

Nominal output: 19V DC , 1A

Made in China | Designed in Spain

Summary of Contents for CONGA HOME 2000

Page 1: ...Conga Home 2000 Automatisk rense base Autoclean base Brugermanual Instruction manual CONGA home 2000 ...

Page 2: ...fikationer 9 7 Bortskaffelse af gamle elektriske apparater 10 8 Teknisk support og garanti 10 9 Ophavsret 10 Index Safety instructions 11 1 Parts and components 12 2 Before use 12 3 Operation 12 4 Cleaning and maintenance 13 5 Troubleshooting 14 6 Technical specifications 14 7 Disposal of old electrical appliances 15 8 Technical support and warranty 15 9 Copyright 15 ...

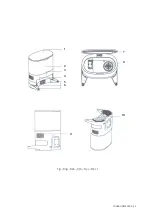
Page 3: ...CONGA HOME 2000 3 Fig Img Abb Afb Rys Obr 1 1 2 3 4 5 6 7 8 9 10 ...

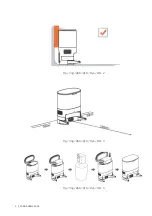
Page 4: ...4 CONGA HOME 2000 Fig Img Abb Afb Rys Obr 2 Fig Img Abb Afb Rys Obr 3 Fig Img Abb Afb Rys Obr 4 ...

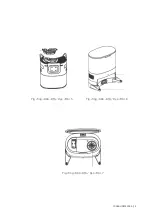
Page 5: ...CONGA HOME 2000 5 Fig Img Abb Afb Rys Obr 5 Fig Img Abb Afb Rys Obr 7 Fig Img Abb Afb Rys Obr 6 ...

Page 6: ... godkendt netledning som kun kan bruges i standard AC udtag Brug ikke enhver anden type strømledning Hvis du skal udskifte netledning kontakt venligst din forhandler eller Cecotec Nordic alternativt Skil ikke enheden ad medmindre dette er tilladt i brugervejledningen Denneenhedinkludererikkereservedele Hvis du har brug for at skille produktet ad kontakt venligst din forhandler eller alternativt Ce...

Page 7: ... så kontakt hurtigst muligt din forhandler og alternativt Cecotec Nordic 3 BETJENING Installation 1 Placer enheden på en flad overflade 6 cm fra væggen Fig 2 2 Hold en afstand på mindst 1 2 m foran og 0 5 m på begge sider af enheden Fig 3 Oplysninger om Autoclean basen Autoclean basen inkluderer en opladnings og tømningsfunktion samt en ny støvpose Efter rengøring vil robotten automatisk vende til...

Page 8: ... om der er en blokering i det gennemsigtige dæksel I så fald skalskruerne fjernes med en skruetrækker som vist på billedet til højre Åbn derefter det gennemsigtige låg og fjern låsen Fig 5 gennemsigtigt dæksel til støvrør Fjern skruerne med en skruetrækker og undgå at fjerne dem voldsomt Udskift det gennemsigtige dæksel Vedligeholdelse Rengøring af den infrarøde linse og opladnings autoclean indik...

Page 9: ...Følg disse trin for at starte en autorensning manuelt Tryk på robottens tænd sluk knap for at starte den Tryk derefter på en vilkårlig knap for at pause robotten efter at den har forladt den automatiske tømningsbase Tryk på Genoplad på robotten for at den vender retur til auto clean basen Automatisk opladning starter når den automatiske tømning er afsluttet 3 Fjern snavs fra sugeindtaget i bunden ...

Page 10: ...r blevet brugt til andre formål end dem det er beregnet til misbrugt udsat for slag udsat for fugt nedsænket i flydende eller ætsende stoffer samt enhver anden fejl der kan henføres til kunden Produktet er blevet adskilt modificeret eller repareret af personer der ikke er autoriseret af den officielle tekniske supporttjeneste for Cecotec Fejl der skyldes normal slitage af dens dele som følge af br...

Page 11: ...n the product The product comes with a regionally approved power cord which can only be used in standard AC outlets Do not use any other type of power cord If you need to replace the power cord please contact our Customer Service to ensure that you choose the correct product Do not disassemble the device unless permitted by this manual This unit does not include spare parts If you need to disassem...

Page 12: ...Technical Support Service of Cecotec for advice or reparation 3 OPERATION Installation 1 Place the unit on a flat surface 6 cm from the wall Fig 2 2 Maintain a separation of at least 1 2 m in front and 0 5 m on both sides of the unit Fig 3 Information on the autoclean base The autoclean base includes a charging and emptying function and a new dust bag After cleaning the robot will automatically re...

Page 13: ...nd rotate the unit to check if there is a blockage in the transparent cover If so remove the screws with a screwdriver as shown in the picture on the right Then open the transparent cover and remove the lock Fig 5 Transparent dust tube cover Remove the screws with a screwdriver and avoid violent removal Replace the transparent cover Maintenance Cleaning of the infrared lens and the charging autocl...

Page 14: ...try turning the unit on to perform an autoclean Follow these steps to initiate an autoclean manually Press the power button on the robot to start it Then press any button to pause the robot after it has left the auto empty base Press Recharge on the robot to return it to the autoclean base Automatic charging will start when auto emp tying is finished 3 Remove dirt from the suction inlet at the bot...

Page 15: ... proper use as explained in this instruction manual The warranty will not cover the following situations The product has been used for purposes other than those intended for it misused beaten exposed to moisture immersed in liquid or corrosive substances as well as any other fault attributable to the customer The product has been disassembled modified or repaired by persons not authorised by the C...

Page 16: ...www cecotecnordic com cecotecnordic info cecotecnordic com ...

Reviews: