background image

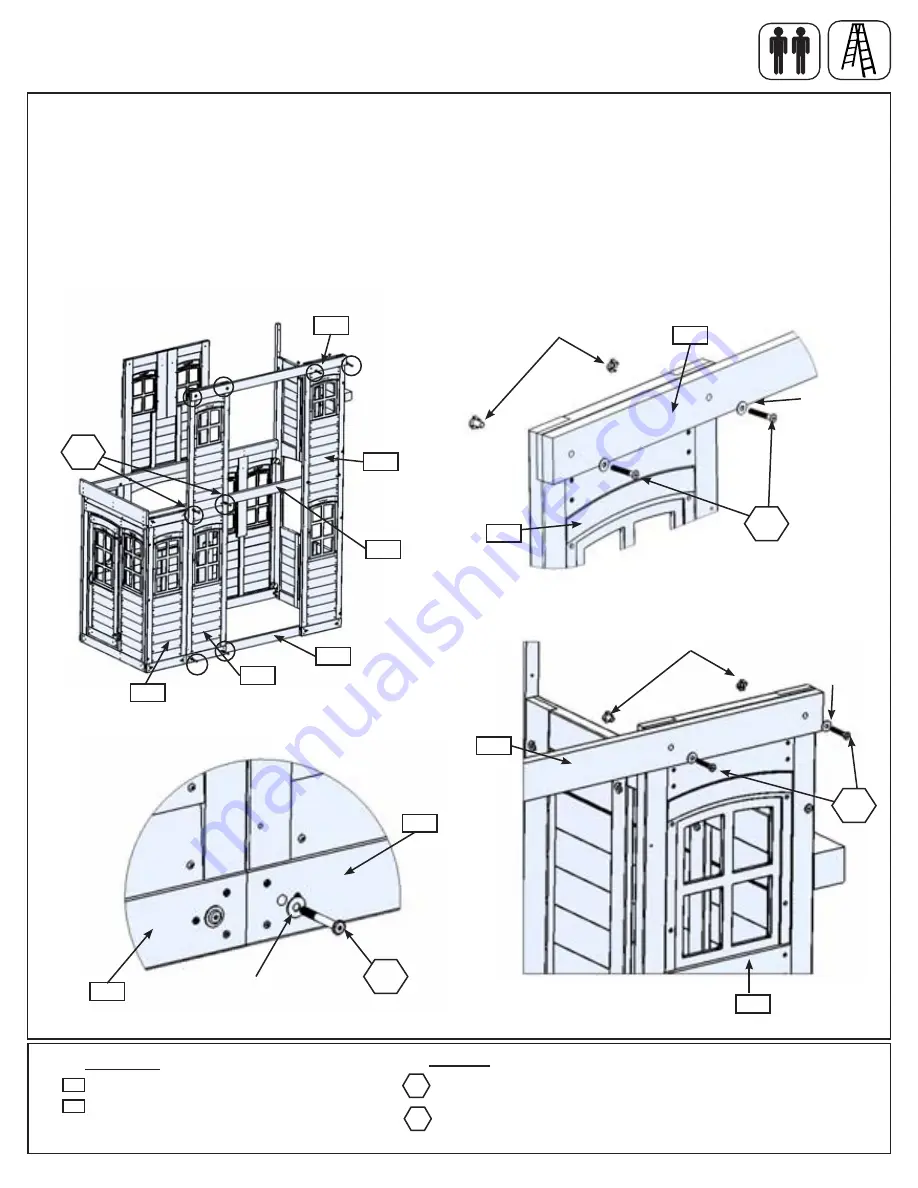
Hardware

Fig. 10.1

060

6 x 

5/16 x 2-1/8” Wafer Bolt (5/16” flat washer, 4 x 5/16” t-nut)

2 x 

5/16 x 2-3/8” Wafer Bolt (5/16” flat washer)

Step 10:  Back Wall Assembly 

Part 1

A:

  Place 1 (050) Narrow Window Panel beside (060) Half Narrow Window Panel on the back side.  Make sure 

the panels are tight together.  Loosely fasten (050) Narrow Window Panel to (065) Back Ground with 2 (WB9) 

5/16 x 2-1/8” Wafer Bolts (with 5/16” flat washer - t-nuts previously installed) and to (064) Back Floor with 2 

(WB8) 5/16 x 2-3/8” Wafer Bolts (with 5/16” flat washer - t-nuts previously installed).  (fig. 10.1 and 10.2)

B:

  Loosely attach (100) Back Top to the tops of both (050) Narrow Window Panels with 2 (WB9) 5/16 x 2-1/8” 

Wafer Bolts (with 5/16” flat washer and 5/16” t-nut) per panel.   (fig. 10.1, 10.3 and 10.4)

WB9

Swing Wall

WB9

Fig. 10.4

Fig. 10.2

5/16” Flat 

Washer

064

Back

050

WB9

5/16” Flat 

Washer

060

050

050

100

100

WB9

5/16” T-Nut

5/16” T-Nut

5/16” Flat 

Washer

050

Fig. 10.3

1 x 

Narrow Window Panel FSC 1-1/4 x 16-3/4 x 99”

1 x 

Back Top FSC 5/4 x 4 x 65-1/2”

Wood Parts

050

WB8

100

065

050

100

WB8


57 


support@cedarsummitplay.com   

Summary of Contents for F25668

Page 1: ...t 110 lbs 49 9 kg per child RESIDENTIAL HOME USE ONLY Not intended for public areas such as schools churches nurseries day cares or parks Rev 02 05 2014 3405668 Table of Contents Warnings and Safe Play Instructions pg 2 Protective Surfacing Guidelines pg 3 Instructions for Proper Maintenance pg 4 About Our Wood Limited Warranty pg 5 Keys to Assembly Success pg 6 Part ID pg 7 Step By Step Instructi...

Page 2: ... for which it was not intended Standing on or jumping from the roof elevated platforms swings climbers ladders or slide can be dangerous Do not allow children to swing empty rides or seats Do not allow children to go down slide head first or run up slide 2 SERIOUS HEAD INJURY HAZARD Installation over concrete asphalt dirt grass carpet and other hard surface creates a risk of serious injury or deat...

Page 3: ...lay equipment support posts will help you to see when the material has settled and needs to be raked and or replenished Be sure to rake and evenly redistribute the surfacing in heavily used areas Do not install loose fill surfacing over hard surfaces such as concrete or asphalt Poured In Place Surfaces or Pre Manufactured Rubber Tiles You may be interested in using surfacing other than loose fill ...

Page 4: ...ood members As with all wood some checking and small cracks in grain is normal Unprotected they will appear weathered over time Periodic application of an exterior water repellent or stain water based will help improve appearance and life Check the following at the beginning of the play season HARDWARE Inspect for tightness Must be firmly against but not crushing the wood DO NOT OVER TIGHTEN This ...

Page 5: ...eceive important product notifications and assure prompt warranty service 10 Year Limited Warranty Solowave Design warrants that this product is free from defect in materials and workmanship for a period of one year from the original date of purchase In addition lumber is warranted for 10 years against structural failure due to rot and insect damage All other parts such as hardware swings rides ac...

Page 6: ...le are required to safely complete the step To avoid injury or damage to the assembly make sure to get help Check that assembly is square before tightening bolts Use a measuring tape to assure proper location Check that set or assembly is properly level before proceeding Pre drill a pilot hole before fastening screw or lag to prevent splitting of wood This indicates time to tighten bolts but not t...

Page 7: ...s and look for the Key Number stamped on the end of the wood part see chart below Sort each wood part into the different assembly steps SAVE TIME TIP 2 In addition to the key number stamp you can also identify the wood parts by using the Parts Identification pages in the manual or the Parts Identification weather resistant poster HARDWARE The majority of each hardware part comes packed in a separa...

Page 8: ...l Telescope with mount SW Side 043 270 Maze N Wave Slide 041 Corner Panel Bracket x8 Seat x2 x2 Swing Belt 54 Chain Heavy T 080 Bracket x2 Bracket x4 25 Chain 1 2 6 Heavy L Acro Handle Cedar Summit ID Plaque 081 2 6 0 Heavy G Bracket 272 112 280 Re Bar Ground Stake x6 271 1 2 7 Transom Front 220 x2 082 Flower Box x2 x2 x2 121 122 Hidden Heavy Duty Swing Hanger x6 Acro Bar 8 support cedarsummitplay...

Page 9: ...il EN71 Hand 1 6 7 x2 110 111 065 063 020 x4 0 2 3 0 3 0 0 3 2 0 3 2 0 3 2 0 3 5 0 3 5 0 3 4 0 3 4 0 3 3 0 3 3 021 0 3 3 0 3 1 151 x3 1 4 0 0 6 2 022 Flat Panel Bracket x5 0 6 4 370 152 x9 221 Transom Grip x10 x2 Back 124 x2 Steel Hand Rocks Door Hardware x2 1 6 2 x2 126 1 6 3 x2 161 0 9 4 192 191 190 Hidden 100 025 093 091 013 x2 x4 010 x2 012 011 x2 x2 014 Corner Bracket x6 Swing Brackets x3 9 s...

Page 10: ... 443 441 441 442 441 442 441 442 450 4 X 442 430 442 2X Rail EN71 Hand 2X 2X C a n o p y 2 7 x 6 6 540 5 5 2 2X 5X 392 Hand Grip x2 460 Steel Ground Stake x6 2X 3X 5 0 2 511 500 5 0 1 4X 514 510 2X 553 451 Rocks x10 550 Triangle Plate x4 512 2X 551 5 2 3 PARTS IDENTIFICATION Tunnel Addition 490 491 10 support cedarsummitplay com ...

Page 11: ...13 Box 2 4638820 x 3 Wall Board FSC 1 x 4 x 26 Box 4 4638039 166 8pc 2pc 093 1pc Door Bottom FSC 1 x 4 x 33 Box 2 4638821 023 1pc Ladder Gap FSC 1 x 4 x 15 Box 2 4638828 Board Access FSC 1 x 4 x 20 Box 4 4638826 030 Roof Board A FSC 1 x 5 x 22 Box 3 4638803 321 1pc 186 Roof Board B FSC 1 x 5 x 23 Box 3 4638804 1pc 322 Centre Wall Board FSC 1 x 5 x 32 Box 5 4638608 164 1pc 1pc Floor A FSC 1 x 5 x 3...

Page 12: ... 150 3pc Rock Board D FSC 1 x 6 x 20 Box 5 4638825 035 2pc Rock Board B FSC 1 x 6 x 20 Box 5 4638823 033 3pc Rock Board A FSC 1 x 6 x 20 Box 5 4638822 032 3pc Rock Bottom FSC 1 x 6 x 20 Box 3 4638827 031 1pc A Frame Floor D FSC 1 x 5 x 62 23 32 Box 7 4638877 523 1pc Rock Board A FSC 1 x 6 x 23 Box 7 4638149 441 5pc Rock Board B FSC 1 x 6 x 23 Box 7 4638137 442 5pc Access Board FSC 1 x 6 x 23 Box 7...

Page 13: ...638834 014 2pc SW Table Top FSC 5 4 x 3 x 31 Box 3 4638811 112 1pc Top Ladder FSC 5 4 x 3 x 34 Box 2 4638829 025 1pc 1pc Tunnel Top Cross FSC 5 4 x 3 x 16 1 2 Box 7 4632404 500 Ladder Tread FSC 5 4 x 4 x 13 Box 3 4638517 022 4pc Box Ground FSC 5 4 x 4 x 29 Box 2 4638830 012 2pc Roof Support Left FSC 5 4 x 4 x 29 Box 4 4638807 181 1pc Roof Support FSC 5 4 x 4 x 29 Box 4 4638806 180 1pc 1pc Box 4 46...

Page 14: ... x 79 Box 3 4638780 065 1pc Front Ground FSC 5 4 x 4 x 79 Box 3 4638776 063 1pc Ground SW FSC 5 4 x 4 x 82 Box 3 4638782 110 1pc SL Top Right FSC 5 4 x 5 x 6 Box 4 4638788 123 1pc SL Top Left FSC 5 4 x 5 x 9 Box 3 4638787 120 1pc Crowsnest Side FSC 5 4 x 5 x 16 Box 4 4638815 162 2pc Steering Wheel Dash FSC 5 4 x 5 x 12 Box 4 4638609 165 1pc A Frame Tread FSC 5 4 x 5 x 22 Box 7 4638867 430 4pc A Fr...

Page 15: ...44 Box 3 4638790 1pc 182 Top Post Right FSC 1 x 2 x 24 Box 4 4638809 1pc 183 Top Post Left FSC 1 x 2 x 24 Box 4 4638808 1pc 370 Middle Arch FSC 5 4 x 5 x 36 Box 3 4638800 1pc 160 Crowsnest Top FSC 5 4 x 5 x 37 Box 2 4638884 1pc 080 Table Top FSC 5 4 x 5 x 35 Box 3 4638801 1pc 125 SL Top FSC 5 4 x 5 x 30 Box 3 4638793 1pc 185 Sunburst FSC 5 4 x 6 x 10 Box 2 4638614 2pc 510 Tunnel Right End FSC 5 4 ...

Page 16: ...x 4 x 5 Box 4 4638789 1pc 124 Short Floor Joist FSC 2 x 4 x 5 Box 4 4638623 2pc 161 Crowsnest Post FSC 2 x 3 x 28 Box 3 4638812 2pc 111 Diagonal FSC 2 x 3 x 42 Box 3 4638587 2pc 553 Lower Diagonal FSC 2 x 3 x 37 Box 7 4630369 2pc 502 Tunnel Arch FSC 2 x 4 x 23 Box 7 4638857 1pc 492 Tunnel Joist FSC 2 x 4 x 18 7 16 Box 7 4638855 1pc 513 Tunnel Corner Support FSC 2 x 4 x 23 5 8 Box 7 4638856 1pc 514...

Page 17: ...k Floor FSC 2 x 4 x 81 Box 3 4638785 064 1pc Left Access Rail FSC 2 x 4 x 62 Box 4 4638145 020 1pc Right Access Rail FSC 2 x 4 x 62 Box 4 4638146 021 1pc A Frame Upright FSC 2 x 4 x 41 Box 7 4638866 390 5pc Front Tunnel Support FSC 2 x 4 x 56 23 64 Box 7 4638861 490 1pc MK Rail FSC 2 x 5 x 64 Box 7 4638858 541 2pc A Frame Post FSC 2 x 5 x 73 9 32 Box 7 4638869 382 2pc A Frame Access R FSC 2 x 5 x ...

Page 18: ...red SW Beam FSC 3 x 5 x 110 Box 2 4638509 260 1pc SW Post FSC 4 x 4 x 105 Box 3 4638166 272 2pc SW Wall FSC 4 x 4 x 38 Box 3 4638779 044 1pc SW Block Angle FSC 2 x 3 x 15 Box 3 4638508 270 1pc Block SW FSC 2 x 3 x 15 Box 3 4638507 271 1pc Support Cross FSC 2 x 3 x 64 Box 4 4638510 280 1pc 1pc 184 SW Top FSC 1 x 5 x 36 Box 3 4638810 18 support cedarsummitplay com ...

Page 19: ... 47638891 FSC SL Side Window Panel 1pc 1pc Door Window Box 2 47608835 1 x 16 x 44 7 16 FSC Dark Brown Panel 090 050 1 x 16 x 99 Box 3 47638702 FSC Narrow Window Panel 2pc 061 1 x 36 x 54 Box 2 47638888 FSC Door Wall Window Panel 1pc 040 1 x 35 x 99 Box 2 47638887 FSC Cafe Wall Window Panel 1pc 210 1 x 31 x 41 Box 4 47638756 FSC Large Roof Panel 2pc 211 1 x 31 x 32 Box 4 47638760 FSC Small Roof Pan...

Page 20: ...61 2x 6pk Rebar Ground Stake 16 3200318 Sand and Water Insert 9320105 1x 9320357 Cedar Summit ID Plaque 1x 1x 3 in 1 Bench Set 3320123 6pk 3206570 Corner Bracket Part Identification Reduced Part Size Flat Panel Brkt 5pk 3200635 4pk 3200629 3201700 MFL Bracket Set Corner Panel Brkt 1x 4pk 3200628 Corner Panel Brkt 2x 9200151 L Bracket 1x 9200152 T Bracket 1x 9200150 G Bracket 1x Heavy Bracket Set 3...

Page 21: ...5 16 x 2 53613326 16pc WL5 Wafer Lag 1 4 x 2 52613222 5pc LS9 Lag Screw 5 16 x 4 52213343 32pc WB9 Wafer Bolt 5 16 x 2 53613324 2pc G1 Hex Bolt 5 16 x 1 1 2 53703312 Hardware Identification Actual Size 21pc WB2 Wafer Bolt 5 16 x 1 53613316 12pc G13 Hex Bolt 5 16 x 6 53703364 20pc PB2 Pan Bolt 1 4 x 11 4 53433212 4pc G21 Hex Bolt 5 16 x 3 53703333 13pc WL3 Wafer Lag 1 4 x 1 52613216 16pc G8 Hex Bol...

Page 22: ...S18 Wood Screw 6 x 1 52013910 53703890 1pc G18 Hex Bolt 3 8 x 9 NOTE Appoximately 2 removed from actual size 4pc G17 Hex Bolt 3 8 x 6 53703860 306pc S20 Wood Screw 8 x 1 52043516 1pc G20 Hex Bolt 3 8 x 4 53703840 NOTE Appoximately 2 removed from actual size 1pc G26 Hex Bolt 3 8 x 9 53703891 52pc S8 Pan Screw 12 x 52433603 47pc S7 Pan Screw 12 x 2 52433620 12pc TS Trim Screw 6 x 30mm 52953911 6pc S...

Page 23: ...LW1 1 4 Lock Washer 51303200 1 Hillcrest Canopy 9753270 32pc LW2 5 16 Lock Washer 51303300 1 Triangle Plates 4pk 3200184 1 Maze N Wave Slide 3318120 Green 2 5M 22pc FW1 1 4 Flat Washer 51103200 14pc FW10 3 8 Flat Washer Narrow 51103800 17pc FW5 Plastic Formed Washer 3290000 12pc LN2 5 16 Lock Nut 54303300 127pc TN2 5 16 T Nut 54503300 7pc LN3 3 8 Lock Nut 54303800 20pc BN1 1 4 Barrel Nut 54803200 ...

Page 24: ... is located on the Cedar Summit ID Plaque 9320357 Please retain this information for future reference You will need this information if you contact the Consumer Relations Department Please refer to Page 6 for proper hardware assembly Each step indicates which bolts and or screws you will need for assembly as well as any flat washers lock washers t nuts or lock nuts A This is the time for you to in...

Page 25: ...hown in fig 1 1 and 1 2 Make sure 012 Box Ground is flush to the end of one 010 Box Leg C Repeat Steps A and B to create a second Box End Assembly so it is opposite to the first Box End Assembly fig 1 1 and 1 2 4 x Box Leg FSC 5 4 x 4 x 16 2 x Box End FSC 5 4 x 4 x 14 1 4 2 x Box Ground FSC 5 4 x 4 x 29 012 011 010 Fig 1 1 Wood Parts Step 1 Sand and Water Table Assembly Part 1 12 x 5 16 x 1 3 8 Wa...

Page 26: ...ake sure the assembly is square then attach both 013 Box Sides to each 011 Box End using 2 S15 8 x 1 3 4 Wood Screws per end as shown in fig 1 6 8 x 8 x 1 3 4 Wood Screw 4 x 5 16 x 3 Wafer Bolt 5 16 flat washer 5 16 t nut Hardware 013 013 010 010 Fig 1 3 Fig 1 4 013 S15 Fig 1 6 Top View Step 1 Sand and Water Table Assembly Part 2 5 16 Flat Washer 5 16 T Nut Flush Fig 1 5 WB7 010 S15 S15 011 013 WB...

Page 27: ... flat against 013 Box Side attach 1 014 Box Gusset to each front 010 Box Leg using 1 S15 8 x 1 3 4 Wood Screw in the top hole and 1 S3 8 x 2 1 2 Wood Screw in the bottom hole per gusset fig 1 7 H Attach both 014 Box Gussets to 013 Box Side with 1 S20 8 x 1 3 8 Wood Screw and 1 S3 8 x 2 1 2 Wood Screw per gusset as shown in fig 1 8 S15 Step 1 Sand and Water Table Assembly Part 3 013 Front 010 S15 S...

Page 28: ...ter Insert to the assembly using 8 S13 6 x 5 8 Pan Screws as shown in fig 1 10 and 1 11 L Place the Seat over the Sand and Water Insert Other Parts 1 x Seat 1 x Sand and Water Insert 8 x 6 x 5 8 Pan Screw Hardware Step 1 Sand and Water Table Assembly Part 4 Seat Fig 1 10 Fig 1 9 Fig 1 11 Fig 1 12 Sand and Water Insert Seat S13 S13 S13 28 support cedarsummitplay com ...

Page 29: ...ess rails fig 2 1 and 2 2 C Pre drill pilot holes with a 1 8 drill bit and attach Rails and Ladder Treads together using 4 S3 8 x 2 1 2 Wood Screws per tread fig 2 1 Other Parts 2 x Swing Bracket 16 x 8 x 2 1 2 Wood Screw 2 x 5 16 x 1 3 8 Wafer Bolt 5 16 flat washer 5 16 t nut WB2 S3 Fig 2 2 Fig 2 3 020 021 022 Swing Bracket End View WB2 5 16 Flat Washer 5 16 T Nut Flush to edges 021 D Attach Swin...

Page 30: ... of Access Ladder assembly and 024 Rock Rail using 3 S3 8 x 2 1 2 Wood Screws Notice that the holes in the board are towards the top and notched end is at 024 Rock Rail fig 2 6 G Attach 1 Swing Bracket to the top angled edge of 024 Rock Rail making sure the bracket faces out Use 1 WB2 5 16 x 1 3 8 Wafer Bolt with flat washer and t nut fig 2 6 Wood Parts Hardware Other Parts 1 x Swing Bracket 3 x 8...

Page 31: ...ver 024 Rock Rail fig 3 1 B Make sure all boards fit together snugly and the assembly is square then attach 030 Board Access and 031 Rock Bottom using 4 S20 8 x 1 3 8 Wood Screws per board fig 3 1 C Fasten all the other boards with 4 S20 8 x 1 3 8 Wood Screws per board fig 3 1 D Place EN71 Hand Rail 1 from front edge of 025 Top Ladder and on 020 Left Access Rail Pre drill holes using a 3 16 drill ...

Page 32: ...and shapes attach 1 rock to each rock board using 1 PB2 1 4 x 1 1 4 Pan Bolt with lock washer flat washer and barrel nut and 1 S10 8 x 1 Pan Screw per rock fig 3 4 and 3 5 The Pan Screw is placed in the hole beneath the Pan Bolt fig 3 4 and 3 5 Note Make sure all hardware is used to secure each rock properly Fig 3 4 3 16 Flat Washer 1 4 Barrel Nut Fig 3 5 S10 PB2 1 4 Lock Washer 32 support cedarsu...

Page 33: ...ach each 041 Window Shutter to 040 Cafe Wall Window Panel with 3 TS 6 x 30 mm Trim Screws per shutter fig 4 2 Note 2 outer Shutters need to be flush to outside edge of panel fig 4 2 12 x 6 x 30 mm Trim Screw TS 1 x Cafe Wall Window Panel FSC 1 1 4 x 35 1 2 x 99 4 x Window Shutter FSC 5 8 x 3 x 15 Wood Parts 040 041 Fig 4 1 040 TS x 3 per Window Shutter Fig 4 2 041 11 11 Flush Flush 33 support ceda...

Page 34: ...t sits tight to the panel fig 4 3 and 4 4 D Attach Spin Chalk Sign to 042 Chalkwall Panel with 6 S5 8 x 1 2 Pan Screws fig 4 4 6 x 8 x 1 2 Pan Screw S5 Other Parts 1 x Spin Chalk Sign 1 x Chalkwall Panel FSC 1 1 4 x 16 3 4 x 56 Wood Parts 042 042 Fig 4 4 Front Fig 4 3 Back S5 042 Spin Chalk Sign 34 support cedarsummitplay com ...

Page 35: ...lts with lock washer flat washer and t nut fig 4 5 and 4 6 1 x SW Side Panel FSC 1 1 4 x 36 x 87 1 4 1 x SW Wall FSC 4 x 4 x 38 1 2 Wood Parts 043 044 5 16 Flat Washer 5 16 t nut 5 16 Lock Washer Fig 4 6 043 Fig 4 5 G21 Front Side 044 043 4 x 5 16 x 3 3 4 Hex Bolt 5 16 lock washer 5 16 flat washer 5 16 t nut G21 044 35 support cedarsummitplay com ...

Page 36: ...e flat edge of the bracket must be facing up and it must be installed on the correct side fig 5 1 and 5 2 B Measure 84 from the bottom of 050 Narrow Window Panel and attach a second 2 x 2 1 4 Corner Panel Bracket with 2 S8 12 x 3 4 Pan Screws The flat edge of the bracket must be facing up and it must be installed on the correct side fig 5 1 and 5 2 Note Bottom of 2 x 2 1 4 Corner Panel Bracket mus...

Page 37: ...cket must be facing up and it must be installed on the correct side fig 5 3 and 5 4 D Measure 48 3 4 from the bottom of 051 SL Side Window Panel and attach a second 1 1 2 x 2 1 4 Corner Panel Bracket with 2 S8 12 x 3 4 Pan Screws The flat edge of the bracket must be facing up and it must be installed on the correct side fig 5 3 and 5 4 Note Bottom of 1 1 2 x 2 1 4 Corner Panel Bracket must sit at ...

Page 38: ...w Window Panel up against the right side edge of 043 SW Side Panel so the bottom edges are flush fig 5 5 F Attach both Corner Panel Brackets to 043 SW Side Panel with 2 S8 12 x 3 4 Pan Screws per bracket fig 5 5 5 6 and 5 7 S8 9 0 9 0 Corner Panel Bracket Fig 5 5 050 Fig 5 7 Fig 5 6 S8 050 043 043 050 043 Corner Panel Bracket Flush 38 support cedarsummitplay com ...

Page 39: ...Panel with 2 S8 12 x 3 4 Pan Screws per bracket fig 5 8 and 5 9 Note Make sure panels are square and flush to each other fig 5 10 H Pre drill with a 3 16 drill bit then fasten the 050 Narrow Window Panel and 051 SL Side Window Panel to 043 SW Side Panel with 3 WL5 1 4 x 2 1 2 Wafer Lags per panel fig 5 8 9 0 9 0 9 0 Fig 5 10 051 Fig 5 9 Fig 5 8 Flush WL5 WL5 S8 043 050 043 051 Corner Panel Bracket...

Page 40: ...nd attach a second 1 1 2 x 2 1 4 Corner Panel Bracket with 2 S8 12 x 3 4 Pan Screws The flat edge of the bracket must be facing up and it must be installed on the correct side fig 6 1 and 6 2 Note Bottom of 1 1 2 x 2 1 4 Corner Panel Bracket must sit at 50 3 4 Hardware 4 x 12 x 3 4 Pan Screw S8 Step 6 Door Wall Assembly Part 1 Other Parts 2 x 1 1 2 x 2 1 4 Corner Panel Bracket Fig 6 1 042 Fig 6 2 ...

Page 41: ...ng up and it must be installed on the correct side fig 6 3 and 6 4 D Measure 50 3 4 from the bottom of 060 Narrow Half Window Panel and attach a second 2 x 2 1 4 Corner Panel Bracket with 2 S8 12 x 3 4 Pan Screws The flat edge of the bracket must be facing up and it must be installed on the correct side fig 6 3 and 6 4 Note Bottom of 2 x 2 1 4 Corner Panel Bracket must sit at 50 3 4 Step 6 Door Wa...

Page 42: ...h both Corner Panel Brackets to 061 Door Wall Window Panel with 2 S8 12 x 3 4 Pan Screws per bracket fig 6 5 and 6 7 G With a helper hold 060 Narrow Half Window Panel up against the left side edge of 061 Door Wall Window Panel so the bottom edges are flush Attach both Corner Panel Brackets to 061 Door Wall Window Panel with 2 S8 12 x 3 4 Pan Screws per bracket fig 6 5 and 6 6 Fig 6 5 061 Corner Pa...

Page 43: ...er fig 6 9 H Pre drill with a 3 16 drill bit then fasten 042 Chalkwall Panel and 060 Narrow Half Window Panel to 061 Door Wall Window Panel with 3 WL5 1 4 x 2 1 2 Wafer Lags per panel fig 6 8 Step 6 Door Wall Assembly Part 4 9 0 Fig 6 8 061 042 Fig 6 9 060 WL5 WL5 43 support cedarsummitplay com ...

Page 44: ... 062 Front Floor as shown in fig 6 10 J Install 6 5 16 t nuts in 063 Front Ground 064 Back Floor and 065 Back Ground as shown in fig 6 11 6 12 and 6 13 Wood Parts Hardware 064 063 062 Fig 6 10 Fig 6 11 Fig 6 13 22 x 5 16 T Nuts Step 6 Door Wall Assembly Part 5 Fig 6 12 062 063 064 065 5 16 t nut 5 16 t nut 5 16 t nut 5 16 t nut 065 44 support cedarsummitplay com ...

Page 45: ...Bolts with flat washer as shown in fig 6 14 L Make sure the t nuts are facing inward fig 6 15 and loosely attach 062 Front Floor to 042 Chalkwall Panel with 2 WB8 5 16 x 2 3 8 Wafer Bolts with flat washer and 064 Back Floor to 060 Half Narrow Window Panel with 2 WB8 5 16 x 2 3 8 Wafer Bolts with flat washer as shown in fig 6 14 Fig 6 14 Notice T Nuts are facing inward Top with 5 16 Flat Washers WB...

Page 46: ...mbly and slide both assemblies together so 062 Front Floor 063 Front Ground 064 Back Floor and 065 Back Ground are tight to 040 Cafe Wall Window Panel as shown in fig 7 3 7 4 and 7 5 Step 7 Join Door Wall and Swing Side Wall Assemblies Part 1 Fig 7 3 Fig 7 5 Fig 7 4 Fig 7 1 Fig 7 2 040 064 062 065 063 Door Wall Assembly Swing Side Wall Assembly 46 support cedarsummitplay com ...

Page 47: ...loor to 050 Narrow Window Panel with 2 WB8 5 16 x 2 3 8 Wafer Bolts with flat washer as shown in fig 7 7 4 x 5 16 x 2 1 8 Wafer Bolt 5 16 flat washer 2 x 5 16 x 2 3 8 Wafer Bolt 5 16 flat washer Hardware WB9 WB8 Step 7 Join Door Wall and Swing Side Wall Assemblies Part 2 Front 5 16 Flat Washer WB9 Fig 7 6 051 Fig 7 8 Fig 7 7 with 5 16 Flat Washer WB9 WB8 with 5 16 Flat Washer 063 065 064 Back 050 ...

Page 48: ... with 5 16 flat washer t nuts previously installed fig 8 1 8 2 and 8 3 B Loosely fasten 040 Cafe Wall Window Panel to 062 Front Floor with 2 WB8 5 16 x 2 3 8 Wafer Bolts with 5 16 flat washer t nuts previously installed fig 8 1 and 8 2 5 16 Flat Washer Door Wall Fig 8 2 WB9 062 040 Swing Wall 051 042 062 WB8 with 5 16 Flat Washer 051 042 063 hidden 063 hidden 040 2 x 5 16 x 2 1 8 Wafer Bolt 5 16 f...

Page 49: ...the assembly is on level ground and 051 SL Side Window Panel and 042 Chalkwall Panel are square and tight to 040 Cafe Wall Window Panel D Tighten all 10 Wafer Bolts on the front side as shown in fig 8 4 051 042 040 Front Tighten 49 support cedarsummitplay com ...

Page 50: ... attach from inside the assembly with 2 S3 8 x 2 1 2 Wood Screws and to 080 Table Top with 2 S15 8 x 1 3 4 Wood Screws as shown in fig 8 6 G On the inside of the assembly attach 040 Cafe Wall Window Panel to 042 Chalkwall Panel and 051 SL Side Window Panel using 2 Flat Panel Brackets in the places shown with 4 S8 12 x 3 4 Pan Screws per bracket fig 8 7 Hardware 8 x 12 x 3 4 Pan Screw 4 x 8 x 2 1 2...

Page 51: ... and 8 9 I Tight to the top of 051 SL Side Window Panel attach 082 SL Post to 043 SW Side Panel with 3 S3 8 x 2 1 2 Wood Screws as shown in fig 8 8 and 8 9 Tight Hardware 4 x 8 x 3 Wood Screw 3 x 8 x 2 1 2 Wood Screw S4 Fig 8 9 062 S3 Fig 8 8 S3 051 043 1 x SL Post FSC 1 1 4 x 1 1 4 x 44 7 8 Wood Parts 082 082 S4 S4 064 064 062 51 support cedarsummitplay com ...

Page 52: ...2 S18 6 x 1 Wood Screws fig 9 1 and 9 2 B On the inside of 090 Door Window Panel next to the Catch Plate attach 1 Door Handle using 2 S13 6 x 5 8 Pan Screws fig 9 1 and 9 2 Fig 9 2 Fig 9 1 S18 S13 16 Catch Plate Door Handle Inside View 090 2 x 6 x 1 Wood Screw 2 x 6 x 5 8 Pan Screw S18 S13 1 x Door Window Panel FSC 1 1 4 x 16 3 4 x 44 7 16 Wood Parts 090 52 support cedarsummitplay com ...

Page 53: ...the one on the inside Use 2 S13 6 x 5 8 Pan Screws fig 9 3 D Attach 2 Door Hinges on the outside of the 090 Door Window Panel on the opposite side from the Door Handle Judge spacing based on fig 9 3 Use 3 S13 6 x 5 8 Pan Screws per Hinge Note Hinge stops must be tight to 090 Door Window Panel fig 9 4 8 x 6 x 5 8 Pan Screw S13 Other Parts 1 x Door Handle 2 x Door Hinge Top View 53 support cedarsumm...

Page 54: ... Window Panel bottom and maximum 5 8 from right side of the opening which would be the Door Hinge side and attach the remaining side of the hinges to 061 Door Wall Window Panel using 3 S13 6 x 5 8 Pan Screws per hinge fig 9 5 9 6 and 9 7 Fig 9 6 Fig 9 5 6 x 6 x 5 8 Pan Screw S13 5 8 S13 5 8 54 support cedarsummitplay com ...

Page 55: ...of the assembly attach 091 Door Stop to 061 Door Wall Window Panel with 3 S15 8 x 1 3 4 Wood Screws making sure 091 Door Stop overhangs 061 Door Wall Window Panel by 1 1 4 and is in position to receive the Catch Plate fig 9 9 9 10 and 9 11 Fig 9 9 Fig 9 11 Fig 9 8 1 x Door Stop FSC 5 4 x 4 x 10 091 2 x 6 x 1 Wood Screw S18 3 x 8 x 1 3 4 Wood Screw S15 061 Other Parts 1 x Magnetic Catch 091 S15 S18...

Page 56: ... 4 S4 8 x 3 Wood Screws in the remaining holes as shown in fig 9 12 and 9 13 Notice the orientation of the holes Make sure the top of 092 Floor End measures 5 8 from top of both 062 Front Floor and 064 Back Floor From inside the assembly attach two 5 16 t nuts to 092 Floor End I On the inside of the assembly attach 093 Door Bottom to the bottom of 061 Door Wall Window Panel with 8 S20 8 x 1 3 8 Wo...

Page 57: ...alled and to 064 Back Floor with 2 WB8 5 16 x 2 3 8 Wafer Bolts with 5 16 flat washer t nuts previously installed fig 10 1 and 10 2 B Loosely attach 100 Back Top to the tops of both 050 Narrow Window Panels with 2 WB9 5 16 x 2 1 8 Wafer Bolts with 5 16 flat washer and 5 16 t nut per panel fig 10 1 10 3 and 10 4 WB9 Swing Wall WB9 Fig 10 4 Fig 10 2 5 16 Flat Washer 064 Back 050 WB9 5 16 Flat Washer...

Page 58: ...Fig 10 5 Step 10 Back Wall Assembly Part 2 C Make sure the assembly is square D Tighten all 16 Wafer Bolts on the back side as shown in fig 10 5 Tighten 100 064 060 065 58 support cedarsummitplay com ...

Page 59: ...ep 10 Back Wall Assembly Part 3 E On the inside of the assembly attach 050 Narrow Window Panel to 060 Half Narrow Window Panel using 1 Flat Panel Bracket with 4 S8 12 x 3 4 Pan Screws fig 10 6 and 10 7 Flat Panel Bracket Fig 10 7 S8 050 060 Front Back 59 support cedarsummitplay com ...

Page 60: ...end of 110 Ground SW loosely attach 1 111 Diagonal with 1 G8 5 16 x 2 Hex Bolt with lock washer flat washer and t nut per side fig 11 1 and 11 2 Fig 11 1 043 043 1 x Ground SW FSC 5 4 x 4 x 82 5 8 2 x Diagonal FSC 2 x 3 x 42 1 4 110 111 6 x 5 16 x 2 Hex Bolt 5 16 lock washer 5 16 flat washer 5 16 t nut G8 5 16 T Nut 5 16 Flat Washer 5 16 Lock Washer Fig 11 3 Fig 11 2 G8 5 16 T Nut Inside View 043 ...

Page 61: ... 4 D Tighten all 6 G8 5 16 x 2 Hex Bolts from Step 11 A and B E In the opening of 043 SW Side Panel attach 112 SW Table Top tight to the corner of the panels with 3 S3 8 x 2 1 2 Wood Screws as shown in fig 11 4 Hardware 2 x 1 4 x 2 1 2 Wafer Lag 1 4 flat washer 3 x 8 x 2 1 2 Wood Screw WL5 1 4 Flat Washer Fig 11 4 043 WL5 WL5 111 050 111 S3 060 112 Wood Parts 1 x SW Table Top FSC 5 4 x 3 x 31 3 4 ...

Page 62: ...st to the bottom of both 122 Posts with 1 G8 5 16 x 2 Hex Bolt with lock washer flat washer and t nut per post fig 12 1 and 12 2 Note Make sure 120 SL Top Left 123 SL Top Right and 121 Short Joists are level to the top and bottom of 122 Posts 2 x 5 16 x 1 1 2 Hex Bolt 5 16 lock washer 5 16 flat washer 5 16 t nut 2 x 5 16 x 2 Hex Bolt 5 16 lock washer 5 16 flat washer 5 16 t nut G1 5 16 T Nut 5 16 ...

Page 63: ...or and centred over the pilot holes then attach with 2 S4 8 x 3 Wood Screws per assembly fig 12 3 and 12 4 D Place 124 Short Floor Joist flush to the top of 062 Front Floor and centred over the middle pilot holes then attach with 2 S4 8 x 3 Wood Screws fig 12 3 and 12 4 051 040 121 Flush Front 040 6 x 8 x 3 Wood Screw S4 Step 12 Slide Top Assembly Part 2 Fig 12 4 121 124 043 062 Inside View 043 Le...

Page 64: ... to 040 Cafe Wall Window Panel with 2 S15 8 x 1 3 4 Wood Screws per board fig 12 5 and 12 6 F Make sure both 120 SL Top Left and 123 SL Top Right are level then tighten bolts on each Post Assembly Fig 12 6 Fig 12 5 4 x 8 x 1 3 4 Wood Screw S15 120 Step 12 Slide Top Assembly Part 3 043 123 040 Flush Panel Support S15 64 support cedarsummitplay com ...

Page 65: ... attach 125 SL Top to 120 SL Top Left and 123 SL Top Right with 4 S3 8 x 2 1 2 Wood Screws fig 12 7 H Flush to the tops of 121 Short Joists and 124 Short Floor Joist attach 126 SL End with 6 S4 8 x 3 Wood Screws fig 12 7 Fig 12 7 123 122 121 Step 12 Slide Top Assembly Part 4 120 126 Flush Flush 124 125 122 121 126 S4 S4 Flush Flush S3 S3 65 support cedarsummitplay com ...

Page 66: ...ll Window Panel with 2 WB9 5 16 x 2 1 8 Wafer Bolts with flat washer and t nut as shown in fig 12 8 and 12 9 J Attach 127 Front Top to 082 SL Post with 1 S15 8 x 1 3 4 Wood Screw in the top hole fig 12 8 and 12 9 Fig 12 8 127 Flush Step 12 Slide Top Assembly Part 5 Fig 12 9 082 WB9 WB9 127 040 082 S15 5 16 T Nut 5 16 Flat Washer Leave this hole empty 66 support cedarsummitplay com ...

Page 67: ...kes to 063 Front Ground 065 Back Ground and both 111 Diagonals using 1 S7 12 x 2 Pan Screw per ground stake as shown in fig 13 2 and 13 3 C After driving stakes into the ground check for sharp edges caused by the impact of the hammer Smooth any sharp edges from impact area and touch up with outdoor paint Step 13 Install Fort Ground Stakes MOVE FORT TO FINAL LOCATION PRIOR TO STAKING FINAL LOCATION...

Page 68: ...14 1 and 14 2 B Line 140 Floor Joist up to the pilot holes on the 043 SW Side Panel making sure the top of the joist is flush to the top of the panel board shown in fig 14 3 then attach with 2 S4 8 x 3 Wood Screws fig 14 1 14 3 and 14 4 Fig 14 3 1 x Floor Joist FSC 2 x 4 x 81 4 x 8 x 3 Wood Screw S4 140 Fig 14 2 Inside View 061 Flush 140 Fig 14 1 Fig 14 4 092 140 043 043 Flush Note Board removed f...

Page 69: ...ck Floor These boards should be tight to 043 SW Side Panel fig 15 1 and 15 2 B Place 3 151 Slidenest Floor A s next to 150 Slidenest Floors fig 15 1 and 15 2 C These floor boards are between both 121 Posts and evenly spaced Attach all 6 boards with 8 S20 8 x 1 3 8 Wood Screws per board fig 15 2 Fig 15 1 Door Wall Side Tight 043 Fig 15 2 151 Top View Front S20 Swing Side Wall 150 151 043 121 121 12...

Page 70: ... 092 Floor End fig 15 3 E Evenly space and attach the 10 unfastened floor boards to 062 Front Floor 140 Floor Joist and 064 Back Floor with 6 S20 8 x 1 3 8 Wood Screws per board fig 15 4 Step 15 Floor Board Assembly Part 2 Fig 15 3 151 Swing Side Wall hidden 153 Back Front 064 062 Door Wall Side 092 153 140 hidden S20 x 6 per board Hardware 60 x 8 x 1 3 8 Wood Screw S20 Fig 15 4 152 70 support ced...

Page 71: ...sely attach 1 162 Crowsnest Side flush to the top of each 161 Crowsnest Posts with 2 WB9 5 16 x 2 1 8 Wafer Bolts with flat washer and t nut fig 16 1 16 2 and 16 3 Fig 16 1 Step 16 Crowsnest Assembly Part 1 Hardware 2 x 5 16 x 3 Wafer Bolt 5 16 flat washer 5 16 t nut 2 x 5 16 x 2 1 8 Wafer Bolt 5 16 flat washer 5 16 t nut 2 x 5 16 T Nut WB7 Top View 160 Fig 16 2 Fig 16 3 5 16 T Nut 5 16 Flat Washe...

Page 72: ...arrow Window Panel place a second 163 Crowsnest Bottom in between 050 Narrow Window Panel and 092 Floor End on the back of the assembly Notice the pilot hole at the top of the board Attach to 064 Back Floor with 3 S7 12 x 2 Pan Screws fig 16 4 and 16 5 Back Fig 16 4 062 Step 16 Crowsnest Assembly Part 2 Front 092 Hardware 6 x 12 x 2 Pan Screw S7 hidden 064 hidden 060 042 040 163 2 x Crowsnest Bott...

Page 73: ...ch 161 Crowsnest Post with 1 S3 8 x 2 1 2 Wood Screw per post fig 16 6 F Attach each 163 Crowsnest Bottom to each 161 Crowsnest Post with 1 S15 8 x 1 3 4 Wood Screw per post fig 16 6 G Pre drill with a 1 8 drill bit then attach 162 Crowsnest Sides to the panels using 1 Flat Panel Bracket with 4 S8 12 x 3 4 Pan Screws per side fig 16 6 Hardware 4 x 8 x 1 3 4 Wood Screw 2 x 8 x 2 1 2 Wood Screw 8 x ...

Page 74: ...6 Wall Board between 040 Cafe Wall Window Panel and 166 Wall Board and between 050 Narrow Window Panel and 166 Wall Board tight to 152 Floors then attach to 162 Crowsnest Sides and 163 Crowsnest Bottoms with 4 S20 8 x 1 3 8 Wood Screws per board fig 16 7 and 16 8 Hardware Fig 16 8 16 x 8 x 1 3 8 Wood Screw 162 S20 161 x 4 per board Fig 16 7 Wood Parts 4 x Wall Board FSC 1 x 4 x 26 1 2 166 166 166 ...

Page 75: ...nt of the assembly attach Telescope to 161 Crowsnest Post and 162 Crowsnest Side with 2 S15 8 x 1 3 4 Wood Screws fig 17 1 17 2 and 17 3 Fig 17 1 1 x Telescope Fig 17 3 Front 2 x 8 x 1 3 4 Wood Screw S15 161 162 S15 Fig 17 2 S15 75 support cedarsummitplay com ...

Page 76: ... side facing up Place 184 SW Top over 182 and 183 Top Post Right and Left so the notches fit together fig 18 2 and 18 3 C Place Roof Support Assembly over 184 SW Top with the counter sunk holes facing up then attach with 2 G8 5 16 x 2 Hex Bolts with lock washer flat washer and t nut The angled edges of 182 and 183 Top Post Right and Left should be flush to the outside edges of 180 Roof Support and...

Page 77: ...n then measure 12 from the centre of either bolt hole and 2 down from the top of 184 SW Top and attach 1 185 Sunburst with 2 S15 8 x 1 3 4 Wood Screws to the outside of the assembly fig 18 4 and 18 5 185 Fig 18 4 180 181 184 12 Hardware 2 x 8 x 1 3 4 Wood Screw S15 Fig 18 5 2 185 184 181 180 S15 Outside View Inside View 77 support cedarsummitplay com ...

Page 78: ...y are tight to the top of 184 SW Top fig 18 6 G Attach 186 Centre Gable with 4 S20 8 x 1 3 8 Wood Screws and both 187 Side Gables with 3 S20 8 x 1 3 8 Wood Screws per board to 185 Sunburst 180 Roof Support and 181 Roof Support Left as shown in fig 18 6 Fig 18 6 10 x 8 x 1 3 8 Wood Screw S20 187 x 3 Wood Parts 1 x Centre Gable FSC 1 x 4 x 13 1 2 2 x Side Gable FSC 1 x 4 x 8 1 2 186 187 180 181 186 ...

Page 79: ...on 190 Right Gable Angle and 191 Left Gable Angle so it is flush to the outside edges of the boards fig 19 2 C Flip the assembly over so the large counter sunk holes are facing up Attach 192 Gable Bottom to 190 Right Gable Angle and 191 Left Gable Angle with 2 G8 5 16 x 2 Hex Bolts with lock washer and flat washer fig 19 2 and 19 3 Fig 19 1 1 x 8 x 3 Wood Screw 2 x 5 16 x 2 Hex Bolt 5 16 lock wash...

Page 80: ...e Bottom making sure it is flush to the bottom of 192 Gable Bottom then attach with 2 S15 8 x 1 3 4 Wood Screws to the outside of the assembly fig 19 4 and 19 5 190 Fig 19 4 191 8 1 2 Step 19 Gable Angle Support Assembly Part 2 192 Flush 185 Hardware 2 x 8 x 1 3 4 Wood Screw S15 Fig 19 5 185 191 190 192 S15 Outside View Inside View 80 support cedarsummitplay com ...

Page 81: ... fig 19 6 G Attach 186 Centre Gable with 4 S20 8 x 1 3 8 Wood Screws and both 187 Side Gables with 3 S20 8 x 1 3 8 Wood Screws per board to 185 Sunburst 190 Right Gable Angle and 191 Left Gable Angle as shown in fig 19 6 Fig 19 6 185 10 x 8 x 1 3 8 Wood Screw S20 192 x 3 Wood Parts Tight Step 19 Gable Angle Support Assembly Part 3 S20 S20 S20 x 4 x 3 187 187 186 1 x Centre Gable FSC 1 x 4 x 13 1 2...

Page 82: ...Wood Screw S4 Step 20 Roof Spacer Assembly A Attach 1 200 Roof Spacer to another at the peak using 1 S4 8 x 3 Wood Screw Notice the pilot holes are towards the bottom of the board fig 20 1 B Make sure the assembly is square Notice hole position 200 S4 82 support cedarsummitplay com ...

Page 83: ...s square and tight Attach panels together with 3 S15 8 x 1 3 4 Wood Screws per panel fig 21 1 and 21 2 Fig 21 1 Fig 21 2 210 6 x 8 x 1 3 4 Wood Screw 2 x Large Roof Panel FSC 1 1 4 x 31 3 4 x 41 210 Wood Parts S15 Step 21 Small and Large Roof Assemblies Part 1 210 S15 210 210 S15 Notice overlap is flush 83 support cedarsummitplay com ...

Page 84: ...o the one panel overlaps the other and the inside angle is square and tight Attach panels together with 3 S15 8 x 1 3 4 Wood Screws per panel fig 21 3 and 21 4 Fig 21 4 Fig 21 3 211 6 x 8 x 1 3 4 Wood Screw 2 x Small Roof Panel FSC 1 1 4 x 31 3 4 x 32 1 2 211 Wood Parts S15 S15 211 211 211 S15 84 support cedarsummitplay com ...

Page 85: ...and then 11 up from the second mark Pre drill with a 1 8 drill bit at all 6 marks fig 21 6 and 21 7 E Attach Roof Spacer Assembly to Small Roof Assembly with 3 S3 8 x 2 1 2 Wood Screws per side fig 21 6 and 21 7 6 x 8 x 2 1 2 Wood Screw S3 Step 21 Small and Large Roof Assemblies Part 3 Fig 21 5 211 Fig 21 6 Fig 21 7 S3 211 7 11 11 1 2 S c r e w t o P a n e l E n d Roof Spacer Assembly Roof Spacer ...

Page 86: ...tside edge is flush to the outside edge of 082 SL Post as shown in fig 22 1 and 22 2 B From inside the assembly attach 220 Transom Front to 127 Front Top with 3 S15 8 x 1 3 4 Wood Screws fig 22 2 C Retighten the bolt loosened in Step A if loosened 040 Front Fig 22 2 Hardware 1 x Transom Front FSC 1 1 4 x 11 1 2 x 35 7 8 220 Wood Parts S15 220 Flush 082 127 Inside View Front Wall 3 x 8 x 1 3 4 Wood...

Page 87: ... the outside edge of 050 Narrow Window Panel as shown in fig 22 3 and 22 4 E From inside the assembly attach 221 Transom Back to 100 Back Top with 2 S15 8 x 1 3 4 Wood Screws 22 4 Hardware 1 x Transom Back FSC 1 1 4 x 11 1 2 x 35 7 8 221 Wood Parts Fig 22 4 221 2 x 8 x 1 3 4 Wood Screw S15 Fig 22 3 Front Back 100 050 221 S15 87 support cedarsummitplay com ...

Page 88: ...d 23 2 C Attach 182 Top Post Right to 082 SL Post with 1 S3 8 x 2 1 2 Wood Screw in the bottom hole and 1 S4 8 x 3 Wood Screw through 127 Front Top to 220 Transom Front with 2 S3 8 x 2 1 2 Wood Screws fig 23 1 and 23 2 Step 23 Attach Roof Support Assemblies Part 1 Fig 23 1 Fig 23 2 Roof Support Assembly 6 x 8 x 2 1 2 Wood Screw 1 x 8 x 3 Wood Screw 043 S3 183 050 221 183 050 Flush 043 182 082 220 ...

Page 89: ... Cafe Wall Window Panel 100 Back Top and 050 Narrow Window Panel with 2 S3 8 x 2 1 2 Wood Screw per side as shown in fig 23 4 190 Right Gable Angle and 191 Left Gable Angle must be flush to the tops of 127 Front Top and 100 Back Top 4 x 8 x 2 1 2 Wood Screw S3 Step 23 Attach Roof Support Assemblies Part 2 Fig 23 4 127 Fig 23 3 36 Flush 191 190 100 Gable Angle Support Assembly 040 Door Wall 050 Flu...

Page 90: ...0 Cafe Wall Window Panel using 1 Corner Panel Bracket with 3 S13 6 x 5 8 Pan Screws per side fig 23 5 6 x 6 x 5 8 Pan Screw Other Parts 2 x Corner Panel Bracket 050 Step 23 Attach Roof Support Assemblies Part 3 Fig 23 5 x 3 per bracket 190 191 S13 040 Flush S13 Corner Panel Bracket one hidden 90 support cedarsummitplay com ...

Page 91: ...r Assembly sits flush to the top and outside edges of both 220 Transom Front and 221 Transom Back fig 24 1 B Attach each 200 Roof Spacer to 220 Transom Front and 221 Transom Back with 2 S15 8 x 1 3 4 Wood Screws per side fig 24 1 Step 24 Attach Roof Assemblies to Fort Part 1 Fig 24 1 Back Roof Spacer Assembly Hardware 4 x 8 x 1 3 4 Wood Screw Flush S15 220 200 221 S15 Gable Angle Support Assembly ...

Page 92: ...own from the peak on each panel pre drill with a 1 8 drill bit then attach the Small Roof Assembly to the Gable Angle Support Assembly with 2 S3 8 x 2 1 2 Wood Screws per side as shown in fig 24 3 Hardware 4 x 8 x 2 1 2 Wood Screw S3 Step 24 Attach Roof Assemblies to Fort Part 2 Fig 24 3 Small Roof Assembly Fig 24 2 Gable Angle Support Assembly 2 3 4 5 5 S3 S3 92 support cedarsummitplay com ...

Page 93: ...e Large Roof Assembly lays flat on the Roof Support Assembly and it overhangs by 2 fig 24 5 G Using the factory drilled holes as a guide attach the Large Roof Assembly to the Roof Support Assembly and Roof Spacer Assembly with 4 S3 8 x 2 1 2 Wood Screws per side as shown in fig 24 4 and 24 5 Step 24 Attach Roof Assemblies to Fort Part 3 Hardware 8 x 8 x 2 1 2 Wood Screw S3 Fig 24 5 Large Roof Asse...

Page 94: ...l using 2 WB7 5 16 x 3 Wafer Bolts with flat washer and t nut fig 25 1 and 25 2 2 x 5 16 x 3 Wafer Bolt 5 16 flat washer 5 16 t nut Other Parts 1 x Heavy T Bracket WB7 Fig 25 1 Fig 25 2 044 044 Heavy T Bracket 5 16 Flat Washer 5 16 T Nut Swing Side Wall WB7 94 support cedarsummitplay com ...

Page 95: ... Heavy Duty Swing Hangers 6 x Quick Clips WB7 G13 Wood Parts 1 x Engineered SW Beam FSC 3 x 5 1 4 x 110 260 C Install 4 WB7 5 16 x 3 Wafer Bolts with flat washer and t nut in 260 Engineered SW Beam as shown in fig 26 3 and 26 4 A Wafer Bolt does not get installed on the Swing Side of the beam IMPORTANT MAKE SURE ALL 4 BOLTS ARE ATTACHED THEY WILL MINIMIZE CHECKING OF WOOD Fig 26 2 260 5 16 Flat Wa...

Page 96: ...IMIZE CHECKING OF WOOD C Place 270 SW Block Angle and 271 Block SW assembly in between 2 272 SW Post Heavy L Brackets towards the outside Place 1 Heavy G Bracket on the top 272 SW Post and attach with G26 3 8 x 9 1 4 Hex Bolt with 2 flat washers and 1 lock nut as shown in fig 27 5 2 x 3 8 x 6 Hex Bolt 3 8 flat washer x 2 plastic formed washer 3 8 lock nut 1 x 3 8 x 9 1 4 Hex Bolt 3 8 flat washer x...

Page 97: ...ing Post Assembly to Swing Beam Assembly using 1 G20 3 8 x 4 Hex Bolt with 2 flat washers and lock nut through Heavy L Bracket fig 27 8 F Attach 260 Engineered SW Beam to Heavy G Bracket with 1 G17 3 8 x 6 Hex Bolt with 2 flat washers plastic formed washer and lock nut fig 27 8 2 x 3 8 x 6 Hex Bolt 3 8 flat washer x 2 plastic formed washer 3 8 lock nut 1 x 3 8 x 9 Hex Bolt 3 8 flat washer x 2 plas...

Page 98: ... FSC 2 1 2 x 3 x 64 280 360 C Place 280 Support Cross between 272 SW Post at the previously determined spot and fasten with 1 LS9 5 16 x 4 3 4 Lag Screw with flat washer per side fig 28 3 and 28 4 Notice one side is fastened on the outside and one on the inside It is important that each side is positioned exactly the same as the diagram fig 28 3 Tighten the lag screw when you are sure 280 Support ...

Page 99: ... A Attach 1 LS9 5 16 x 4 3 4 Lag Screw with flat washer into each 272 SW Post as shown in fig 29 1 B Attach 1 LS9 5 16 x 4 3 4 Lag Screw with flat washer into remaining hole of the Heavy G Bracket into 260 Engineered SW Beam fig 29 1 3 x 5 16 x 4 3 4 Lag Screw 5 16 flat washer LS9 272 260 Fig 29 1 5 16 Flat Washer 272 Heavy G Bracket LS9 5 16 Flat Washer LS9 99 support cedarsummitplay com ...

Page 100: ...e Threaded Clip tightly using an adjustable wrench fig 30 2 and 30 3 C Attach the other end of the swing chains to the Quick Clips attached to the swing hangers fig 30 1 1 x Acro Bar 2 x Acro Handle 2 x Swing Belt Seat 2 x Short Swing Chain 4 x Long Swing Chain 6 x Threaded Clips Short Swing Chain Quick Clip Swing Seat Long Swing Chain Threaded Clip Tighten Clip using adjustable wrench Threaded Cl...

Page 101: ...own in fig 31 1 C After driving stakes into the ground check for sharp edges caused by the impact of the hammer Smooth any sharp edges from impact area and touch up with outdoor paint Warning To prevent tipping and avoid potential injury stakes must be driven 13 into ground Digging or driving stakes can be dangerous if you do not check first for under ground wiring cables or gas lines Fig 31 1 2 x...

Page 102: ...s to 040 Cafe Wall Window Panel with 4 Corner Brackets using 3 S13 6 x 5 8 Pan Screws per bracket fig 32 2 and 32 3 Note 2 Corner Brackets sit flush to the top of 012 Box Grounds shown in fig 32 2 12 x 6 x 5 8 Pan Screw Fig 32 2 Corner Brackets Hardware 012 Fig 32 1 Fig 32 3 012 x 3 per bracket Notice these two brackets are flush to top 040 Flush 4 x Corner Bracket S13 S13 102 support cedarsummitp...

Page 103: ...ning between 121 Posts fig 33 1 and 33 2 B Attach slide to fort through the floor boards and into 126 SL End using 3 S7 12 x 2 Pan Screws fig 33 2 and 33 3 Fig 33 3 Fig 33 1 Hardware 121 Front Fig 33 2 121 3 x 12 x 2 Pan Screw S7 Other Parts 1 x Slide S7 hidden Floor Boards Floor Boards S7 Slide Slide 126 126 103 support cedarsummitplay com ...

Page 104: ...ox under each window and attach to 040 Wall Cafe Window Panel with 2 S13 6 x 5 8 Pan Screws per Flower Box fig 34 1 and 34 2 040 Fig 34 1 Front Fig 34 2 Other Parts 2 x Flower Box Hardware 4 x 6 x 5 8 Pan Screw S13 Flower Box Flower Box S13 S13 104 support cedarsummitplay com ...

Page 105: ...be re attached fig 35 2 B Place the Access Ladder Rockwall on the Back side of the fort and attach to 064 Back Floor with 1 WL3 1 4 x 1 3 8 Wafer Lag Screw with flat washer in each Swing Bracket fig 35 1 35 2 and 35 3 C Re attach 030 Board Access to the same place it was removed fig 35 2 Fig 35 3 064 3 x 1 4 x 1 3 8 Wafer Lag 1 4 flat washer WL3 Fig 35 1 Fig 35 2 1 4 Flat Washer 030 WL3 Important ...

Page 106: ...adder on each 050 Narrow Window Panel and attach 1 Steel Hand Grip per panel with 2 WH2 12 x 1 Wafer Screw with flat washer per Steel Hand Grip fig 36 1 and 36 2 4 x 12 x 1 Wafer Head Screw 3 16 flat washer WH2 Fig 36 1 3 16 Flat Washer 025 Steel Hand Grip 050 Steel Hand Grip Other Parts 2 x Steel Hand Grip WH2 050 050 6 Fig 36 2 106 support cedarsummitplay com ...

Page 107: ...70 Middle Arch with 4 S15 8 x 1 3 4 Wood Screws fig 37 1 and 37 2 4 x 8 x 1 3 4 Wood Screw Wood Parts 1 x Middle Arch FSC 5 4 x 5 x 36 1 4 370 S15 Fig 37 2 025 050 Fig 37 1 050 370 28 Warning Check entire play center for bolts protruding beyond T Nuts Use extra washers to eliminate this condition S15 107 support cedarsummitplay com ...

Page 108: ...osts and attach with 2 S3 8 x 2 1 2 Wood Screws per board fig 38 1 and 38 2 8 x 8 x 2 1 2 Wood Screw Wood Parts 1 x A Frame Access R FSC 2 x 5 x 73 9 32 1 x A Frame Access L FSC 2 x 5 x 73 9 32 2 x A Frame Post FSC 2 x 5 x 73 9 32 4 x A Frame Ground FSC 5 4 x 5 x 5 380 Fig 38 2 383 Fig 38 1 381 380 S3 S3 381 383 382 382 108 support cedarsummitplay com ...

Page 109: ... WB9 5 16 x 2 1 8 Wafer Bolts with flat washer and t nut as shown in fig 39 1 B Loosely attach 380 A Frame Access R and 1 382 A Frame Post to 391 A Frame Floor Support with 1 WB8 5 16 x 2 3 8 Wafer Bolt with flat washer and t nut per board and to each 390 A Frame Upright with 1 G22 5 16 x 5 Hex Bolt with lock washer flat washer and t nut per board fig 39 1 Notice bolt hole towards bottom WB8 G22 G...

Page 110: ...A Frame Top Side with 1 WB9 5 16 x 2 1 8 Wafer Bolt with flat washer and t nut as shown in fig 39 3 Notice the direction the 5 16 T Nut installed in Step C is facing E Loosely attach 393 A Frame Lower Side to 382 A Frame Post and 380 A Frame Access R with 2 WB9 5 16 x 2 1 8 Wafer Bolts with flat washer and t nut in the bottom holes fig 39 3 Notice t nut location 380 5 16 Flat Washer 5 16 T Nut 382...

Page 111: ...at washer and t nut per board fig 40 1 Fig 40 1 Notice bolt hole towards bottom 5 16 Flat Washer 5 16 Lock Washer 516 T Nut 5 16 Flat Washer 5 16 T Nut 5 16 Flat Washer 5 16 T Nut 4 x 5 16 x 2 3 8 Wafer Bolt 5 16 flat washer 5 16 t nut 2 x 5 16 x 5 Hex Bolt 5 16 lock washer 5 16 flat washer 5 16 t nut 2 x 5 16 x 2 1 8 Wafer Bolt 5 16 flat washer 5 16 t nut 2 x A Frame Upright FSC 2 x 4 x 41 1 2 1 ...

Page 112: ...ly attach 393 A Frame Lower Side to 382 A Frame Post and 381 A Frame Access L with 2 WB9 5 16 x 2 1 8 Wafer Bolts with flat washer and t nut in the bottom holes fig 40 2 Fig 40 2 2 x 5 16 x 2 1 8 Wafer Bolt 5 16 flat washer 5 16 t nut WB9 5 16 Flat Washer 516 T Nut 381 382 WB9 393 WB9 112 support cedarsummitplay com ...

Page 113: ...h 2 410 Floors to each side of the assembly with 4 S20 8 x 1 3 8 Wood Screws per board fig 41 1 and 41 2 Wood Parts 4 x Floor FSC 1 x 5 x 21 410 Hardware 16 x 8 x 1 3 8 Wood Screw Fig 41 1 Flush 410 A Frame Access Wall A Frame MK Wall Fig 41 2 Flush and tight 391 S20 S20 x 4 per board Tight Tight No Gap Tight No Gap A Frame Access Wall A Frame MK Wall 113 support cedarsummitplay com ...

Page 114: ...quare then attach both 393 A Frame Lower Sides to 380 A Frame Access R 381 A Frame Access L and both 382 A Frame Posts with 2 S7 12 x 2 Pan Screws per wall fig 42 1 B Tighten all bolts on both walls fig 42 1 S7 S7 381 380 382 393 S7 Tighten all bolts both walls Fig 42 1 114 support cedarsummitplay com ...

Page 115: ... grooves so they sit tight to each board and flush to the fronts then attach with 4 S3 8 x 2 1 2 Wood Screws per tread fig 43 1 and 43 2 Wood Parts 4 x A Frame Tread FSC 5 4 x 5 x 22 1 4 430 Hardware 16 x 8 x 2 1 2 Wood Screw S3 Fig 43 2 Flush and tight 380 S3 Fig 43 1 381 430 x 4 per tread 430 115 support cedarsummitplay com ...

Page 116: ... to the bottom of 440 Access Board and flush to the outside edges of 382 A Frame Posts attach 5 441 Rock Board A and 5 442 Rock Board B placing them as shown in fig 44 1 this will prevent rocks from forming a straight line Secure boards with 4 S20 8 x 1 3 8 Wood Screws per board fig 44 1 C Tight to the last 441 Rock Board A and flush to the outside edges of 382 A Frame Posts attach 443 Access Boar...

Page 117: ... 1 rock to each rock board using 1 PB2 1 4 x 1 1 4 Pan Bolt with lock washer flat washer and barrel nut and 1 S10 8 x 1 Pan Screw per rock fig 44 2 and 44 3 The Pan Screw is placed in the hole beneath the Pan Bolt fig 44 3 Note Make sure all hardware is used to secure each rock properly Rock S10 PB2 Rock 1 4 Lock Washer 3 16 Flat Washer Fig 44 2 Fig 44 3 1 4 Barrel Nut hidden 117 support cedarsumm...

Page 118: ...ners attach 1 Corner Brace using 3 S13 6 x 5 8 Pan Screws per Corner Brace as shown in fig 45 1 45 2 and 45 3 The Corner Brace should be centred on 450 A Frame Roof End and 392 A Frame Top Side Wood Parts Hardware 2 x A Frame Roof End FSC 1 x 4 x 27 3 4 8 x 8 x 1 3 4 Wood Screw 12 x 6 x 5 8 Pan Screw 450 4 x Corner Brace Other Parts Fig 45 1 x 4 Fig 45 3 392 x 4 450 392 450 x 3 per brace S13 S13 F...

Page 119: ...392 A Frame Top Side with 1 WB8 5 16 x 2 3 8 Wafer Bolt with flat washer and t nut in the bottom hole and 1 S15 8 x 1 3 4 Wood Screw in the top hole The bolt and screw are installed from the outside of the assembly fig 45 4 and 45 5 D Attach 452 A Frame Ridge to tops of 451 Roof Uprights with 2 S4 8 x 3 Wood Screws so each end has an overhang of 2 1 8 fig 45 4 and 45 5 Fig 45 4 Fig 45 5 5 16 Flat ...

Page 120: ...ke sure the Canopy is smooth and tight then secure to the remaining 450 A Frame Roof End with 4 S13 6 x 5 8 Pan Screws with 8 flat washer fig 45 6 and 45 7 H Attach Canopy to each end of 452 A Frame Ridge with 2 S13 6 x 5 8 Pan Screws with 8 flat washer Install screws 1 2 from each edge fig 45 6 and 45 7 Fig 45 6 450 Fig 45 7 1 2 450 Hardware 10 x 6 x 5 8 Pan Screw 8 flat washer 1 x Canopy Other P...

Page 121: ...ame Top Side attach 166 Wall Board to each 390 A Frame Upright with 4 S20 8 x 1 3 8 Wood Screws fig 46 1 and 46 2 Fig 46 1 x 4 392 166 460 22 5 8 390 x 4 390 391 Hardware 4 x 8 x 1 3 8 Wood Screw 4 x 12 x 2 Pan Screw Wood Parts 1 x Tunnel Left End FSC 5 4 x 4 x 27 1 2 1 x Wall Board FSC 1 x 4 x 26 1 2 460 166 A Frame Access Wall Note 460 Tunnel Left End must be flush to the outside edge of each 39...

Page 122: ...e drill holes using a 3 16 drill bit then attach EN71 Hand Rail using 2 WL3 1 4 x 1 3 8 Wafer Lags with flat washer fig 47 1 47 2 and 47 3 1 4 flat washer EN71 Hand Rail 381 Hardware 2 x 1 4 x 1 3 8 Wafer Lag 1 4 flat washer Other Parts 1 x EN71 Hand Rail WL3 381 1 Fig 47 1 Fig 47 2 A Frame Access Wall WL3 Fig 47 3 WL3 1 4 flat washer 381 EN71 Hand Rail 122 support cedarsummitplay com ...

Page 123: ...ch 390 A Frame Upright with 2 WL3 1 4 x 1 3 8 Wafer Lags with flat washer per Hand Grip Make sure the top of the Hand Grip sits above the bolt holes in both 390 A Frame Upright fig 48 1 and 48 2 1 4 flat washer Hand Grip 390 Hardware 4 x 1 4 x 1 3 8 Wafer Lag 1 4 flat washer Other Parts 2 x Hand Grip 381 380 2 Fig 48 1 Fig 48 2 WL3 Place above bolt hole 390 1 4 flat washer WL3 Hand Grip 123 suppor...

Page 124: ... Frame Upright Attach each board to each upright with 2 S4 8 x 3 Wood Screws per board fig 49 2 and 49 3 C Attach 490 Front Tunnel Support and 491 Back Tunnel Support to 092 Floor End with 1 S15 8 x 1 3 4 Wood Screw per board fig 49 2 Fig 49 2 490 Fig 49 1 Fig 49 3 S4 A Frame Main Fort Notice bolt hole location Flush and tight Flush 390 A Frame 390 Hardware 2 x 5 16 x 2 Hex Bolt 5 16 lock washer 5...

Page 125: ... and 491 Back Tunnel Support with 2 S4 8 x 3 Wood Screws per side using the pilot holes as a guide fig 49 4 and 49 5 Fig 49 4 Fig 49 5 S4 492 Pilot Holes Flush 490 Hardware 4 x 8 x 3 Wood Screw S4 Wood Parts 1 x Tunnel Joist FSC 2 x 4 x 18 7 16 492 Flush Main Fort A Frame S4 491 125 support cedarsummitplay com ...

Page 126: ...n the other until you hear the connector tabs click together and the bottom edges are flush You may have to knock panels on a hard surface to align properly fig 50 2 and 50 3 C Press nodules through the connector tab holes to hold Tunnel panels in place fig 50 3 D Repeat Steps A C to create a second Tunnel Side Step 50 Tunnel Assembly Part 1 Other Parts 4 x Tunnel Panels Bend Here Fig 50 1 Fig 50 ...

Page 127: ...p fig 50 5 50 6 and 50 7 G Turn assembly over and place 502 Tunnel Arch centred on top of 501 Tunnel Top then attach with 2 S4 8 x 3 Wood Screws fig 50 7 Step 50 Tunnel Assembly Part 2 Hardware 1 x 8 x 2 1 2 Wood Screw 16 x 8 x 1 Pan Screw 2 x 8 x 3 Wood Screw S3 Wood Parts 1 x Tunnel Top Cross FSC 5 4 x 3 x 16 1 2 1 x Tunnel Top FSC 2 x 4 x 31 23 32 1 x Tunnel Arch FSC 2 x 4 x 23 1 2 500 1 Fig 50...

Page 128: ... bottom of both 491 Back Tunnel Support and 490 Front Tunnel Support then attach 1 S10 8 x 1 Pan Screw to each support in the holes closest to the A Frame fig 51 3 C Maintaining the 2 measurement on each 491 Back Tunnel Support and 490 Front Tunnel Support install 5 more S10 8 x 1 Pan Screws in each support working from A Frame towards the main fort fig 51 3 Step 51 Attach Tunnel Assembly to Fort ...

Page 129: ... 51 5 E Attach top of Tunnel Asssembly to bottom of 460 Tunnel Left End with 4 S10 8 x 1 Pan Screws fig 51 5 F Attach remaining side of Tunnel Assembly to second 390 A Frame Upright with 4 S10 8 x 1 Pan Screws in the connector tab holes fig 51 5 Step 51 Attach Tunnel Assembly to Fort Part 2 x 4 per side S10 S10 390 Fig 51 4 Fig 51 5 x 4 129 support cedarsummitplay com ...

Page 130: ...de of 510 Tunnel Right End to 511 Tunnel Post in the bottom hole with 1 H8 1 4 x 4 1 4 Hex Bolt with lock washer flat washer and t nut fig 51 6 Step 51 Attach Tunnel Assembly to Fort Part 3 Notice bolt hole at top 501 Fig 51 6 511 490 510 160 Wood Parts 1 x Tunnel Right End FSC 5 4 x 6 x 23 11 16 1 x Tunnel Post FSC 2 x 4 x 31 1 4 510 1 1 2 511 1 x 5 16 x 2 Hex Bolt 5 16 lock washer 5 16 flat wash...

Page 131: ...nnel Post with 1 WB9 5 16 x 2 1 8 Wafer Bolt with flat washer and t nut fig 51 7 and 51 8 Step 51 Attach Tunnel Assembly to Fort Part 4 Notice bolt hole at top 511 Fig 51 7 511 512 160 Wood Parts 1 x Tunnel Rail FSC 5 4 x 4 x 23 11 16 512 1 x 5 16 x 2 Hex Bolt 5 16 lock washer 5 16 flat washer 1 x 5 16 x 2 1 8 Wafer Bolt 5 16 flat washer 5 16 t nut G8 G8 WB9 WB9 G8 5 16 Flat Washer 5 16 Lock Washe...

Page 132: ...51 9 M Attach top of Tunnel Assembly to bottom of 510 Tunnel Right End with 4 S10 8 x 1 Pan Screws fig 51 10 Step 51 Attach Tunnel Assembly to Fort Part 5 8 x 8 x 1 Pan Screw S10 Hardware Fig 51 9 Fig 51 10 511 510 511 510 Tunnel Assembly S10 S10 Tunnel Assembly 132 support cedarsummitplay com ...

Page 133: ...ost with 5 S7 12 x 2 Pan Screws fig 51 11 and 51 12 P Attach Tunnel Assembly to 513 Tunnel Corner Support with 4 S10 8 x 1 Pan Screws in the connector tab holes fig 51 11 and 51 12 Step 51 Attach Tunnel Assembly to Fort Part 6 2 x 8 x 3 Wood Screw 5 x 12 x 2 Pan Screw 4 x 8 x 1 Pan Screw S10 Hardware S4 510 x 2 S10 S4 Fig 51 12 Fig 51 11 S7 510 161 501 513 501 161 S7 Top View Wood Parts 1 x Tunnel...

Page 134: ...ure 513 Tunnel Corner Support and 161 Crowsnest Post to 153 Floor A with 1 Corner Brace per board using 3 S13 6 x 5 8 Pan Screws per brace fig 51 14 and 51 15 Step 51 Attach Tunnel Assembly to Fort Part 7 2 x 8 x 1 3 4 Wood Screw 1 x 12 x 2 Pan Screw 6 x 6 x 5 8 Pan Screw S13 Hardware 513 Fig 51 13 S13 Fig 51 14 Fig 51 15 S7 510 511 160 512 161 153 S7 Inside View S15 S15 2 x Corner Brace Other Par...

Page 135: ...an Screws fig 51 16 V Evenly space and flush to the top of 512 Tunnel Rail attach 2 more 514 Tunnel Spindles to 512 Tunnel Rail and 490 Front Tunnel Support with 4 S7 12 x 2 Pan Screws per spindle fig 51 16 Step 51 Attach Tunnel Assembly to Fort Part 8 12 x 12 x 2 Pan Screw Hardware Flush Fig 51 16 S7 S7 S7 094 490 512 Wood Parts 3 x Tunnel Spindle FSC 2 x 4 x 29 1 2 514 x 6 Flush Flush x 6 514 16...

Page 136: ...ack Tunnel Support with 6 S20 8 x 1 3 8 Wood Screws per floor board fig 52 1 B Attach floor boards to 094 Floor End on the Main Fort with 2 S20 8 x 1 3 8 Wood Screws per board fig 52 2 Step 52 Attach Tunnel Floor 391 Fig 52 1 Fig 52 2 Main Fort hidden 521 520 hidden x 2 per board 523 522 Hardware 32 x 8 x 1 3 8 Wood Screw Wood Parts 1 x A Frame Floor A FSC 1 x 6 x 79 1 32 1 x A Frame Floor B FSC 1...

Page 137: ...e washer while hammering stakes into the ground as this could cause the washer to break off B Attach ground stakes to each board using 1 S7 12 x 2 Pan Screw per ground stake as shown in fig 53 1 C After driving stakes into the ground check for sharp edges caused by the impact of the hammer Smooth any sharp edges from impact area and touch up with outdoor paint Step 53 Install A Frame Ground Stakes...

Page 138: ... bottom of the board C Attach 540 1 1 8 x 15 7 8 Dowels to both rails with 2 S4 8 x 3 Wood Screws per dowel fig 54 3 B Make sure shoulder of dowel is against each rail before pre drilling pilot holes Drill 1 8 pilot holes through the rails and into the dowels to prevent splitting fig 54 2 Fig 54 2 Wood Parts Hardware 8 x 8 x 3 Wood Screw 4 x Tennon Dowel 1 1 8 x 15 7 8 2 x MK Rail FSC 2 x 5 x 64 5...

Page 139: ...sher and t nut per triangle plate in the hole indicated in fig 54 4 54 5 and 54 6 Correct hole usage is very important E Attach 1 H8 1 4 x 4 1 4 Hex Bolt with lock washer flat washer and t nut to the ends of each 541 MK Rail The bolts do not attach to anything but MUST be installed to the beams to prevent splitting and checking of wood fig 54 4 54 5 54 6 Triangle Plate 5 16 Flat Washer 5 16 T Nut ...

Page 140: ...1 1 8 x 18 5 8 Dowels into 2 551 MK Posts as shown in fig 55 1 B Make sure shoulder of dowel is against each post before pre drilling pilot holes Drill 1 8 pilot holes through the posts and into the dowel to prevent splitting fig 55 2 and 55 3 Wood Parts Hardware 4 x 8 x 3 Wood Screw 2 x Tennon Dowel 1 1 8 x 18 5 8 2 x MK Post FSC 2 x 5 x 84 550 S4 551 551 551 550 550 551 Fig 55 1 Fig 55 3 Fig 55 ...

Page 141: ...and t nut keeping the bolts loose and to each 551 MK Post with 1 WL5 1 4 x 2 1 2 Wafer Lag with flat washer Once lag screws are installed tighten all bolts from Steps D E fig 55 4 and 55 5 2 x 5 16 x 5 Hex Bolt 5 16 lock washer 5 16 flat washer 5 16 t nut 2 x 5 16 x 2 1 8 Wafer Bolt 5 16 flat washer 5 16 t nut 2 x 1 4 x 2 1 2 Wafer Lag 1 4 flat washer Hardware Wood Parts 1 x MK Ground FSC 5 4 x 6 ...

Page 142: ...h flat washer and t nut in the bottom hole of Triangle Plate fig 56 1 and 56 2 Triangle Plate Hardware G9 Fig 56 2 Fig 56 1 5 16 Flat Washer 5 16 Lock Washer 5 16 T Nut 2 x 5 16 x 2 1 2 Hex Bolt 5 16 lock washer 5 16 flat washer 5 16 t nut 2 x 5 16 x 1 3 8 Wafer Bolt 5 16 flat washer 5 16 t nut G9 WB2 WB2 5 16 Flat Washer Monkey Ladder Assembly Monkey Rail Assembly Monkey Ladder Assembly Monkey Ra...

Page 143: ...nd 1 WL3 1 4 x 1 3 8 Wafer Lag with flat washer in the bottom hole per side as shown in fig 57 1 B Make sure all bolts in the Monkey Bar Assembly are tight Pre drill all pilot holes using a 1 8 drill bit before installing the Lag Screws Fig 57 1 5 16 Flat Washer 5 16 Lock Washer 5 16 T Nut Hardware Triangle Plate G5 G5 1 4 Flat Washer WL3 Monkey Bar Assembly Triangle Plate WL3 390 390 Warning Chec...

Page 144: ...ring stakes into the ground as this could cause the washer to break off B Attach ground stakes to each post using 1 S7 12 x 2 Pan Screw per ground stake as shown in fig 58 2 C After driving stakes into the ground check for sharp edges caused by the impact of the hammer Smooth any sharp edges from impact area and touch up with outdoor paint Step 58 Install Monkey Bar Assembly Ground Stakes 2 x 12 x...

Page 145: ...N ON YOUR PLAY EQUIPMENT This provides warnings concerning safety and important contact information A Tracking Number is provided to allow you to get critical information or order replacement parts for this specific model WARNING S13 ATTACH THIS WARNING I D PLAQUE TO THIS LOCATION ON YOUR PLAY EQUIPMENT This provides warnings concerning safety and important contact information A Tracking Number is...

Page 146: ...NOTES 146 support cedarsummitplay com ...

Page 147: ...NOTES 147 support cedarsummitplay com ...

Page 148: ...ellent Very Good Average Below Average Poor How would you rate our instructions Excellent Very Good Average Below Average Poor How would you rate the quality of packaging Excellent Very Good Average Below Average Poor Would you recommend the purchase of our products to friends and family Yes No Comments Cedar Summit would like to say Thank You for your time and feedback MM DD YY REVISION 12 01 09 ...

Reviews: