1 x
Board Access 1 x 4 x 22-1/8”
1 x
Access Rock Bottom 1 x 6 x 22-1/8”
5 x
Board Rock A 1 x 6 x 22-1/8”
5 x
Board Rock B 1 x 6 x 22-1/8”
Step 2: Access Ladder / Rockwall Assembly
Part 3
Fig. 2.7
Fig. 2.8
Wood Parts
Hardware
Other Parts
1 x EN71 Hand Rail
026
029
028
027
H:
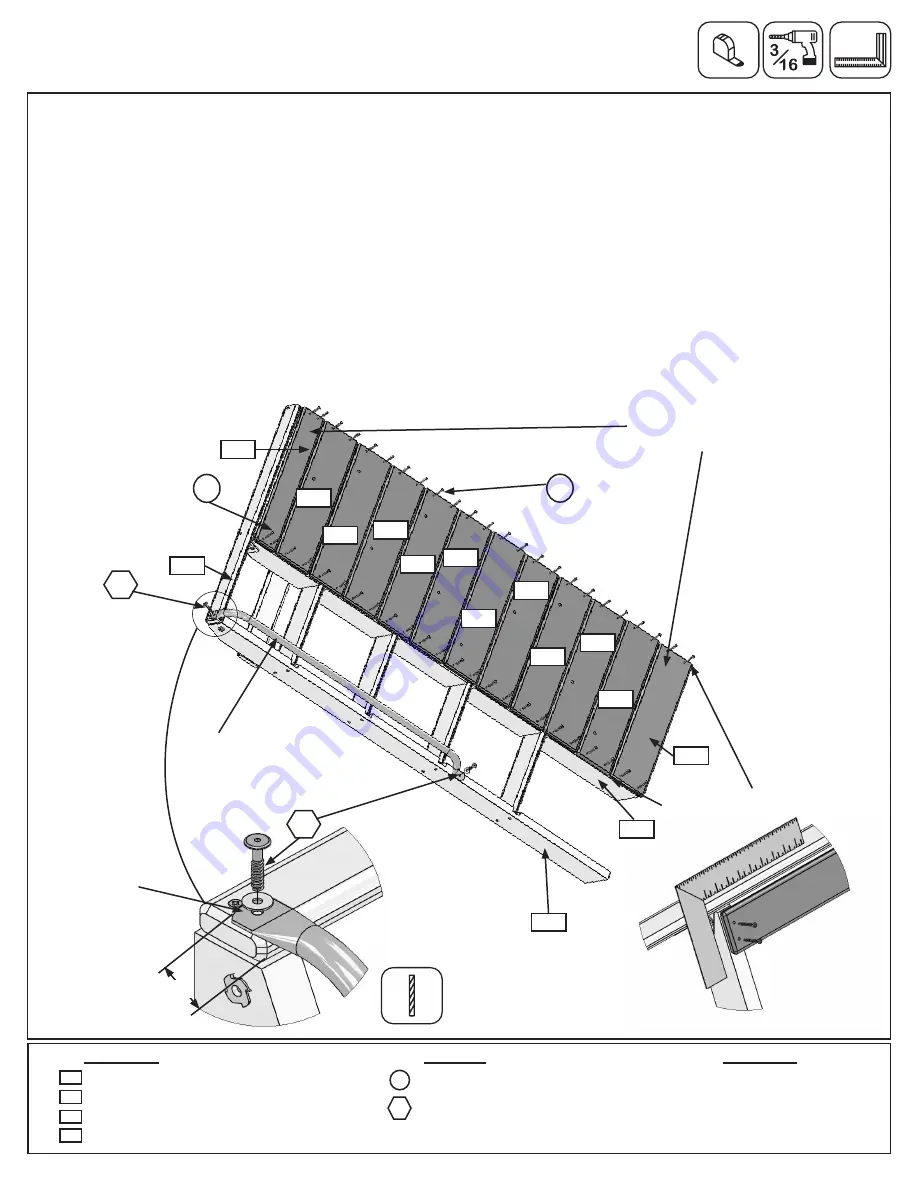
Place (026) Board Access at top of the assembly and (027) Access Rock Bottom at the bottom of the
assembly as shown in fig. 2.7. Then place (028) Board Rock A and (029) Board Rock B as shown in fig. 2.7. Do
not screw boards down yet. Rock holes are to be staggered so they do not form a straight line and are at the top
of the boards.
Note: Rock Boards are to be flush to (021) Right Access Rail and (024) Rock Rail. (fig. 2.7)
I:
Make sure all boards fit together snugly and the assembly is square, then attach (026) Board Access and (027)
Access Rock Bottom using 4 (S20) #8 x 1-3/8” Wood Screws per board. (fig. 2.7 and 2.8)
J:
Fasten all the other boards with 4 (S20) #8 x 1-3/8” Wood Screws per board. (fig. 2.7)
K:
Place EN71 Hand Rail 1” from front edge of (025) Top Ladder and on (020) Left Access Rail.
Pre-drill holes
using a 3/16” drill bit
then attach EN71 Hand Rail using 2 (WL3) 1/4 x 1-3/8” Wafer Lags (with flat washer). (fig.
2.7 and 2.9)
48 x
#8 x 1-3/8” Wood Screw
2 x
1/4 x 1-3/8” Wafer Lag
(1/4” flat washer)
WL3
S20
029
028
026
Fig. 2.9
Rock Boards are
flush to each rail
Install these 2
boards first to
get spacing
IMPORTANT!
Follow hole
pattern
025
WL3
WL3
028
028
028
028
029
029
029
029
S20
Pre-drill
3/16” Bit
x 24
x 24
1/4” Flat
Washer
020
EN71
Hand Rail
S20
027
021
1”
26
support@cedarsummitplay.com


