background image

Network

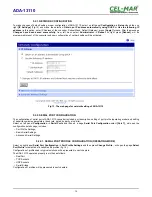
 – show statistics of ETHERNET interface for IP, TCP, UDP, ICM protocols.

5.2.6.6. REBOOT

Section

 Reboot

 allows making software reset of ADA-13110. Pressing [

Reboot

] will start rebooting of server during 1 min.

5.2.6.7. LOGOUT – ENDING MANAGEMENT AND CONFIGURATION

After completion of the configuration or administration should be pressing 

Logout

 on left panel – logout from WWW server of ADA-

13110 converter.

6. USING VIRTUAL PORT SERVICE [REALPORT] 

6.1. VIRTUAL PORT DRIVER INSTALLATION IN WINDOWS XP

The installation of virtual serial port drivers should be done for the CD, by choosing: 

Win Server-2003-2008-2012

Win-2000

Win-98-ME

Win-NT4.0SP5

Win-Vista

Win-XP-7-8

Installation of Virtual serial port drivers is as follows:

1. connect the ADA-13110 to ETHERNET network and to power supply (see p.3.2.1 - 3.2.2.),
2. press [

Start

] and select [

Run...

],

3. in the dialog window [

Run

] press [ 

Browse 

],

4.

select „

My computer

” and CD-Rom with „

ADANET_DRV

”,

5.

select catalog 

Drivers/Windows/Win-XP-7-8,

6.

select file „

Setup.exe

” for 32-bits system or „

Setup64.exe

” for 64-bits and press [

Open

],

7. when the installation window will appear press [

Next

],

8. will start the searching for the wireless serial servers in the network, founded devices will be added to the list.

9.

 select the wireless serial servers from the list for installation of virtual port driver and press [

Next

].

10.

 in window Describe the device select or not the Starting Com port and press [

Finish

]. The driver will be installed.

The Virtual Serial Port Drivers can be installed without connection of ADA-13110 to ETHERNET network and it is as follows:

1.

press [

Start

] button, select [

Run...

]

2. in the dialog window [

Run

] press [ 

Browse 

]

3. select „

My computer

” and CD-Rom with „

ADANET_DRV

”.

4. select catalog 

Drivers/Windows/Win-XP-7-8

.

5. select file „

Setup.exe

” for 32-bits system or „

Setup64.exe

” for 64-bits and press [

Open

].

6. when the installation window will appear press [

Next

] .

7. will start the searching for converters in the network.
8. if no devices were not found press [

Next

].

9. should be set in the window Describe the device:
– IP address for wireless serial server,
– number of installing COM port (No. Ports)
– Starting COM
and press [

Finish

]. The driver will be installed.

In this way installed virtual port can require the configuration in case of connecting the wireless serial server to network.

6.2. REALPORT CONFIGURATION IN WINDOWS XP

After installation of RealPort drivers, can be done the configuration by the use the Device Manager of Windows and it is as follows:
1. Press [ 

Start 

], select [ 

Properties/Setting 

], press [ 

Control Panel 

].

2. Double click icon [ 

Administrative Tools

] and [ 

Device Manager 

]

3. Press [

Ports (COM & LPT)

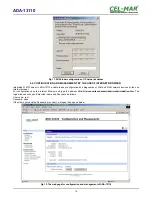
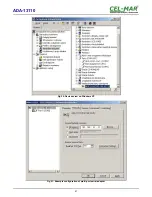
]. On fig. 20 are shown available serial ports COM1, COM2 and 

COM3 

marked as 

ADA-13110 

which

was created after installation of RealPort driver.
4. Then select [

Multi-port Serial Adapter

], there will be the name 

ADA-13110,

5. Double click the name and the window [

Properties

] will appear.

6. Select [

Advanced

] and press [

Properties

].

7. Enter  

new name of virtual port for wireless serial server

. In the window [

Advanced Properties

] click [

ADA-13110

] and then

select [

Properties

], press [

Rename Ports

], now it is possible to change the name of virtual port driver for example COM5, COM11

etc. To accept the changes press [

OK

].

8. 

Select IP address, MAC, DNS server for communication with virtual port driver

. In the window [

Advanced Properties

] click

[

ADA-13110

] and then select [

Network

] (Fig. 21), and set the 

IP address

MAC Address 

or 

DNS name

 of the wireless serial server

for communication with virtual port driver.
9. In the next window press [

OK

] to accept the changes.

20

ADA-13110

Summary of Contents for ADA-13110

Page 1: ...User manual ADA 13110 RS232 to ETHERNET converter 1 io_ada 13110_v 1 12_en ADA 13110 Copyright 2001 2017 CEL MAR sp j...

Page 2: ...RT PROFILE CONFIGURATION OPERATING MODE 12 5 2 2 1 1 REALPORT VIRTUAL PORT CONFIGURATION 13 5 2 2 1 2 TCP SOCKETS CONFIGURATION 13 5 2 2 1 2 1 TCP SERVER CLIENT CONFIGURATION 13 5 2 2 1 2 2 THE ENABLE...

Page 3: ...pply network is only after disconnecting the power supply circuit voltage Do not carry out the assembly or dis assembly of the device if it is enabled This may result to short circuit and damage the d...

Page 4: ...was provided from the power pack about 3W power Converter has implemented protection against opposite polarization of power supply and over voltage protection ESD 15kV on RS232 interface lines We pro...

Page 5: ...should be the upper part of the casing put hooks on the terminal and then press the bottom of the cover until you hear a characteristic Click sound 3 2 ETHERNET NETWORK CONNECTION The ADA 13110 has to...

Page 6: ...ernet connection will be describe in chapters below 3 2 1 CONNECTING TO NETWORK ADAPTER OF PC If there is not the switch or the HUB it is possible to connect the ADA 13110 directly to a network adapte...

Page 7: ...hub to operating in the Real Port mode 7 ADA 13110 ETHERNET Straight Cable Table 1 Local network ETHERNET built on the switch Device with RS232 interface RS232 PC with a network adapter Static IP addr...

Page 8: ...LAN connection to operating in the TCP UDP serial bridge mode one to one 8 ADA 13110 INTERNET ROUTER Public IP address RS232 ROUTER Public IP address ETHERNET Straight Cable Table 1 Device with RS232...

Page 9: ...built on the switch SLAVE device with RS232 interface ADA 13110 Static IP address ETHERNET Straight Cable Table 1 ADA 13110 Static IP address ADA 13110 Static IP address ETHERNET Straight Cable Table...

Page 10: ...se LEDs are respectively LED Description RS232 interface Power PWR Signalization of power supply RX Signalization of data receiving by ADA 13110 converter from RS232 TX Signalization of data transmiss...

Page 11: ...the list Devices and press Configure IP Settings in windows Set IP Address select option Automatically obtain network settings via DHCP default setting or Manually configure network setting In case of...

Page 12: ...network devices by the use Internet browser For configuration open the Internet Browser and type the address http ip converter address admin administration htm The login windows will open Enter User...

Page 13: ...l port of ADA 13110 converter includes port description setting of port profile operating mode and setting of serial transmission parameters baud rate data bits parity stop bits Select on left panel C...

Page 14: ...sage 5 2 2 1 2 TCP SOCKETS CONFIGURATION Choosing TCP Sockets is configured the serial port of ADA 13110 for direct communication with PC or other network device by the use of TCP socked Data sending...

Page 15: ...rt service is 2101 If on the local network is conflict with other network service using the same port in the converter s port configuration change number of port into another for the server and client...

Page 16: ...en section UDP Server Settings with operating parameters like on picture below Set access to UDP server on e g 2101 port Then select Automatically send serial data in section UDP Client Settings this...

Page 17: ...In field Description enter e g location of the converter and MASTER device Send To enter IP address of converter connected to MASTER device UDP Port enter the number of port on which is working UDP S...

Page 18: ...rt service is 2101 If on the local network is conflict with other network service using the same port in the converter s port configuration change number of port into another for the server and client...

Page 19: ...are to sections Serial Ports Connections 5 2 5 1 SERIAL PORTS MANAGEMENT Section Serial Ports allows to identification connections disconnection to the serial port of the converter through the network...

Page 20: ...m with ADANET_DRV 4 select catalog Drivers Windows Win XP 7 8 5 select file Setup exe for 32 bits system or Setup64 exe for 64 bits and press Open 6 when the installation window will appear press Next...

Page 21: ...Fig 20 Devices view on Windows XP Fig 21 Example configuration of multi port serial adapter 21 ADA 13110...

Page 22: ...loaded to the converter from the backup I changed the configuration and the converter isn t functioning 1 Enter in the Internet browser http converter ip address 2 Select the menu Factory Default Sett...

Page 23: ...port DSR red LED incoming signal on RS232 port DCD red LED incoming signal on RS232 port Electrical Parameters Power requirements 10 24 30 V DC Power Cable Recommended length up to 3m Power 3W Protect...

Page 24: ...mission converters with interface RS232 RS485 RS422 USB Current Loop Fibre Optic Converters and Ethernet or Wi Fi Please contact us to tell how you like our products and how we can satisfy you present...

Reviews: