4.3. POWER SUPPLY
The converter is powered from USB port of PC. After connection to USB port, will start driver installation and after that, the green LED
PWR should be lit. If doesn't check:
- the computer is running,
- the connection of converter cable to the computer,
- hibernation mode of computer,
- the correctness of driver installation.
5. DRIVERS INSTALLATION IN SYSTEM WINDOWS
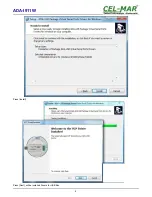
ADA-I911W is delivered with the driver package Installer for Windows systems on CD-ROM.
For installation follow the steps below:
a/ insert the CD-ROM to optical driver of the computer,
b/ the installation wizard will run automatically, if not double click
ADAUSBDRV.exe
.
c/ follow the steps of installation wizard, will be installed the Drivers and Uninstaller for the Windows systems 98, ME, 2000, XP,
2003, Vista, Win7, 2008, Win8,
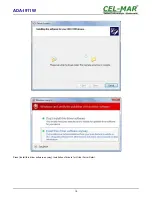
d/ connect the convert to USB port of computer and follow the steps of installation wizard.
5.1. EXAMPLE DRIVER INSTALLATION IN WINDOWS 7 SYSTEM
ADA-I911W is delivered with the drivers for Windows system 98/ME/2000/XP/Vista/7/2008 Win8
Driver installation have to be done from the account with Administrator permissions. For the drivers installation in Win7 follow the
steps bellow:
a/ insert the CD-ROM to optical driver of computer,
b/ the installation wizard will run automatically, if not double click
ADAUSBDRV.exe
form the CD-ROM.
After running the installer, the wizard installation window will appear.
6
ADA-I911W
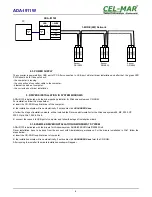
Sensor
DS18B20
Sensor
DS18B20
Sensor
DS18B20
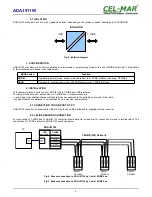
1-WIRE (2W) Network
1-WIRE
connector
USB
connector
ADA-I911W
VDD
GND
1-W
USB
B
PC
USB
A

