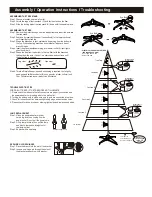
ASSEMBLING THE TREE
Step 1. Remove the protective caps from the tree bottom and insert the pole into
the tree stand.
Step 2. Continue by inserting the upper tree section(s) to the lower section(s)
until inserting the tree top.
Step 3. Shape the branches to your preference by working from the bottom to
the top. When adjusting branches, ensure that all wires are free of
branch hinges.
Step 4. Insert the green label adapter plug into the wall outlet. All your lights
should now be lit.
Step 5. Shape the tree from the bottom to the top. Start with the branches
farthest from the pole – fan out in a star shape, and continue until
the entire tree is shaped.
Step 6. This is a Simple Shape
®
tree and no shaping is required. Just slightly
upsweep and shift branches to fill in any gaps for a fuller, uniform look.
Your Christmas tree is now ready to be decorated.
Assembly / Operation Instructions / Troubleshooting
ASSEMBLING THE TREE STAND
Step 1. Choose a location near a wall outlet.
Step 2. Unfold the legs of the tree stand (G) and lay the stand on the floor.
Step 3. Slide the locking disk of the tree stand (G) down until it snaps into place.
Top view
Side view
*ELECTRICAL RATING FOR THE TREE
(FOR INDOOR USE ONLY)
Input: 120V, 60Hz, 0.45A
Output: 29V 0.9A
Section 3
Section 1
Section 2
Section 4
Section 5
Tree Top
100S
50S
100S
100S
50S
100S
100S
50S
100S
100S
100S
100S
100S
50S
100S
100S
100S
Adapter
to be plugged
into wall
outlet
Do Not Tamper
Internal Parts
Open the
protective
cap
REPAIRING LOOSE HINGES
Step 1. Place the branch into the slot of the bracket.
Step 2. Insert a new hinge pin through the holes of
the bracket and secure with a washer.
LAMP REPLACEMENT
Step 1. Grasp the power adapter or power
cord plug, and then unplug from the
power outlet. Do not pull the power cord.
Step 2. Lift up lamp lock tab, then pull the lamp
and plastic lamp base straight out of
the lamp-holder.
Step 3. Replace with a new lamp.
TROUBLESHOOTING TIPS
FOR PRE-LIT TREES, IF THE TREE DOES NOT ILLUMINATE
1. Please check to make sure that all connectors are properly connected and
the power adapter cord is plugged into the wall outlet.
2. Turning the poles gently to make sure pole to pole are connected into place.
3. Check for loose connection between light string plugs and extension cords.
4. Please check for loose, broken or missing light bulbs and replace as needed.
Reference figure only
Eye Bolt
Click
Eye Bolt
Do Not Tamper
Internal Parts
Open the
protective
cap
Do Not Tamper
Internal Parts
Open the
protective
cap
Insert Green
Label Extension
Cord into Adapter


