>>
www
.celestron
.com
5
Adjusting the Tripod Height
The tripod that comes with your CPC telescope is adjustable. To adjust
the height at which the tripod stands:
1. Loosen the extension clamp on one of the tripod legs (see figure 3-1).
2 . Extend the leg to the desired height .
3 . Tighten the extension clamp to hold the leg in place .
4 . Repeat this process for each of the remaining legs making sure that
the tripod is level when complete .
You can do this while the tripod legs are still folded together .
Remember that the higher the tripod legs are extended, the less stable
it is. For casual observing, this may not pose a problem. However, if
you plan on doing photography, the tripod should be set low to ensure
stability . A recommended height is to set the tripod in such a manner
that you can look directly into the eyepiece on the telescope with a
diagonal while seated .
Attaching the CPC to the Tripod
Mounting the Telescope
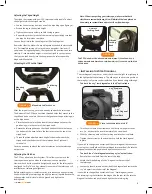
FIGURE 3-2
Positioning
Pin
Mounting
Bolts
After the tripod is set up, you are now ready to attach the telescope .
The bottom of the CPC base has three threaded holes that mount to the
tripod head and one hole in the center that goes over the positioning pin
on the tripod head .
1 . Place the center hole in the bottom of the telescope base over the
positioning pin in the center of the tripod head .
2 . Rotate the telescope base on the tripod head until the three feet on
the bottom of the base fall into the feet recesses on the top of the
tripod head .
3 . Thread the three attached mounting bolts from underneath the
tripod head into the bottom of the telescope base . Tighten all
three bolts .
You are now ready to attach the visual accessories onto the telescope
optical tube .
Adjusting the Clutches
The CPC has a dual axis clutch system . This allows you to move the
telescope manually even when the telescope is not powered on .
However, both clutches need to be tightened down for the telescope to
be aligned for “GoTo” use . Any manual movement of the telescope will
invalidate your telescope’s alignment .
Before attaching your visual accessories, first loosen the altitude locking
knob while holding the telescope tube by the rear cell handle . Rotate the
tube upwards until it is level with the ground and tighten the
locking knob .
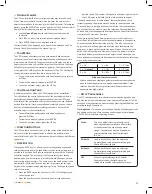
Note: When transporting your telescope, make sure that both
clutches are somewhat loose; this will diminish the load placed on
the worm gear assemblies and protect them from damage.
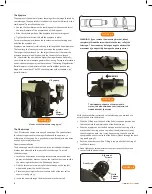
The CPC has an altitude locking knob (right) located on the
fork arm and an azimuth locking knob (left) located on the top
of the base.
FIGURE 3-3
Azimuth
Locking Knob
Altitude
Locking
Knob
>>
Installing the Star Diagonal
The star diagonal is a prism or mirror that diverts the light at a right angle
to the light path of the telescope . This allows you to observe in positions
that are physically more comfortable than if you looked straight through .
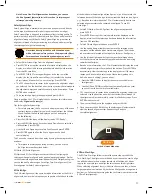
To attach the 1.25” star diagonal onto the 8” optical tube:
1.25” Eyepiece
1.25”
Star Diagonal
Visual Back
Visual accessories for the 8”
FIGURE 3-4
1 . Turn the set screw on the visual back until its tip no longer extends
into (i .e ., obstructs) the inner diameter of the visual back .
2 . Slide the chrome portion of the star diagonal into the visual back .
3 . Tighten the set screw on the visual back to hold the star diagonal
in place .
If you wish to change the orientation of the star diagonal, loosen the set
screw on the visual back until the star diagonal rotates freely . Rotate the
diagonal to the desired position and tighten the set screw .
To attach the 2” star diagonal onto the 9.25/11” optical tubes:
1 . Remove the visual back from the rear of the tube .
2 . Attach the threaded ring of the 2” diagonal to the rear cell of
the telescope .
3 . Loosen the thumb screws on the side of the diagonal and remove the
1 .25” adapter from the barrel of the diagonal .
If you wish to change the orientation of the 2” star diagonal, loosen
the retaining ring that attaches the diagonal to the rear cell . Rotate the
diagonal to the desired position and tighten the retaining ring .
Summary of Contents for 11007
Page 1: ...InstructionManual 11007 11008 11009...
Page 2: ...www celestron com...
Page 40: ...38 www celestron com APPENDIXD MAPSOFTIMEZONES...
Page 41: ...www celestron com 39...
Page 42: ...40 www celestron com APPENDIXE SKYMAPS...
Page 43: ...www celestron com 41...
Page 44: ...42 www celestron com...
Page 45: ...www celestron com 43...
Page 46: ...44 www celestron com...
Page 47: ...www celestron com 45...


