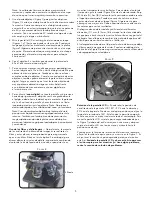
background image

You can take snapshots or a short video with your microscope 

with the built-in digital camera. With the internal storage memory, 

you do not need to use a PC or any other devices to do imaging. 
Transferring of images to your PC for saving and or printing them 
is easy and will be discussed later in this manual.

Note: If you are going to take images, do not connect 
the USB cable to your PC or damage could occur to the 
equipment. The USB cable is not used at all for  
taking images.

Settings and Information for the Digital Camera and the Touch 
Screen — 

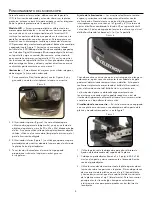
The touch screen icons and their functions are quite 

easy to use and intuitive in nature. Below will be discussed the 
general use of the icons. Typically you use your fingers with the 
touch screen, but you can use the included touch pen as well.

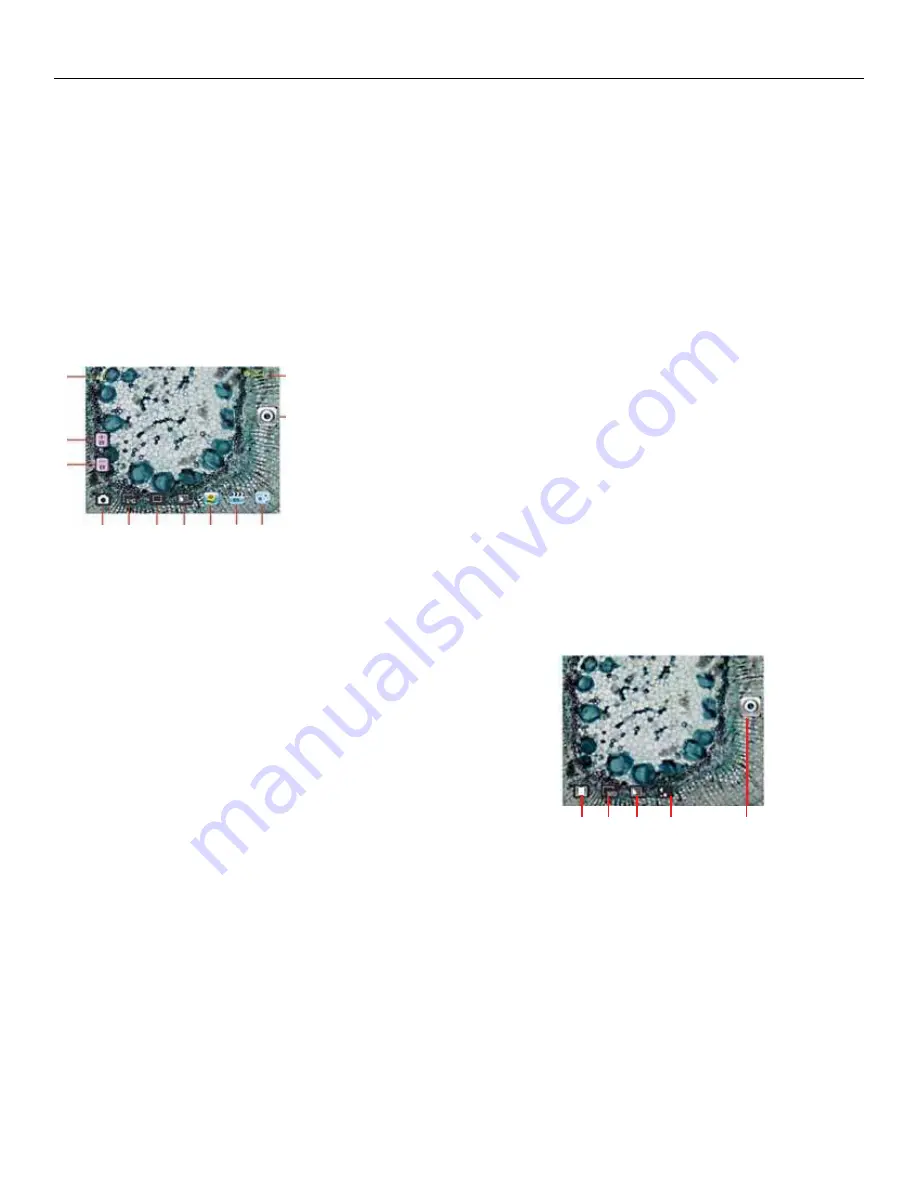
The touch screen has 
various functions and 
choices among those 

functions. From the 

image to the left you 
will find the following 
twelve icons:

Note: After turning the LCD Monitor off, most settings will 
revert to the default settings.

Settings icon (10)


Language — choose from Chinese (simple or traditional), English, 
French, German, Italian, Japanese, Korean, Portuguese, Russian, 

and Spanish

Time for Auto Play Review — 1 second to 6 seconds
Memory — internal memory or SD Card
Time & Date — year, month, and date
Calibration — touch screen sensitivity (use touch pen) — point at 

the four corners and center crosses

Brightness — of touch screen
Auto Shutdown of Power — never to 5 minutes
Beep — beeps with each touch of the screen or you can turn it off
Default Factory Settings — change all back to factory settings

Pixel setting icon (5) 

Lightly tap the icon to change the pixel setting from 320 
(320x640), 640 (640x480), 1280 (1280x1024), 1600 (1600x1200), 
2048 (2048x1536), and 2560 (2560x 2048). 1600 is the sensor 
resolution and 2048 and 2560 give you higher resolution 


through interpolation. 

Snapshot selection (6)

Normal is single shot but you can set for timed or a burst of 


three shots.

Color effect (7)

Lightly tap the icon to change from black & white, sepia, 

negative, transparent, and normal (x).

Viewing / Snapshot mode (12)

When viewing specimens, you will see this icon on the right of 
the screen. After you have made the various settings above and 

you want to take snapshot images, you just lightly press the icon 
to take an image (or use the touch pen).

Image review (8)

In this mode, you can review the snapshot images you have 

taken. Just touch the arrows and touch the screen to navigate 

and to see full screen images, etc.

Video mode (4)

You can take videos in this mode.
To take videos, you need to make the settings first. In the image 
to the left, you will see the following icons on the screen after you 

press the Video icon. The icons on this image (Figure 11) do 


the following:

1.  Touch to go back to the viewing mode

2.  Set the pixel size to 160 or 320 (320 being a higher resolution for 

videos) by touching the screen. In 320 resolution it is 30 fps

3.  Set the color desired — black & white, sepia, negative, or normal by 

touching the screen

4.  Video quality setting — low, medium, or high quality by touching 


the screen

5.  Record Video — touch to begin video and touch again to stop 


the video

Video review (9)

In this mode you can review the videos you have taken. Just 
touch the arrows and touch/scroll the screen to navigate and view 

your videos and delete them if you choose.

EV Function (2, 3)

Adjustment for exposure value, which increases/decreases the 

brightness level.

Using an SD Card

You can take images (snapshot or video) by using an SD (Secure 

Digital) Card (Up to 16GB with SDHC of most brands). Your SD 
card is inserted in the LCD Monitor (Figure 1).
When you insert the SD card properly, the SD card icon will be 
visible in the Image Review mode or in the Set-Up mode for 
memory. When imaging this way the images are saved on the SD 

card and not in the internal storage memory.

6

1

2

3

4

5

6

7

8

9 10

11

12

F

IGURE

 10

D

IGITAL

 I

MAGING

  1.  Digital Zoom Indicator

  2.  Increase EV Function
  3.  Decrease EV Function 
  4.  Video Mode

  5.  Pixel Setting
  6.  Snapshot selection

  7.  Color effect

  8.  Image review

  9.  Video review

  10. Settings

  11.  EV Value
  12.  Viewing/Snapshot Mode

1

2

3

4

5

F

IGURE

 11

Summary of Contents for 44345

Page 1: ...INSTRUCTION MANUAL MODEL 44345 LCD DELUXE DIGITAL MICROSCOPE ENGLISH ...

Page 2: ...itional microscopes You will view specimens or objects on the LCD screen which are easy to see and you can also enjoy them with others In addition you can take snapshots or short videos with the built in digital camera The final sections of this manual provide simple care maintenance and troubleshooting tips for you to follow to ensure that your microscope provides you with years of quality perfor...

Page 3: ...FICATION POWER TABLE Use the following table to determine the magnification of the different objective lenses in combination with your microscope using the normal mode of the digital image on the LCD screen and using the digital zoom feature SPECIFICATIONS Stage Mechanical Stage 3 5 x 3 5 88 mm x 88 mm Digital Camera 2 MP CMOS 10x Magniication in lieu of an Eyepiece 1600x 1200 pixel array Up to 5M...

Page 4: ...e the light shines up through the hole in the stage through the slide 4 Having both illuminators on at the same time can provide enough light for thick and irregular specimens Adjusting the Lighting Specimens of different size thickness and color variations will require different levels of illumination Normally you adjust the brightness by turning the switches shown in Figure 5 6 Another way to ad...

Page 5: ...se to the objective lens so that the objective does not hit the slide specimen or other object and cause damage Using Filters the Diaphragm Normally most viewing or imaging will be done without colored filters and before using the microscope check to make sure no filters are in the optical path However to bring out different levels of detail experiment with changing the color of the back lighting ...

Page 6: ...ect 7 Lightly tap the icon to change from black white sepia negative transparent and normal x Viewing Snapshot mode 12 When viewing specimens you will see this icon on the right of the screen After you have made the various settings above and you want to take snapshot images you just lightly press the icon to take an image or use the touch pen Image review 8 In this mode you can review the snapsho...

Page 7: ...ur microscope carry it by the arm with one hand and not by the focuser knob LCD monitor etc Then put your other hand under the base for support Clean the outside surfaces metal and plastics with a moist cloth Always unplug any cords before cleaning Never clean optical surfaces with cloth or paper towels as they can scratch optical surfaces easily Blow off dust with a camel s hair brush or an air b...

Page 8: ...ed and intended for those 13 years of age and older www celestron com EEC This product complies with EEC guidelines in EN61558 2 6 1997 and EN61558 1 1997 A1 FCC Statement This device complies with Part 15 of FCC Rules Operation is subject to the following two conditions 1 This device may not cause harmful interference and 2 This device must accept any interference received including interference ...

Page 9: ...GUIDE DE L UTILISATEUR MODÈLE N 44345 MICROSCOPE NUMÉRIQUE LCD DE LUXE FRANÇAIS ...

Page 10: ...e fonctionne avec aucun des oculaires habituellement utilisés sur les microscopes traditionnels Vous afficherez des échantillons ou des objets sur l écran LCD afin de les observer sans difficulté et tout en en faisant profiter d autres personnes Vous pourrez également prendre des clichés ou réaliser de courtes vidéos grâce à l appareil photo intégré Les dernières parties de ce manuel offrent des c...

Page 11: ...ES GROSSISSEMENTS PUISSANCE Utilisez le tableau ci dessous pour déterminer le grossissement des différents objectifs en combinaison avec votre microscope en utilisant le mode normal de l image numérique sur l écran LCD et à l aide de la fonction zoom numérique SPECIFICATIONS Platine Platine mécanique 88 mm x 88 mm 3 5 po x 3 5 po Appareil photo 2MP po CMOS grossissement 10x à la place numérique d ...

Page 12: ...re par dessous à travers l orifice de la platine 4 L utilisation simultanée des deux illuminateurs peut permettre d éclairer des échantillons épais et irréguliers Réglage de l éclairage L éclairage des échantillons doit être adapté à leur taille leur épaisseur et leurs variations de couleur Normalement vous pouvez ajuster la luminosité en tournant les interrupteurs illustrés en Figures 5 et 6 ou e...

Page 13: ...ctif ne vienne pas heurter la lame porte objets ou tout autre objet et endommager le matériel Utilisation de filtres et du diaphragme En règle générale l observation ou l imagerie se font sans filtres colorés Avant d utiliser le microscope vérifiez qu aucun filtre ne se trouve sur la trajectoire optique Toutefois pour faire ressortir certains détails expérimentez en changeant la couleur de l éclai...

Page 14: ...t 2560 2560x 2048 1600 correspond à la résolution du capteur et 2048 et 2560 vous donne la plus haute résolution par interpolation Sélection des clichés 6 Normal correspond à un seul cliché mais vous pouvez régler l appareil en mode timed temporisé ou sur une rafale de trois clichés Effet couleur 7 Efleurez l icône pour passer du noir et blanc sur sépia négatif transparent et normal x Mode afficha...

Page 15: ...tion avant le nettoyage Ne nettoyez jamais les surfaces optiques avec des chiffons ou serviettes en papier qui pourraient les rayer facilement Éliminez la poussière des surfaces optiques avec une brosse en poils de chameau ou une buse de pulvérisation Pour éliminer les empreintes des surfaces optiques utilisez un agent nettoyant pour objectifs et un chiffon spécial disponibles dans la plupart des ...

Page 16: ...6 1997 et EN61558 1 1997 A1 de la CEE Déclaration FCC Ce dispositif est conforme à la partie 15 de la réglementation de la Commission Fédérale sur les Communications Son fonctionnement est sujet aux deux conditions suivantes 1 Ce dispositif ne doit pas provoquer d interférences dangereuses et 2 Ce dispositif doit accepter toute interférence reçue y compris les interférences pouvant provoquer un fo...

Page 17: ...MANUAL DE INSTRUCCIONES MODELO Nº 44345 MICROSCOPIO DIGITAL DE LUJO CON PANTALLA LCD ESPAÑOL ...

Page 18: ...o los objetos en la pantalla de cristal líquido LCD lo que hace mas fácil la observación además puede observar las imágenes con otras personas También puede tomar fotos o vídeos cortos con la cámara digital incorporada En las secciones finales de este manual le ofrecemos sencillos consejos para el mantenimiento cuidado y solución de problemas y que debe seguir para garantizar que su microscopio pu...

Page 19: ...res horas INSTALACIÓN DEL MICROSCOPIO TABLA DE AUMENTO POTENCIA Utilice la siguiente tabla para determinar el poder de aumento de los diferentes objetivos en combinación con su microscopio usando el modo normal de la imagen digital en la pantalla LCD y el zoom digital ESPECIFICACIONES Platina Platina mecánica 88 mm x 88 mm 3 5 x 3 5 pulg Cámara digital 2MP pulg CMOS lupa de 10x en lugar de un ocul...

Page 20: ...de la luz pasa por el orificio de la platina hasta el portaobjetos 4 Tener los dos iluminadores al mismo tiempo puede proporcionar suficiente luz para muestras gruesas e irregulares Ajuste de la iluminación Las muestras de diferente tamaño espesor y variaciones de color requerirán diferentes niveles de iluminación Normalmente se ajusta el brillo girando los interruptores que se muestran en la Figu...

Page 21: ...tivo no golpee el portaobjetos u otro objeto y cause daños Uso de los filtros y el diafragma Normalmente la mayoría de la visualización u obtención de imágenes se realizará sin filtros y antes de usar la comprobación para asegurarse de que no se utilizan iltros en la ruta óptica Sin embargo para ofrecer diferentes niveles de detalle experimente cambiando el color de la luz de fondo de la muestra e...

Page 22: ... de tres Efecto de color 7 Golpee suavemente el icono para cambiar de negro y blanco sepia negativo transparente y normal x Modo de fotos vista 12 Cuando observe muestras verá este icono en la parte derecha de la pantalla Después de ajustar los valores de configuración arriba indicados si desea obtener imágenes fotográficas simplemente golpee ligeramente el icono para obtener una imagen o use el l...

Page 23: ...por el brazo con una mano y no por el mando del visor el monitor LCD etc Después ponga la otra mano debajo de la base como apoyo Limpie las supericies externas metálicas y de plástico con un paño húmedo Desenchufe siempre todos los cables antes de limpiar el microscopio Nunca limpie las supericies ópticas con un paño ni con toallitas de papel ya que pueden rayar fácilmente las superficies ópticas ...

Page 24: ...s en adelante www celestron com CEE este producto cumple con la normativa EN61558 2 6 1997 y EN61558 1 1997 A1 de la CEE Declaración FCC Este dispositivo cumple con la parte 15 de la normativa FCC Su funcionamiento está sujeto a las siguientes dos condiciones 1 Este dispositivo no puede causar interferencias perjudiciales y 2 Este dispositivo debe aceptar todas las interferencias recibidas incluye...

Page 25: ...IBEDIENUNGSANLEITUNG MODELL 44345 DELUXE LCD DIGITALMIKROSKOP DEUTSCH ...

Page 26: ...rwendet nicht die in herkömmlichen Mikroskopen verwendeten Okulare Die Proben oder Objekte werden auf dem LCD Bildschirm betrachtet wo sie leicht zu sehen sind und auch gemeinsam mit anderen Personen betrachtet werden können Sie können außerdem Schnappschüsse oder kurze Videos mit der integrierten Digitalkamera aufnehmen Die abschließenden Abschnitte enthalten einfache Tipps zur Pflege Wartung und...

Page 27: ...U DES MIKROSKOPS TECHNISCHE DATEN Objekttisch Mechanical Stage 3 5 x 3 5 88 mm x 88 mm Digitalkamera 2 MP Zoll CMOS 10x Vergrößerung anstelle von Okular 1600x 1200 Pixel Array Bis zu 5 MP mit Interpolation LCD Monitor 3 5 Zoll 90 mm mit 4x Digital Zoom Hochdefinitions HD TFT Digitalanzeige Touchscreen Aulösung 320 x 240 Pixel Kontrastverhältnis 300 Farbe Unterstützung 262 K Farben Helligkeit Leuch...

Page 28: ... verwendet Das Licht leuchtet durch die Öffnung im Objekttisch durch den Objektträger 4 Wenn beide Beleuchtungen gleichzeitig eingeschaltet sind ist das Licht ausreichend für dicke und unregelmäßige Proben Einstellung der Beleuchtung Proben von unterschiedlicher Größe Dicke und Farbvariation erfordern unterschiedliche Beleuchtungsstufen Normalerweise wird die Helligkeit eingestellt in dem die in A...

Page 29: ...eren Vergrößerungsleistungen müssen Sie beim Anheben des Objekttischs vorsichtig sein damit das Objektiv nicht auf den Objektträger oder ein anderes Objekt trifft und Beschädigungen verursacht Verwendung von Filtern und Diaphragma Blende Normalerweise erfolgt der Großteil der Anzeige oder Bildgebung ohne Farbfilter und vor der Verwendung des Mikroskops muss überprüft werden dass sich keine Filter ...

Page 30: ...ensoraulösung und 2048 und 2560 liefern durch Interpolation eine höhere Auflösung Schnappschusswahl 6 Die Normaleinstellung ist Einzelaufnahme jedoch kann auch eine zeitgesteuerte Aufnahme oder Serien von drei Aufnahmen gewählt werden Farbeffekt 7 Tippen Sie leicht auf das Symbol um die Farbe von schwarz weiß Sepiaton Negativ Transparent und Normal x zu ändern Betrachtung Schnappschussmodus 12 Bei...

Page 31: ...tall und Kunststoff mit einem feuchten Tuch Vor Reinigungsarbeiten immer erst alle Kabel abziehen Niemals optische Oberlächen mit Stoff oder Papiertüchern reinigen da sie optische Oberflächen leicht zerkratzen können Staub mit einem Kamelhaarpinsel oder einem Luftgebläse von den optischen Oberflächen abpusten Zur Entfernung von Fingerabdrücken von optischen Oberflächen verwenden Sie ein Objektivre...

Page 32: ...ukt entspricht den EWG Richtlinien in EN61558 2 6 1997 und EN61558 1 1997 A1 FCC Erklärung Dieses Gerät entspricht Teil 15 der FCC Bestimmungen Der Betrieb unterliegt den folgenden zwei Bedingungen 1 Das Gerät darf keine schädlichen Störungen verursachen und 2 Dieses Gerät muss alle empfangenen Störungen annehmen einschließlich Störungen die einen unerwünschten Betrieb verursachen IHR MIKROSKOP HA...

Page 33: ...ITALIANO MANUALE DI ISTRUZIONI MODELLO N 44345 MICROSCOPIO DIGITALE DI LUSSO CON LCD ...

Page 34: ...altre persone Inoltre con la fotocamera telecamera digitale incorporata si posono anche scattare fotografie o riprendere brevi filmati La sezione finale del presente manuale fornisce semplici consigli per la cura la manutenzione e l individuazione e soluzione dei problemi dello strumento basterà seguirli per garantire anni di uso divertimento e prestazioni di alta qualità Accessori standard inclus...

Page 35: ...re la seguente tabella per determinare l ingrandimento delle diverse lenti dell obiettivo nella modalità normale dell immagine digitale sullo schermo LCD e con la funzione di zoom digitale del microscopio DATI TECNICI Portaoggetti Portaoggetti meccanico 88 mm x 88 mm 3 5 pollici x 3 5 pollici Fotocamera CMOS pollice da 2 MP ingrandimento 10x senza oculare 1600x telecamera matrice di 1200 pixel Sin...

Page 36: ...i vetrini di preparato e illumina dal basso attraverso il foro nel portaoggetti e il vetrino 4 Per ottenere luce sufficiente e illuminare preparati spessi e irregolari si possono usare insieme entrambi gli illuminatori Regolazione dell illuminazione Preparati di dimensioni spessore e variazioni di colore differenti richiedono diversi livelli di illuminazione Normalmente si regola la luminosità gir...

Page 37: ...otazione Alle potenze superiori fare attenzione quando si solleva il portaoggetti vicino alla lente dell obiettivo per evitare che l obiettivo urti il preparato del vetrino o altri oggetti e provochi danni Uso dei filtri e del diaframma Per lo più la visualizzazione o l acquisizione di immagini verranno effettuate senza iltri colorati prima di usare il microscopio verificare che non vi siano filtr...

Page 38: ...catto scatti rapide multipli o tre scatti Effetto colore 7 Toccare l icona per cambiare il colore da bianco e nero a color seppia negativa trasparenza e normale 9x Modalità visualizzazione istantanea 12 Questa icona appare sulla destra dello schermo quando si esaminano i preparati Dopo avere eseguito le varie impostazioni descritte sopra toccare l icona se si desidera scattare immagini istantanee ...

Page 39: ... schermo LCD o altre sue componenti Quindi mettere l altra mano sotto la base per sostenerlo Pulire le superici esterne in metallo e plastica con un panno umido Scollegare sempre tutti i cavi prima di eseguire la pulizia Non pulire mai le superici ottiche con salviette di tessuto o di carta in quanto possono graffiarle facilmente Rimuovere la polvere dalle superici ottiche con una spazzolina di se...

Page 40: ...o 13 anni di età www celestron com CEE questo prodotto risulta conforme alle linee guida CEE riportate in EN61558 2 6 1997 e EN61558 1 1997 A1 Dichiarazione FCC Questo dispositivo risulta conforme alla Parte 15 delle norme FCC Il funzionamento è soggetto alle seguenti due condizioni 1 Questo dispositivo non può causare interferenze dannose e 2 Questo dispositivo deve accettare qualsiasi interferen...

Reviews: