background image

Focusing Tips

To achieve best focus, concentrate on a high contrast feature of the object you are imaging. Focusing 

on small features such as a moon’s shadow on Jupiter or Cassini’s division in the ring of Saturn will 

guarantee best focus across the entire image.
Once the frames of your video are stacked, the overall brightness of the composite (stacked) image is 

usually brighter than its individual component frames. For this reason it is best to keep the brightness 

of the video image seen on the screen dimmer than you would normally desire. It is important that 

no part of the image is over-exposed to assure the maximum amount of detail in the final composite 

image. 

Collimation

No matter what type of telescope you image with, poor collimation (alignment of the optics) will 

ruin your chances for a good image. Before you begin imaging, always check the collimation of your 

instrument and make adjustments if necessary. Refer to your telescopes owner’s manual for instruction 

in collimating the optics.

Finding Objects

At first it can be difficult to locate individual planets due to their relative brightness. To make it easier 

to initially find your object in the imaging window, increase the brightness and gain controls on 

the Exposure Tool Bar. This will allow you to better see the object as it passes through the imaging 

window. Once the object is located and centered, you can adjust the setting until the object is at the 

desired brightness and contrast.

how long to take streaming Video

At first you may think that the more frames you record the better. However there are some limitation 

to the duration of video and the amount of frames you can acquire.  Resolution and file size can both 

limit the length of time of your video. 
Since the NexImage will combine as many sharp frames as possible to achieve one high quality image, 

you don’t want to take so many images that you start to detect the rotation of the planet, especially 

on Jupiter which makes one complete rotation in under 10 hours!
Also each frame of a high resolution video can equal a large file size. Hundreds of frames can 

take up much of your hard drive space. Since file sizes of each video taken can be quite large, it is 

recommended that you save your video data onto a CD-ROM. This way you can have a library of files 

stored for processing without filling up your hard drive in the process.

9

Summary of Contents for 93711

Page 1: ...Users Manual Model 93711 English ...

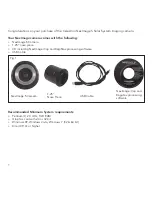
Page 2: ...a 1 25 nose piece CD including NexImage iCap and RegiStax processing software USB Cable Recommended Minimum System requirements Pentium IV 2 0 GHz 1GB RAM Graphics card with 24 or 32 bit Windows XP Windows Vista Windows 7 32 64 bit DirectX 9 0c or higher 1 25 Nose Piece USB Cable NexImage 5 Camera NexImage iCap and Registax processing software Fig 1 1 ...

Page 3: ...ge camera See Fig 2 4 Slide the 1 25 nose piece of the camera into the eyepiece barrel of your telescope See Fig 3 5 Plug the small end of the USB cable into the port on the back of the camera 6 Plug camera into the USB port of your computer Once connected the Found New Hardware message will appear Follow the Installation Wizard until the device has been successfully installed 2 Fig 2 Fig 3 ...

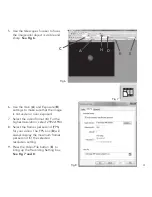
Page 4: ...If the NexImage 5 camera is not already detected select the camera and press OK See Fig 5 3 Select an easy target like the moon to begin with Center and focus your telescope on the specific feature you wish to image 4 You should be able to see light displayed in the Preview window of the iCap software 3 Fig 4 Fig 5 ...

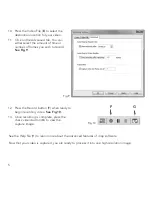
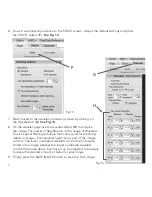
Page 5: ...not under or over exposed 7 Select the video format C For the highest resolution select 2592x1944 8 Select the frames per second FPS for your video The FPS box D will always display the maximum frames per second for the selected resolution setting 9 Press the Video File button E to bring up the Recording Setting box See Fig 7 and 8 4 Fig 6 Fig 7 Fig 8 A B E H D C ...

Page 6: ...sh to record See Fig 9 12 Press the Record button F when ready to begin recording video See Fig 10 13 Once recording is complete press the check video button G to view the capture image See the Help file H to learn more about the advanced features of iCap software Now that your video is captured you are ready to process it into one high resolution image 5 Fig 9 Fig 10 F G ...

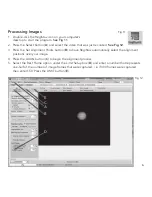
Page 7: ...Alignment Points button B to have RegiStax automatically select the alignment positions over your image 4 Press the ALIGN button C to begin the alignment process 5 Select the Best Frame option under the Limit Setup box D and enter a number that represents one half of the number of image frames that were captured i e if 300 frames were captured then enter 150 Press the LIMIT button E 6 Fig 11 Fig 1...

Page 8: ...f RegiStax sits in the usage of Wavelets This is a special filtering technique that is very good for enhancing details in images Each wavelet layer carries part of the image within it The lower numbered wavelets control the fine detail stored in the image whereas the larger numbered wavelets control the coarse detail Each layer can be adjusted individually to reveal the desired amount of detail fo...

Page 9: ...mager With the included software package each individual frame is analyzed for quality to filter out those frames most affected blurred by poor atmospheric seeing This form of after the fact adaptive optics leaves only the sharpest clearest frames to be stacked and aligned into a high quality image Finally powerful processing features automatically break the image up into individual unsharp mask l...

Page 10: ...to their relative brightness To make it easier to initially find your object in the imaging window increase the brightness and gain controls on the Exposure Tool Bar This will allow you to better see the object as it passes through the imaging window Once the object is located and centered you can adjust the setting until the object is at the desired brightness and contrast How long to take Stream...

Page 11: ...such as MetaGuide www astrogeeks com Bliss MetaGuide and a guider port interface such as GPUSB from Shoestring Astronomy www store shoestringastronomy com Specifications Sensor 1 2 5 format color CMOS Sensor Micron MT9P031 Camera Resolution 5MP 2592 x 1944 Sensor Size 5 7mm x 4 28mm 7 mm diagonal Pixel Size 2 2 micron square Sensitivity 1 4 V lux sec 550nm USB Cable High Speed USB 2 0 cable ...

Page 12: ...h the instructions may cause harmful interference to radio communications However there is no guarantee that interference will not occur in a particular installation If this equipment does cause harmful interference to radio or television reception which can be determined by turning the equipment off and on the user is encouraged to try to correct the interference by one or more of the following m...

Reviews: