background image

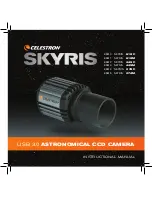
inStRuctional manual

uSB 3.0 

ASTRONOMICAL CCD CAMERA

95510 SKYRIS 618C
95511 SKYRIS 618M
95512 SKYRIS 445C
95513 SKYRIS 445M
95514 SKYRIS 274C
95515 SKYRIS 274M

Summary of Contents for 95510 SKYRIS 618C

Page 1: ...inStRuctional manual uSB 3 0 ASTRONOMICAL CCD CAMERA 95510 SKYRIS 618C 95511 SKYRIS 618M 95512 SKYRIS 445C 95513 SKYRIS 445M 95514 SKYRIS 274C 95515 SKYRIS 274M ...

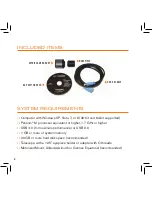
Page 2: ...or higher USB 3 0 for maximum performance or USB 2 0 1 GB or more of system memory 20 GB or more hard disk space recommended Telescope with a 1 25 eyepiece holder or adapter with C threads Motorized Mount Altitude Azimuth or German Equatorial recommended Nosepiece Skyris camera body iCAP SOFTWARE CD USB 3 0 Cable Included Items Nosepiece ...

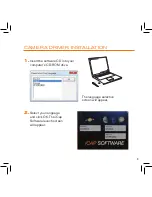
Page 3: ...meRa dRiVeR inStallation 1 Insert the software CD into your computer s CD ROM drive The language selection screen will appear 2 Select your language and click OK The iCap Software launch screen will appear ...

Page 4: ...zard will appear and prompt you to connect your camera 4 Plug the Skyris camera into the computer s USB port using the included cable If equipped use a USB 3 0 port The Driver Installation Wizard will automatically detect your Skyris model Click Next and proceed through the prompts until the driver installation is complete ...

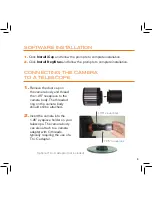
Page 5: ... 1 Remove the dust cap on the camera body and thread the 1 25 nosepiece to the camera body The threaded ring on the camera body should still be attached 2 Insert the camera into the 1 25 eyepiece holder on your telescope The camera body can also attach to a camera adapter with C threads typically requiring the use of a T to C adapter 1 25 nosepiece 1 25 visual back Optional T to C Adapter not incl...

Page 6: ...r eyepiece then remove the eyepiece Remove the diagonal if you are using one Some refractor telescopes may require an extension tube when used without the diagonal 2 Plug the camera into your computer s USB port If equipped use the USB 3 0 port on your computer which may also bear the USB SuperSpeed logo see right When connecting the cable to the Skyris camera use the threaded fasteners to provide...

Page 7: ...but you may need to make adjustments for the object you are imaging 7 If a defocused image appears focus the telescope until it appears sharp on your screen If no image appears confirm your telescope is still centered on a bright object and proceed to step 8 8 Go to the Device menu and select Properties Click the Exposure tab to access the Gain and Exposure Uncheck the Auto box for each to allow f...

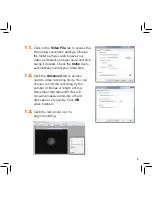
Page 8: ...rding Info Dialog 10 Click on the Codec icon to access the Recording Settings window We highly recommend selecting Uncompressed to retain the full image quality and size Note that Uncompressed will consume a significant amount of hard disk space in a very short time Be mindful of the file sizes when creating AVI files Choose RGB32 or Y800 For Skyris color cameras choose RGB32 which will record in ...

Page 9: ...desired Check the Index box to automatically number your video files 12 Click the Advanced tab to access custom video recording limits You can choose to limit the recording by the number of frames or length of time Remember that these AVI files will consume massive amounts of hard disk space very quickly Click OK when finished 13 Click the red record icon to begin recording ...

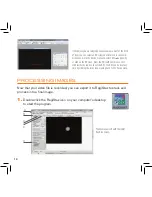
Page 10: ...ourself with the initial RegiStax screen A B D C E If the object you are imaging does not consume most of the field of view you can select an ROI region of interest to save hard disk space Go to the Device menu and select ROI Specifiy or click on the ROI icon Draw the ROI with your mouse then click inside the red box to set the ROI The ROI can be reset any time by clicking the reset icon or going ...

Page 11: ... alignment process 5 Select the Best Frame option under the Limit Setup box D and enter a number that represents one half of the number of image frames that were captured i e if 300 frames were captured then enter 150 Press the Limit button E 6 You will automatically advance to the Stack screen Accept the default settings and press the Stack button F 7 Next move to the wavelet processing screen by...

Page 12: ...e from Celestron filters not included 8 On the Wavelet page use the wavelet sliders H to enhance the image The power of RegiStax sits in the usage of wavelets This is a special filtering technique that is very good for enhancing details in images Each wavelet layer carries part of the image within it The lower numbered wavelets control the fine detail stored in the image whereas the larger numbere...

Page 13: ...atter what type of telescope you image with poor collimation alignment of the optics will ruin your chances for a good image Before you begin imaging always check the collimation of your instrument and make adjustments if necessary Refer to your telescopes owner s manual for instructions on collimating the optics Finding Objects At first it can be difficult to locate individual planets due to thei...

Page 14: ...ng Skyris cameras work well with solar telescopes or telescopes equipped with solar filters including Hydrogen Alpha or white light filters Autoguiding Your Skyris can be utilized as an autoguiding camera when used in junction with an off axis guider or piggyback guidescope Skyris is compatible with many autoguiding software programs such as MetaGuide www astrogeeks com Bliss MetaGuide and PHD Gui...

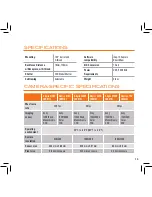
Page 15: ...ICX274AL Monochrome CCD Sony ICX274AQ Color CCD Operating environment 40 C to 40 C 104 F to 40 F Camera resolution 640x480 1280x960 1600x1200 Sensor size 4 46 mm x 3 80 mm 6 26 mm x 5 01 mm 8 5 mm x 6 8 mm Pixel size 5 6 micron square 3 75 micron square 4 4 micron square Mounting 1 25 barrel and C thread Backfocus Distance w Nosepiece w C thread 19mm 17 5mm Shutter CCD Global Shutter Subframing Se...

Page 16: ...accordance with the instructions may cause harmful interference to radio communications However there is no guarantee that interference will not occur in a particular installation if this equipment does cause harmful interference to radio or television reception which can be determined by turning the equipment off and on the user is encouraged to try to correct the interference by one or more of t...

Reviews: