background image

A

stro

M

Aster

®

 t

ripod


#93610
INSTRUCTION MANUAL

The Celestron AstroMaster Tripod is a stable platform for a 
camera, spotting scope, binocular, telescope optical tube, 
and other optical instruments. Set up is quick and easy and no 
tools are required. The tripod can also be called an  
alt-azimuth mount.

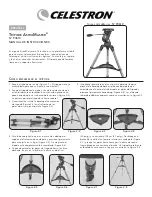
1. Remove the tripod from the box (Figure 2-1). The tripod    
  comes preassembled so that the set up is very easy.
2. Stand the tripod upright and pull the tripod legs apart until  
  each leg is fully extended and then push down slightly on  
  the tripod leg brace (Figure 2-2). The very top of the  
  tripod is called the tripod head.
3. Next, install the tripod accessory tray (Figure 2-3)  
  onto the tripod leg brace (center of Figure 2-2). 

4. Insert the cut-out in the center of the tray (flat side of the 
  tray facing down) to match the center of the tripod leg brace 
  and push down slightly (Figure 2-4).  The ears of the tray 
  should appear as in Figure 2-4.

S

eTTINg


Up


The

 T

RIpOd

English

A

STRO

M

ASTeR

 T

RIpOd

 #93610

Figure 2-5


Figure 2-6


Figure 2-7


Figure 2-8


Figure 2-1


Figure 2-2


Figure 2-3


Figure 2-4


5. Rotate the tray until the ears are under the leg brace  
  support of each leg and push slightly and they will lock  
  in place (Figure 2-5). The tripod is now completely  
  assembled (Figure 2-6).

6. You can extend the tripod legs to the height you desire. At  
  the lowest level the height is 24” (61cm) and extends to 41”  
  (104 cm). You unlock the tripod leg lock knob at the bottom  
  of each leg (Figure 2-7) and pull the legs out to the height 
  you want and then lock the knob securely. A fully extended  
  tripod looks like the image in Figure 2-8. 

Summary of Contents for ASTROMASTER 93610

Page 1: ...r of Figure 2 2 4 Insert the cut out in the center of the tray flat side of the tray facing down to match the center of the tripod leg brace and push down slightly Figure 2 4 The ears of the tray shou...

Page 2: ...Figure 2 13 4 Tighten the safety screw until the tip touches the side of the Dovetail Bracket 5 Make sure the pan handle and azimuth lock are fully locked before the next step 6 Position the tripod a...

Page 3: ...a Figure 2 2 4 Ins rez la d coupe situ e au milieu du plateau face plane de la tablette dirig e vers le bas de mani re la centrer sur le support central du tr pied et enfoncez la l g rement Figure 2 4...

Page 4: ...aronde 7 Tournez la molette de la platine pour queue d aronde dans le sens inverse des aiguilles d une montre pour visser la vis de 1 4x20 dans l adaptateur du tr pied ou l orifice filet afin de fixer...

Page 5: ...tro de la bandeja la parte plana de la bandeja deber estar boca abajo para que coincida con el centro del refuerzo de las patas del tr pode y presione ligeramente hacia abajo Figura 2 4 Las aletas de...

Page 6: ...a 2 13 4 Apriete el tornillo de seguridad hasta que la punta toque el lateral del soporte de la ensambladura a cola de milano 5 Aseg rese de que el mango de rotaci n y el bloqueador azimutal est n tot...

Page 7: ...4 Stecken Sie die Ausschnitts ffnung in der Mitte der Ablage mit der flachen Seite nach unten entsprechend auf die Mitte der Beinstrebe des Stativs Abb 2 4 und dr cken Sie sie leicht an Die Ecken der...

Page 8: ...zu sichern Abb 2 13 4 Ziehen Sie die Sicherungsschraube fest bis die Spitze die Schwalbenschwanzhalterung an der Seite ber hrt 5 Stellen Sie vor dem n chsten Schritt sicher dass der Schwenkgriff und d...

Page 9: ...il lato piatto del vassoio rivolto verso il basso in modo che combaci con il centro del supporto delle gambe del treppiedi e spingere leggermente verso il basso Figura 2 4 Le alette del vassoio dovreb...

Page 10: ...13 4 Serrare la vite di sicurezza fino a quando la sua punta non tocca il lato della staffa a coda di rondine 5 Prima di procedere al punto successivo accertarsi che il manico della piastra e il bloc...

Page 11: ......

Page 12: ...www celestron com...

Reviews: