background image


5

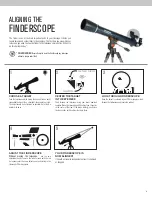
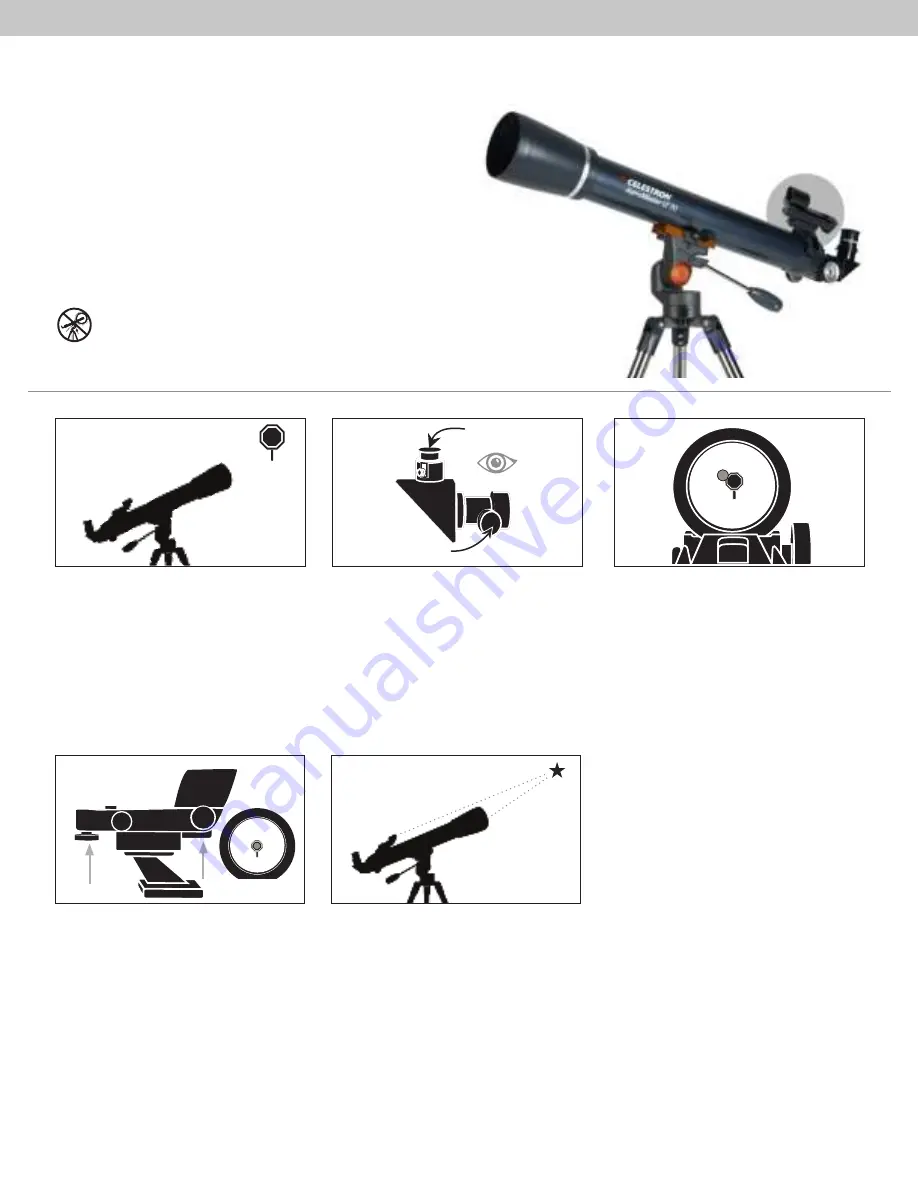
CENTER THE TARGET  

IN THE EYEPIECE

Look through the telescope using your lower powered 
eyepiece. Move the telescope until the object you chose lies 
in the center of the view. If the image is blurry, gently turn 
the focus knobs until it comes into sharp focus. 

LOOK THROUGH FINDERSCOPE

Once the object is centered in your 20 mm eyepiece, look 
through the finderscope and locate the red dot.

3

ADJUST THE FINDERSCOPE

Without moving the telescope,


use the two 

adjustment knobs to move the finder around until the red 
dot appears over the same object you are observing in the 
telescope’s 20 mm eyepiece.

YOUR FINDERSCOPE IS  

 NOW  ALIGNED!

It should not require realignment unless


it is bumped 

or dropped.

4

The finder is one of the most important parts of your telescope. It helps you 
locate objects and center them in the eyepiece. The first time you assemble your 
telescope, you need to align the finder to the telescope’s main optics. It’s best to 
do this during the day*. 


*  SOLAR WARNING! 

Never attempt to view the Sun through any telescope 

without a proper solar filter

!

CHOOSE A TARGET

Take the telescope outside during the day and find an easily 
recognizable object, like a streetlight, license plate or sign. 
The object should be as far away as possible, but at least a 
quarter mile away.

1

5

ALIGNING THE

FINDERSCOPE

2

Low Power Eyepiece

Focus Knobs

Summary of Contents for ASTROMASTER LT 70 AZ

Page 1: ... 22109 QUICK SETUP GUIDE ...

Page 2: ...l they are fully extended Extend each of the three tripod legs down 6 12 To attach the accessory tray line up notches and turn clock wise until tray tabs lock into place with the tripod brackets Next slide telescope tube into the mount Be sure to back out fastening screws to allow enough clearance for the dovetail Use the three tightening screws located at the bottom of each leg to secure the exte...

Page 3: ...ng your AstroMaster telescope Insert the diagonal into the focuser and tighten the set screws Remove the small plastic tab under the battery cover by pulling it straight out For longer battery life be sure to turn off finderscope when not in use Loosen the set screw on the diagonal then insert the chrome barrel of the 20mm eyepiece into the diagonal and tighten the set screw Remove the lens cap fr...

Page 4: ...mp Slide the phone clamp up and down and rotate it left and right until your camera is looking down through the eyepiece of the telescope Tighten the knob on the bottom of the adapter to secure it in place Use the telescope s focuser to adjust focus of your camera Snap the image using your app or use the Bluetooth remote described in the next section Open the eyepiece clamp and place it around the...

Page 5: ... app Press the button on the remote to trigger the shutter on your phone If your camera is in video mode you can press the button once to start recording and again to stop the recording 4 5 To insert or replace the battery place your thumb in the center of the back cover pressing inward and sliding downward remove the battery door The CR2032 battery should be inserted with the positive side facing...

Page 6: ...he telescope s 20 mm eyepiece YOUR FINDERSCOPE IS NOW ALIGNED It should not require realignment unless it is bumped or dropped 4 The finder is one of the most important parts of your telescope It helps you locate objects and center them in the eyepiece The first time you assemble your telescope you need to align the finder to the telescope s main optics It s best to do this during the day SOLAR WA...

Page 7: ...to a few days before a Full Moon During this period you will be able to see the most detail in the craters and lunar mountain ranges To get a closer view of the Moon loosen the set screws on the focuser and remove the 20mm eyepiece Replace it with your 10mm eyepiece and tighten the set screws to secure it in place The 10mm eyepiece will give you significantly more magnification making the Moon app...

Page 8: ... harmful interference and 2 this device must accept any interference received including interference that may cause undesired operation CAUTION Changes or modifications not expressly approved by the party responsible for compliance could void the user s authority to operate the equipment NOTE This equipment has been tested and found to comply with the limits for a Class B digital device pursuant t...

Reviews: