background image

Aligning the Secondary Mirror

The following describes the procedure for daytime collimation of your telescope using the optional Newto-
nian Collimation Tool (#94183) offered by Celestron. To collimate the telescope without the Collimation Tool, 
read the following section on night time star collimation. For very precise collimation, the optional Collima-

tion Eyepiece 1 ¼” (# 94182) is offered. 

If you have an eyepiece in the focuser, remove it.  Rack the focuser tube in completely, using the focusing 
knobs, until its silver tube is no longer visible.  You will be looking through the focuser at a reflection of the 
secondary mirror, projected from the primary mirror.  During this step, ignore the silhouetted reflection from 
the primary mirror.  Insert the collimating cap into the focuser and look through it.  With the focus pulled in 
all the way, you should be able to see the entire primary mirror reflected in the secondary mirror.  If the pri-
mary mirror is not centered in the secondary mirror, adjust the secondary mirror screws by alternately tight-
ening and loosening them until the periphery of the primary mirror is centered in your view.  DO NOT loosen 
or tighten the center screw in the secondary mirror support, because it maintains proper mirror position.

Aligning the Primary Mirror

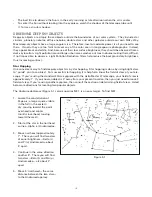
Now adjust the primary mirror screws 
to re-center the reflection of the small 
secondary mirror, so it’s silhouetted 
against the view of the primary.  As you 
look into the focuser, silhouettes of the 
mirrors should look concentric.  Re-
peat steps one and two until you have 
achieved this.

Remove the collimating cap and look 
into the focuser, where you should see 
the reflection of your eye in the second-
ary mirror.

21

Summary of Contents for AstroMaster LT

Page 1: ...Series Telescopes INSTRUCTION MANUAL AstroMaster LT 60AZ 21073 AstroMaster LT 70AZ 21074 AstroMaster LT 76AZ 31036 A s t r o M a s t e r L T 6 0 A Z A s t r o M a s t e r L T 7 6 A Z ...

Page 2: ...d of View 12 General Observing Hints 12 ASTRONOMY BASICS 13 The Celestial Coordinate System 13 Motion of the Stars 14 CELESTIAL OBSERVING 15 Observing the Moon 15 Observing the Planets 15 Observing the Sun 15 Observing Deep Sky Objects 16 Seeing Conditions 18 ASTROPHOTOGRAPHY 19 Short Exposure Prime Focus Photography 19 Planetary Lunar Photography with Special Imagers 19 CCD Imaging for Deep Sky O...

Page 3: ...up CD ROM The Sky X Level 1 astronomy software which provides education about the sky and print able sky maps All models can be used terrestrially as well as astronomically with the standard accessories included Take time to read through this manual before embarking on your journey through the Universe It may take a few observing sessions to become familiar with your telescope so you should keep t...

Page 4: ...r Finderscope 4 Eyepiece 5 Diagonal 6 Focus Knob 7 Pan Handle 8 Accessory Tray 9 Tripod 10 Azimuth Lock 11 Alt Az Mount 12 Dovetail Mounting Bracket 4 Figure 1 1 AstroMaster LT 70AZ Refractor AstroMaster LT 60AZ refractor similar 8 6 7 5 3 4 2 12 1 11 10 9 ...

Page 5: ...Eyepiece 3 Telescope Optical Tube 4 Primary Mirror 5 Pan Handle 6 Azimuth Lock 7 Accessory Tray 8 Tripod 9 Alt Az Mount 10 Dovetail Mounting Bracket 11 Focus Knob 5 Figure 1 2 AstroMaster LT 76 AZ Newtonian 7 5 4 6 3 2 1 11 8 9 10 ...

Page 6: ...is called the tripod head 3 Next we will install the tripod accessory tray Figure 2 3 onto the tripod leg brace center of Figure 2 2 4 Insert the cut out in the center of the tray flat side of the tray facing down to match the center of the tripod leg brace and push down slightly Figure 2 4 The ears of the tray should appear as in Figure 2 4 5 Rotate the tray until the ears are under the leg brace...

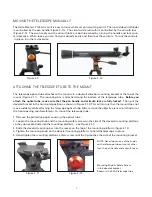
Page 7: ... bracket in the horizontal position as shown in Figure 2 10 This will ensure that the mount does not move suddenly while attaching the telescope optical tube Also remove the objective lens cap refractor or the front opening cap Newtonian To mount the telescope tube 1 Remove the protective paper covering the optical tube 2 Loosen the mounting knob and the mounting safety screw on the side of the do...

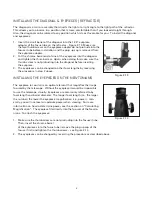
Page 8: ...ting the eyepiece 3 The eyepieces can be changed to other focal lengths by reversing the procedure in step 2 above INSTALLING THE EYEPIECES ON THE NEWTONIANS The eyepiece or ocular is an optical element that magnifies the image focused by the telescope Without the eyepiece it would be impossible to use the telescope visually Eyepieces are commonly referred to by focal length and barrel diameter Th...

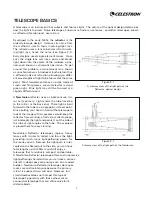
Page 9: ...the mirror at the back end There light is bent forward in the tube to a single point its focal point Since putting your head in front of the telescope to look at the image with an eyepiece would keep the reflector from working a flat mirror called a diago nal intercepts the light and points it out the side of the tube at right angles to the tube The eyepiece is placed there for easy viewing Newton...

Page 10: ...ure the sharpest possible focus If you have astigmatism corrective lenses must be worn at all times ALIGNING THE FINDERSCOPE The Star Pointer is the quickest and easiest way to point your telescope exactly at a desired object in the sky It s like having a laser pointer that you can shine directly onto the night sky The Star Pointer is a zero magnification pointing tool that uses a coated glass win...

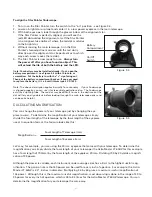
Page 11: ...e The red dot may be difficult to see in the daytime but the dot will let you align objects before looking through the main telescope optics and can be quite helpful CALCULATING MAGNIFICATION You can change the power of your telescope just by changing the eye piece ocular To determine the magnification of your telescope simply divide the focal length of the telescope by the focal length of the eye...

Page 12: ...ces a linear field width of 89 feet at a distance of one thousand yards GENERAL OBSERVING HINTS When working with any optical instrument there are a few things to remember to ensure you get the best possible image Never look through window glass Glass found in household windows is optically imperfect and as a result may vary in thickness from one part of a window to the next This inconsistency can...

Page 13: ...ial hemisphere from the southern Like the Earth s equator it bears a reading of zero degrees On Earth this would be latitude However in the sky this is referred to as declination or DEC for short Lines of declination are named for their angular distance above and below the celestial equator The lines are broken down into degrees minutes of arc and seconds of arc Declination readings south of the e...

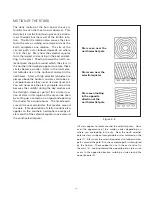
Page 14: ...ht during the day washes out the starlight However part of this circular mo tion of stars in this region of the sky can be seen by setting up a camera on a tripod and opening the shutter for a couple hours The timed expo sure will reveal semicircles that revolve around the pole This description of stellar motions also applies to the southern hemisphere except all stars south of the celestial equat...

Page 15: ...ugh its lunar like phases Mars can reveal a host of surface detail and one if not both of its polar caps You will be able to see the cloud belts of Jupiter and the great Red Spot if it is visible at the time you are observing In addition you will also be able to see the moons of Jupi ter as they orbit the giant planet Saturn with its beautiful rings is easily visible at moderate power Planetary Ob...

Page 16: ...way to find deep sky objects is by star hopping Star hopping is done by using bright stars to guide you to an object For successful star hopping it is helpful to know the field of view of you tele scope If you re using the standard 20mm eyepiece with the AstroMaster LT telescope your field of view is approximately 1º If you know an object is 3º away from your present location then you just need to...

Page 17: ...cting the two stars 6 Look through the telescope and the Ring Nebula should be in your field of view The Ring Nebula s angular size is quite small and difficult to see 7 Because the Ring Nebula is rather faint you may need to use averted vision to see it Averted vision is a technique of looking slightly away from the object you re observing So if you are observing the Ring Nebula center it in your...

Page 18: ...rban areas LPR filters enhance deep sky viewing from light polluted areas by blocking unwanted light while transmitting light from cer tain deep sky objects You can on the other hand observe planets and stars from light polluted areas or when the Moon is out Seeing Seeing conditions refers to the stability of the atmosphere and directly affects the amount of fine detail seen in extended objects Th...

Page 19: ...ou can image the Moon as well as the brighter planets You will have to experiment with various settings and exposure times Much information can be obtained from your camera instruction manual which can supplement what you can find in detailed books on the subject matter Do your photography from a dark sky observing site if possible PLANETARY LUNAR PHOTOGRAPHY WITH SPECIAL IMAGERS During the last f...

Page 20: ... moisture condenses on the inside of the optics remove the accessories from the telescope Place the tele scope in a dust free environment and point it down This will remove the moisture from the telescope tube To minimize the need to clean your telescope replace all lens covers once you have finished using it Since the cells are NOT sealed the covers should be placed over the openings when not in ...

Page 21: ...limating cap into the focuser and look through it With the focus pulled in all the way you should be able to see the entire primary mirror reflected in the secondary mirror If the pri mary mirror is not centered in the secondary mirror adjust the secondary mirror screws by alternately tight ening and loosening them until the periphery of the primary mirror is centered in your view DO NOT loosen or...

Page 22: ... The collimation screws tilt the primary mir ror You will start by loosening the small locking screws a few turns each Normally motions on the order of an 1 8 turn will make a difference with approximately a 1 2 to 3 4 turn being the maximum required for the large collimation screws Turn one collimation screw at a time and with a collimation tool or eyepiece see how the collimation is affected see...

Page 23: ...ent screws simultaneously This way you can see exactly which way the movement occurs It may be helpful to have two people working together one viewing and instructing which screws to turn and by how much and the other performing the adjustments IMPORTANT After making the first or each adjustment it is necessary to re aim the telescope tube to re center the star again in the center of the field of ...

Page 24: ...m 26 66cm Telescope Weight 13 5 8kg 16 7 2kg 12 5 4kg Note Specifications are subject to change without notice or obligation Note This equipment has been tested and found to comply with the limits for a Class B digital device pursuant to part 15 of the FCC Rules These limits are designed to provide reasonable protection against harmful interference in a resi dential installation This equipment gen...

Page 25: ...stron All rights reserved Products or instructions may change without notice or obligation Designed and intended for those 13 years of age and older WARNING This product contains a chemical s known to the State of California to cause cancer birth defects or other reproductive harm Item 21061 INST Printed in China 10 00 06 07 ...

Reviews: