36
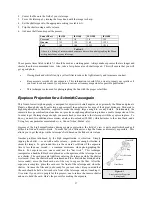
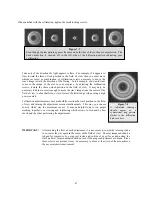
4. Set the shutter speed to the “B” setting and focus the lens to the infinity setting.
5. Locate the area of the sky that you want to photograph and move the telescope so that it points in that
direction.
6. Find a suitable guide star in the telescope eyepiece field of view. This is relatively easy since you can
search a wide area without affecting the area covered by your camera lens. If you do not have an
illuminated cross hair eyepiece for guiding, simply defocus your guide star until it fills most of the field of
view. This makes it easy to detect any drift.
7. Release the shutter using a cable release.
8. Monitor your guide star for the duration of the exposure making the necessary corrections needed to keep
the star centered.
S
S
h
h
o
o
r
r
t
t
E
E
x
x
p
p
o
o
s
s
u
u
r
r
e
e
P
P
r
r
i
i
m
m
e
e
F
F
o
o
c
c
u
u
s
s
P
P
h
h
o
o
t
t
o
o
g
g
r
r
a
a
p
p
h
h
y
y
f
f
o
o
r
r
R
R
e
e
f
f
r
r
a
a
c
c
t
t
o
o
r
r
s
s
&
&
N
N
e
e
w
w
t
t
o
o
n
n
i
i
a
a
n
n
s
s
Short exposure prime focus photography is the best way to begin recording celestial objects. It is done with the
SLR camera attached to the telescope without an eyepiece or camera lens in place. To attach your SLR camera
you need the T-adapter and a T-Ring for your specific camera (i.e., Canon, Nikon, Pentax, etc.). The focuser
for the refractors and Newtonian has a built-in T-adapter and is ready to accept a 35mm camera body. The T-
Ring replaces the 35mm SLR camera’s normal lens. Prime focus photography allows you to capture the entire
solar disk (if using the proper filter) as well as the entire lunar disk. To attach your camera to your telescope:
See note about digital cameras below.
1. Remove the eyepiece from the 1¼” eyepiece holder.
2. Unthread the 1¼” eyepiece holder from the focuser assembly. This will expose the male thread of the built-
in T-adapter.
3.
Thread the T-ring onto the exposed T-adapter threads.
4.
Mount your camera body onto the T-Ring the same as you would any other lens.
S
S
h
h
o
o
r
r
t
t
E
E
x
x
p
p
o
o
s
s
u
u
r
r
e
e
P
P
r
r
i
i
m
m
e
e
F
F
o
o
c
c
u
u
s
s
P
P
h
h
o
o
t
t
o
o
g
g
r
r
a
a
p
p
h
h
y
y
f
f
o
o
r
r
S
S
c
c
h
h
m
m
i
i
d
d
t
t
-
-
C
C
a
a
s
s
s
s
e
e
g
g
r
r
a
a
i
i
n
n
s
s
Use a T-Adapter (# 93633-A) which threads on to the back of the telescope. The T-Ring threads onto the T-
Adapter and then mount your camera body onto the T-Ring like you would any other lens.
Using Digital Cameras
To attach a digital camera to your telescope you will need the Universal Digital Camera Adapter (# 93626). The
adapter allows the camera to be mounted rigidly. You will follow your camera instructions for capturing
images as the information below relates to 35mm SLR cameras.
With your camera attached to the telescope, you are ready for prime focus photography. Start with an easy
object like the Moon. Here’s how to do it:
1. Load your camera with film that has a moderate-to-fast speed (i.e., ISO rating). Faster films are more
desirable when the Moon is a crescent. When the Moon is near full, and at its brightest, slower films are
more desirable. Here are some film recommendations:
• T-Max
100
• T-Max
400
•
Any 100 to 400 ISO color slide film
•
Fuji Super HG 400


