background image

ENGLISH


I

  7

Fig 8

20x80

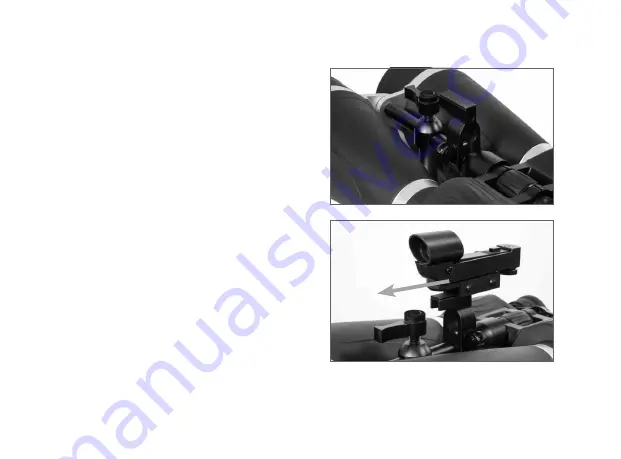
the center rod. Once the finder rail is attached, flip 
the locking lever to lock it in place and slide an 
aftermarket red dot finder onto the top of the rail.  
Celestron offers red dot finders that are compatible 
with the finder rail that can be found on our website.  
Before using the red dot it will have to be aligned 
with the binocular to ensure accurate aiming.  
Follow the instructions included with the red dot 
finder for alignment information.  

Fig 9

Summary of Contents for Skymaster Pro

Page 1: ...BINOCULARS JUMELLE BINOCULARES FERNGLAS BINOCOLI...

Page 2: ...ENGLISH 2 FRAN AIS 15 ESPA OL 28 DEUTSCH 41 ITALIANO 54...

Page 3: ...ENGLISH BINOCULARS...

Page 4: ...of enjoyment and faithful service Please read the instructions carefully before using your binocular to ensure proper use and care CELESTRON SKYMASTER PRO BINOCULARS Logo Plate Tripod Adapter Threads...

Page 5: ...he binocular up to your eyes using both hands and look through them at an object in the distance Move the two barrels halves of the binocular closer together or further apart until you see a single cl...

Page 6: ...with your hand or the objective lens cap 3 Rotate the focus wheel until the image viewed with your left eye is clear and sharp 4 Cover the left objective lens with your hand or objective lens cap 5 Vi...

Page 7: ...ng situations while the winged eyecups are recommended for viewing situations when the amount of stray light entering the eyepieces needs to be reduced for optimal viewing The winged eyecups may need...

Page 8: ...the maximum field of view When done observing make sure the rubber eyecups are in the up position for storage The SkyMaster Pro includes a red dot finder rail that allows a red dot finder to be attach...

Page 9: ...ket red dot finder onto the top of the rail Celestron offers red dot finders that are compatible with the finder rail that can be found on our website Before using the red dot it will have to be align...

Page 10: ...er These threads can be accessed by unscrewing the logo plate found on the front of the hinge To attach the binocular to a tripod thread the adapter into the binocular and attach the other end of the...

Page 11: ...rod so that the perfect balance point can be found when attached to a tripod To attach the binocular to a tripod thread the mounting screw of the tripod or quick release plate into the bottom of the...

Page 12: ...se 3 Store your binocular in a cool dry place whenever possible 4 When storing for an extended period of time place the binocular in a plastic bag or airtight container with a desiccant 5 Do not leave...

Page 13: ...motion Start in the middle of the lens and work your way to the edges Breathe lightly on the lens to provide moisture if needed 3 For a more thorough cleaning we recommend the use of a lens optics cl...

Page 14: ...s warranty does not cover defects due to normal wear and tear and other conditions This warranty is valid to U S A and Canadian customers who have purchased their binocular from an authorized Celestro...

Page 15: ......

Reviews: