40’ x 280’ Classic Series Frame Tent
www.GetTent.com / www.CelinaTent.com
PG.11
© 2013 Celina Tent Inc.
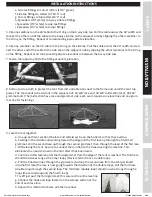
19. Attach ratchet straps or ropes to the stakes (ratchet assemblies are standard on all Celina Classic Series
Frame Tents):
Ratchets:
Attach the ratchet buckle with loop strap (A) to the stakes by turning the 6” loop at the end of the
ratchet inside out and pull the strap through the loop to create a noose and pull tight over the stake. Take the
loop strap (B) attached to the tent and pull it through the reel bars slot of the ratchet (ratchet buckle needs to
have handle facing upward at all time) and pull the loop strap (B) back towards the tent approximately 1 ½ feet.
Hold the strap at this point with one hand and begin to crank the ratchet handle back and forth.
Ropes:
Attach the rope around the fitting at each leg location. Tie the bottom end of the rope to the stake using a Double Loop Clove Hitch Knot - Gripping the rope down
from the grommet in your left hand, take the opposite end and create two loops that overlap. Move the first loop (located on the bottom) so that it slightly overlaps on
top of the second; put loops over the stake through the center gap created by the overlapping loops. Pull tight with the excess rope.
Ropes
20. Roll excess ratchet straps and secure into the ratchet buckle.
21. The tent top should now be complete. If sidewalls are desired, unroll the sidewalls between the stakes and
the legs around the perimeter of the tent. Starting at a leg, clip the sidewall snap hooks to the rope line that is
attached to the tent top.
Sidewall Rope Tensioning: For new tents and during its life cycle, it may be necessary to tighten the sidewall
support rope that runs the perimeter of the tent top. After the tent has been set up and tensioned, locate the
corner where the sidewall rope starts and stops. Securely tie off one end of the rope. While pulling against the
tie-off point, work your way around the perimeter of the tent, pulling out any unnecessary rope slack. Tie off the
opposite end of the rope once reached.
SAFETY
MAINTENANCE
INS
TALLA
TION
CONT
AC
TS
INSTALLATION INSTRUCTIONS


