


16
v3.1.22
10.
With 7/16 socket wrench, remove the two hex head bolts that attach the
cooling unit to the ceiling of the cellar. Save these bolts! Leave mounting
brackets attached to the cooling unit so that the proper location can be
duplicated with the replacement cooling unit.
PLEASE NOTE: If the nut in the ceiling becomes loose, you will need to use pliers
from the top of the cabinet to hold the nut and keep it from spinning with the
bolt.
11.
The cooling unit is now free to remove. Drop front end down, and move side to
side to free from cabinet opening.
CAUTION: Two people may be required to remove the cooling unit, which weighs 58
pounds. Do not let the cooling unit drop on unprotected bottle racks.
TO INSTALL THE REPLACEMENT COOLING UNIT
1.
Carefully remove the replacement cooling unit from the packaging. NEVER store the
cooling unit upside down or on its side, and NEVER turn the unit upside down. You
may reuse this packaging for shipping or storing the old cooling unit
2.
Remove any materials that have been packed inside the exhaust cavity.
3.
Before installing the cooling unit, make sure it works by plugging it in and letting
it run on a hard, flat surface for no more than 5 minutes. Check that cold air is
being produced by the unit.
PLEASE NOTE:
CellarPro cooling systems are
programmed with a 3-minute delay at start-up to protect its internal
components.
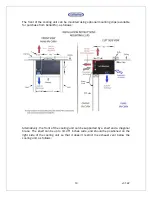
4.
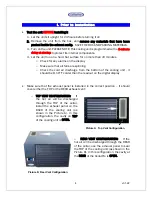
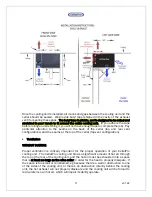
For top-vent configurations, make sure that the exhaust panel is installed at the
REAR of the cooling unit, so that the top of the unit has an opening for the hot
air exhaust. For rear-vent configurations, make sure that the exhaust panel is
installed in the TOP of the cooling unit, so that the rear of the unit has an
opening for the hot air exhaust. In both configurations, return air from outside
the cellar will come into the coils at the rear of the cooling unit.
5.
If using mounting clips, attach the clips to the FRONT of the cooling unit so that the
short side slides under the metal fold near the top of the cooling unit, and space
the clips so that they’ll line up with the holes in the ceiling of the cellar. You may
need to remove the front grill (attached with two screws on each side of the cooling
unit) in order to slide the mounting clips under the sheet metal, then replace the
front grill after the clips are in place.
6.
If your wine cabinet has three pieces of foam located on the bottom and on each
side of the black metal bracket that supports the rear of the cooling unit (attached
to the rear wall in most top-vented units), place these foam pieces along the bottom
and sides of the metal bracket.


