background image


17 

V3.15.22


Power Supply 


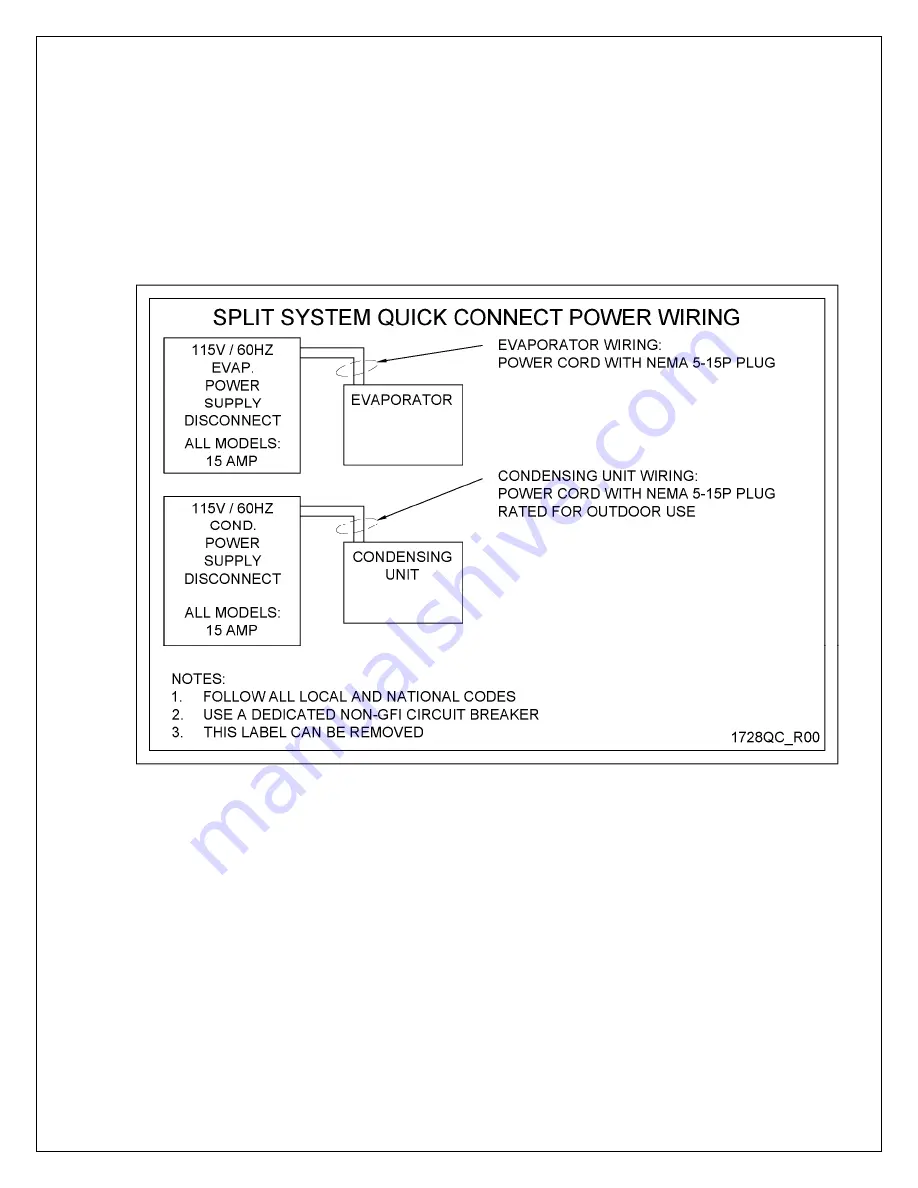
The Evaporator and Condensing units are separately powered with 8’ power cords and 
grounded  plugs.    No  interconnecting  wiring  is  needed  between  the  Evaporator  and 
Condensing unit. 
Evaporator Power: 

  Plug in the Nema 5-15P plug to a shared or dedicated 15 amp receptacle 

Condensing Unit Power: 

  Plug in the Nema 5-15P plug to a 

dedicated

 non-GFI 15 amp receptacle. 


The  Evaporator  turns  on  and  off  based  on  the  digital  display  controls,  and  the 
Condensing Unit turns on and off based on suction pressure, as follows:  

  The Evaporator includes a factory installed liquid line solenoid valve (LLSV), which is 

controlled  by  the  Evaporator  temperature  controller.    The  Condensing  unit  is 
controlled by a low pressure switch which reacts to the suction pressure and senses 
whether the LLSV is open or closed. 

  When the Evaporator temperature set-point is reached and the Evaporator turns off, 

the  LLSV  closes,  causing  the  system  to  pump  down  until  the  low  pressure  switch 
shuts off the Condensing unit.   

  When the Evaporator turns on, the LLSV opens, causing the suction pressure to rise 

and activate the Condensing unit.   


Summary of Contents for 3000Shqc-EC

Page 1: ...V3 15 22 ControltheElements QuickConnectSplitRefrigerationSystems Owner sManual...

Page 2: ...2 V3 15 22 This page intentionally left blank...

Page 3: ...f you still have questions please don t hesitate to contact your dealer or reach us directly at CellarPro Cooling Systems 1445 N McDowell Blvd Petaluma CA 94954 707 794 8000 x3 Email info cellarprocoo...

Page 4: ...b l e o f C o n t e n t s I Package Contents 5 II Specifications and Cut Sheets 6 III Cellar Construction 9 IV Installation Instructions 11 V Operating Instructions 26 VI Troubleshooting 33 VII Limit...

Page 5: ...sleeve 1 1 Butyl 18 in n a Adhesive backed foam strips 1 x 9 25 x1 5 x1 5 and 1 x 3 75 x1 5 x1 5 n a 1 Set Large tie wraps 2 2 Remote Display Kit 1 optional 1 optional Bottle Probe 1 optional 1 optio...

Page 6: ...mounting bracket 63 0 50 5 6 4000Shqc EC 30 4 x 14 4 x 13 2 incl mounting bracket 65 0 50 7 9 Condensing Unit with Hood Model Dimensions W x D x H inches Weight lbs MCA 3000Sqc Shqc EC 19 4 x 23 3 x...

Page 7: ...7 V3 15 22 Evaporator Cut Sheets...

Page 8: ...8 V3 15 22 Condensing Unit Cut Sheet...

Page 9: ...er recessed lighting which can allow air to leak into the cellar It is important that all walls joints doors and windows electrical outlets and or switches pipes vents and light fixtures be sealed to...

Page 10: ...o the bottom of the cellar To ensure proper airflow and reduce temperature stratification inside the cellar the space in front of the cold air discharge should be clear of any obstructions including w...

Page 11: ...r warranty does not cover damage from marine exposure within 5 miles of the ocean In these environments you will need an applied coating such as Insitu to protect against corrosion that is common in c...

Page 12: ...ns 3000Sqc EC and 4000Sqc EC Connection locations are specified when ordering the equipment and are available in the following options Refrigerant connections rear or left side Power cord rear or left...

Page 13: ...Shqc EC and 4000Shqc EC Connection locations are specified when ordering the equipment and are available in the following options Refrigerant connections rear or left side Power cord rear or left side...

Page 14: ...V3 15 22 Evaporator Mounting Instructions 3000Sqc EC and 4000Sqc EC Mounting brackets which attach to the sides of the evaporator are provided to mount the evaporator flush to a wall inside the cella...

Page 15: ...ches to the wall behind the evaporator is provided to mount the evaporators to the wall inside the cellar First the wall bracket is attached to the wall and then the evaporator slides onto the bracket...

Page 16: ...again into an open drain Then fill the trap with water The condensate trap will allow any excess moisture inside the Evaporator to overcome the static pressure and flow out of the drain line Before pu...

Page 17: ...he Condensing Unit turns on and off based on suction pressure as follows The Evaporator includes a factory installed liquid line solenoid valve LLSV which is controlled by the Evaporator temperature c...

Page 18: ...18 V3 15 22 Wiring Diagram...

Page 19: ...QuickConnect Line Set has sufficient length to interconnect the two units If the line set is not long enough do not proceed Contact CellarPro for immediate assistance 2 Reference the Evaporator Mount...

Page 20: ...tion line connection to the male connection STOP AND MAKE SURE YOU ARE ATTACHING BLUE TO BLUE Hand thread at first to get the threads started without cross threading Once it is too hard to turn by han...

Page 21: ...d wrap around the coupling provided that the seam is sealed tight Insulating the suction connection is essential to avoid condensation issues 8 Identify the Liquid line marked RED on the female connec...

Page 22: ...nnections only It is important to keep the drain line level or below the point where it exits the evaporator as it passes through the cutout 11 3000Sqc EC 4000Sqc EC systems rear connections only Appl...

Page 23: ...o the wall cutout and drywall trim around the connections as desired For serviceability do not use spray foam to insulate around the metal QuickConnect fittings 16 Route the drain line installing a tr...

Page 24: ...onnection STOP AND MAKE SURE YOU ARE ATTACHING BLUE TO BLUE Follow the previous process to tighten the connection 22 Identify the Liquid line marked RED on the female connector 23 Identify the male Li...

Page 25: ...nsing unit fans to confirm airflow There shouldn t be any excessive vibration noise or obstructions to airflow Do not leave the system unattended until it has reached normal operating conditions and t...

Page 26: ...wine which tend to be much colder than storage temperatures especially serving temperatures for white and sparkling wines CellarPro cooling units must be used stored moved and or shipped in the uprigh...

Page 27: ...ontroller is described in detail in the following section 2 Fan Speed Selector Switch Low Med High The cooling unit fans operate on 3 speed settings Low Medium and High For optimum sound and energy ef...

Page 28: ...grill of the cooling unit Power On Off Press Power On Off to turn the unit on and off When the Compressor On indicator light is on the Compressor is running When the Fan On indicator light is on the F...

Page 29: ...Differential of 4 F This means that the cooling unit will turn on when the display rises above 62 F 58 F 4 F and turn off when the display falls below 58 F In this example the average temperature ins...

Page 30: ...re Differential is unchanged Quick Chill Button To activate the Quick Chill mode press the Up Quick Chill button for three seconds To deactivate Quick Chill press Quick Chill button for three seconds...

Page 31: ...To activate the Quick Chill mode press the Up button for 3 seconds To deactivate Quick Chill press the Up button for 3 seconds again The Quick Chill indicator Row 3 light will turn on when the cooling...

Page 32: ...ry preset ENERGY SAVINGS MODE DIFFERENTIAL The factory preset for this setting is 4 This setting controls the Temperature Differential for the Energy Savings Mode The recommended range for this settin...

Page 33: ...lter is clean 3 Increase the supply of cool air to the space outside the condenser coils using a fan ducting or an exhaust system to remove heat from the space 4 Raise the Minimum Set Point on the coo...

Page 34: ...eck for loose wires and reconnect Low pressure switch is open On Valve control systems make sure solenoid is energized Jumper out switch to check for a faulty switch and replace if necessary Note that...

Page 35: ...re power Power supply to fan interrupted loose wire Inspect for loose fan wiring and reconnect Fan capacitor check for loose wires or out of spec capacitance Reconnect loose wires or replace capacitor...

Page 36: ...op section Condensing unit never shuts off System is wired incorrectly Locate correct wiring diagram for Electronic or Valve controlled system trace wiring and correct If a Valve control system the lo...

Page 37: ...first 23 hours of operation after the cooling unit is plugged in and or turned on The control panel also will flash a code for each alarm as follows Alarm What it means What to do P1 Probe 1 which sen...

Page 38: ...ted warranty applies only to cooling units purchased from the factory or an authorized dealer Damage caused by others or by any cause beyond the control of CellarPro shall not be considered defects in...

Reviews: