2
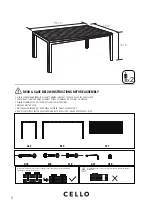
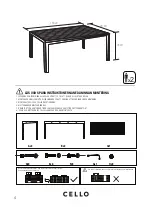
READ & SAVE BELOW INSTRUCTIONS BEFORE ASSEMBLY
1. PLEASE SEPARATE AND IDENTIFY ALL PARTS,MAKING SURE THAT YOU HAVE ALL OF THE PARTS LISTED.
2. TO AVOID ANY SCRATCH DURING ASSEMBLY, PLEASE ASSEMBLE ON A SOFT MAT OR SIMILAR.
3. PLEASE ASSEMBLE STEP BY STEP AND FOLLOW THE INSTRUCTIONS.
4. WASHERS MUST BE USED.
5. WHILE EACH SCREW AND NUT IS PROPERLY FASTENED, DO NOT OVER FASTEN IT.
6. DO NOT COMPLETELY FASTEN EACH SCREW AND NUT UNTIL ALL THE SCREWS ARE PROPERLY FIXED.
Ax2
Bx2
Cx1
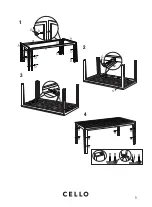
Install all the relevant screws,but do not tighten them completely at the very beginning.
Tighten the screws fully one by one.
Don't tighten up the screw before you start next mounting during the
installation.
x
2
150 cm
90 cm
73 cm
Ex6
Dx8
Fx8
Gx1
Hx8


