background image

SKU 91179

For technical questions, please call 1-800-444-3353.

Page 6

H

IV

Horizon-

Figure C

Figure A

Figure B

 (2)
3 “AA” Batteries

Pendulum

Lock “door”

(bottom of Laser)

Indicator
  Light

Vertical
  Light

tal Light

Unpacking

When unpacking, check to make sure the parts shown on the cover of this
manual are included.  If any parts are missing or broken, please call Harbor
Freight Tools at the number on the cover of this manual.

Operating Instructions

 A Tripod may also be used with the Cross Line Laser (not included).

1.

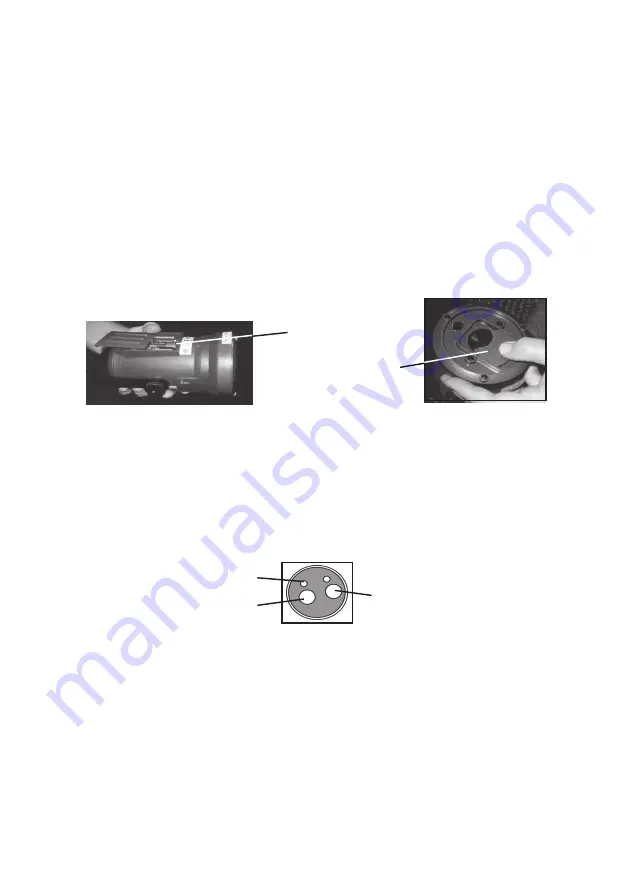
After removing the Laser from the Carrying Bag (4), insert the three “AA”
Batteries (2) into the battery compartment according to the polarity symbols
shown in the Battery Compartment.

 Close the Battery Compartment door.

See Figure A.

2.

Release the Pendulum Lock on the bottom of the Laser, by sliding the “door”
to the center.

 See Figure B.

3.

Be sure to set the Laser on as flat a surface as possible. The self-leveling
range of the Laser is within ±5°. The Laser will work properly if it is
positioned within its self-leveling range.

4.

Press the button on the top of the unit to switch “ON”. Either button will turn
on the red indicator light. The “H” Button is for the horizontal line and the “IV”
button is for the vertical line. 

See Figure C.

5.

For safety reasons, after you have pushed either horizontal or vertical
buttons to switch “ON”, there will be a delay of one second before the Laser
beam is emitted. This delay will not happen when pressing the second
button. If the Laser Beam blinks, it means it is still locked or NOT within the
leveling range.

6.

Allow 4-6 seconds for the horizontal and vertical Laser lines to be stabilized.
After stabilization, the Laser lines can be used for measurement reference.
Laser lines may swing slightly due to vibration from surroundings.

Summary of Contents for 91179

Page 1: ...te at http www harborfreight com Copyright 2004 by Harbor Freight Tools All rights reserved No portion of this manual or any artwork contained herein may be reproduced in any shape or form without the express written consent of Harbor Freight Tools For technical questions and replacement parts please call 1 800 444 3353 91179 ...

Page 2: ...afety shoes should be used when working with this product Do not wear loose clothing or jewelry as they can become caught in moving parts 5 Use eye protection Do not stare into the Laser Beams It is also recommended when installing this product to wear ANSI approved impact safety goggles ANSI approved safety impact eye glasses are available from Harbor Freight Tools NEVER point the laser directly ...

Page 3: ...this Laser are to be performed only by a qualified service technician 10 Do not use this Laser if under the influence of alcohol or drugs Read warning labels on prescriptions to determine if your judgment or reflexes are impaired while taking drugs If there is any doubt do not use this product 11 Use only batteries of the type recommended size AA Do not mix old and new batteries Do not use differe...

Page 4: ...t Vertical Plane On Off Switch Horizontal Plane On Off Switch BACK BOTTOM Center Line 3600 Rotary Base Laser Output Window Locking Wheel Identification of Parts Figure A Wall Mount 1 5 8 Mounting Thread for Wall Mount 1 Battery Compartment 3 AA Batteries 2 TOP Horizontal Plane Indicator Light H IV ...

Page 5: ... z i r o H m m 2 t a 6 1 h t g n e l e n i l d n e o t d n e e n a l p l a c i t r e V m 3 t a m 6 1 h t g n e l e n i l h t g n e L e n i L x o r p p A 6 4 t a 3 3 e c n a t s i d t e g r a t e l g n A n a F 0 7 x o r p p A e g n a R g n i k r o W o t p U 5 5 6 a e r a g n i k r o w f o n o i t a n i m u l l i n o p u t n e d n e p e d e c r u o S r e s a L s e d o i d r e s a l e t a r a p e s o...

Page 6: ...he Laser by sliding the door to the center See Figure B 3 Be sure to set the Laser on as flat a surface as possible The self leveling range of the Laser is within 5 The Laser will work properly if it is positioned within its self leveling range 4 Press the button on the top of the unit to switch ON Either button will turn on the red indicator light The H Button is for the horizontal line and the I...

Page 7: ...e wall Use the Adjustment Knob to choose measurements See Figure G You can also use the Magnetic Bracket 3 not shown for hanging from a steel beam or shelf 2 Set the Hand Wheel Rotary Base and Laser assembled on the shelf of the Wall Mount 1 Use the Mounting Knob for the Wall Mount 1 and thread it through the shelf and into the threaded hole on the bottom of the Laser Rotary Base assembly Adjust l...

Page 8: ...If II a1 a2 I Ib1 b2 II 1mm the accuracy is within tolerance Otherwise return the instrument to a qualified technician for repair Horizontal Beam Level Accuracy End to End 1 Set up the instrument with the Wall Mount 1 or Tripod not included approximately 16 ft from the wall Please ensure the Rotary Base in approximately level 2 Press both the horizontal and vertical buttons to project a laser cros...

Page 9: ...instrument to a qualified technician for repair After Using Laser 1 Detach Laser from Wall Mount 1 or Tripod not included 2 Switch off both laser lines horizontal and vertical Check to see indicator light is off 3 Lock Pendulum Lock by sliding the door from the center position After use the Pendulum Lock should be locked before the instrument is put away in the Carrying Bag 4 See Figure B Note Whe...

Page 10: ...SKU 91179 For technical questions please call 1 800 444 3353 Page 10 Swing Mechanism Assembly Swing Mechanism Parts List ...

Page 11: ...SKU 91179 For technical questions please call 1 800 444 3353 Page 11 Laser Body Parts List Body Parts Assembly ...

Page 12: ...SKU 91179 For technical questions please call 1 800 444 3353 Page 12 Magnetic Damping Parts List Magnetic Damping Device Assembly ...

Page 13: ...SKU 91179 For technical questions please call 1 800 444 3353 Page 13 Rotary Base Assembly Rotary Base Assembly Parts List ...

Page 14: ...Y STATES THAT ALL REPAIRS AND PARTS REPLACEMENTS SHOULD BE UNDERTAKEN BY CERTIFIED AND LICENSED TECHNICIANS AND NOT BY THE BUYER THE BUYER ASSUMES ALL RISK AND LIABILITY ARISING OUT OF HIS OR HER REPAIRS TO THE ORIGINAL PRODUCT OR REPLACEMENT PARTS THERETO OR ARISING OUT OF HIS OR HER INSTALLATION OF REPLACEMENT PARTS THERETO NOTE Some parts are listed and shown for illustration purposes only and ...

Reviews: