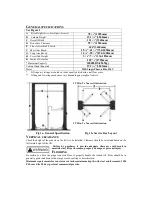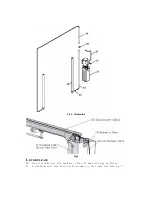
Fig 2
–
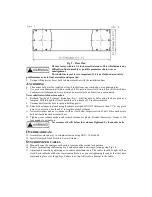
Floor Plan
Be sure to stay within a 1/4 inch overall tolerance. This will eliminate any
difficulty in final assembly or possible premature chain wear or
misalignment.
The chalk line layout is very important. If it is not followed accurately
problems may arise in final assembly and operation.
5.
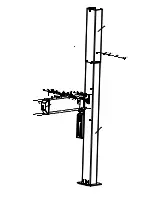
Using a lifting device, Erect both column assemblies with the installation lines.
A
NCHORING
6.
The anchor bolts must be installed at least 8 inches from any crack, edge, or expansion joint.
7.
Use a concrete hammer drill with a carbide bit. Do not use excessively worn bits or bits which have
been incorrectly sharpened. A core bit may be necessary if an obstruction is encountered.
Never substitute with shorter anchor.
8.
Recheck
“
Inside of Columns
”
dimension, Fig 1. Drill the anchor holes using the base plate as a
template. Drill through the floor if possible or to a depth of 3.5 inches minimum.
9.
Vacuum dust from the hole for proper holding power.
10.
Shim both columns to plumb using the shims provided. DO NOT shim more than 1/2" at any given
point. Use a level no less than 24
”
in length to plumb columns.
11.
Assemble washer and nut to anchor with nut just below impact section of bolt. Drive anchor into
hole until nut and washer contact base.
12.
Tighten power column anchors and recheck column for plumb. Reshim if necessary. Torque to 150
foot pounds to set anchors.
Never remove the lift before the
columns Tightened by the anchor bolts.
O
VERHEAD BEAM
13.
Assemble overhead ass
’
y to column extension using M12
×
30 Hex bolt.
14.
Install Overhead Limit Switch to Power Column.
S
YNCHRONIZER CABLES
15.
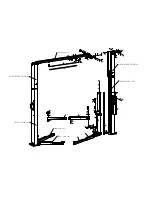
Manually raise the carriages until each is located on the second lock position.
16.
Route synchronizing cables using Fig 3 and attach ends to carriages
’
joining using Fig
’
s 4.
17.
Adjust cable tension by adjusting each cable
’
s adjustment nuts. The cables should be tight with no
slack. Each cable should be the same tension. Be sure as you are tightening the cables that they have
remained in place over the pulleys. Failure to do this will result in damage to the cable.

