background image

31810 

For technical questions, please call 1-888-866-5797.


Page 5

7. 

People with pacemakers should 
consult their physician(s) before 
use.  Electromagnetic fields in close 
proximity to heart pacemaker could 
cause pacemaker interference or 
pacemaker failure.

8. 

The warnings, precautions, and 
instructions discussed in this manual 
cannot cover all possible conditions 
and situations that may occur.  The 
operator must understand that 
common sense and caution are 
factors which cannot be built into this 
product, but must be supplied by the 
operator.

9. 

Maintain labels and nameplates 
on the Tool.

  These carry important 

information.  If unreadable or missing, 
contact Harbor Freight Tools for a 
replacement.

  SAVE THESE 

INSTRUCTIONS.

GROUNDING


TO PREVENT 
ELECTRIC SHOCK 

AND DEATH FROM 
INCORRECT GROUNDING 
WIRE CONNECTION: 
Check with a qualified 
electrician if you are in doubt 
as to whether the outlet is 
properly grounded.  Do not 
modify the power cord plug 
provided with the tool.  Never 
remove the grounding prong 
from the plug.  Do not use the 
tool if the power cord or plug 
is damaged.  If damaged, have 
it repaired by a service facility 
before use.  If the plug will not 

fit the outlet, have a proper 
outlet installed by a qualified 
electrician.

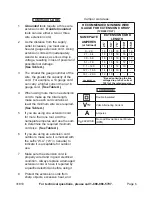
Grounded Tools: Tools with Three 

Prong Plugs

3-Prong Plug and Outlet

1. 

Tools marked with “Grounding 
Required” have a three wire cord 
and three prong grounding plug.  
The plug must be connected to a 
properly grounded outlet.  If the tool 
should electrically malfunction or 
break down, grounding provides a 
low resistance path to carry electricity 
away from the user, reducing the risk 
of electric shock.  

(See 3-Prong Plug 

and Outlet.)

2. 

The grounding prong in the plug is 
connected through the green wire 
inside the cord to the grounding 
system in the tool.  The green wire 
in the cord must be the only wire 
connected to the tool’s grounding 
system and must never be attached 
to an electrically “live” terminal.  

(See 

3-Prong Plug and Outlet.)

3. 

The tool must be plugged into an 
appropriate outlet, properly installed 
and grounded in accordance with all 
codes and ordinances.  The plug and 
outlet should look like those in the 
preceding illustration.  

(See 3-Prong 

Plug and Outlet.)

Summary of Contents for 31810

Page 1: ...his manual and the receipt in a safe and dry place for future reference 18i When unpacking make sure that the product is intact and undamaged If any parts are missing or broken please call 1 888 866 5797 as soon as possible Copyright 2001 by Harbor Freight Tools All rights reserved No portion of this manual or any artwork contained herein may be reproduced in any shape or form without the express ...

Page 2: ...hildren and visitors away while operating a power tool Distractions can cause you to lose control Protect others in the work area from debris such as chips and sparks Provide barriers or shields as needed ELECTRICAL SAFETY 1 Grounded tools must be plugged into an outlet properly installed and grounded in accordance with all codes and ordinances Never remove the grounding prong or modify the plug i...

Page 3: ...ore plugging in Carrying power tools with your finger on the Power Switch or plugging in power tools with the Power Switch on invites accidents 4 Remove adjusting keys or wrenches before turning the power tool on A wrench or a key that is left attached to a rotating part of the power tool may result in personal injury 5 Do not overreach Keep proper footing and balance at all times Proper footing a...

Page 4: ...rts or failure to follow maintenance instructions may create a risk of electric shock or injury SPECIFIC SAFETY RULES 1 Wear ANSI approved safety impact eye goggles hearing protection and a dust mask or respirator when operating this product 2 The Housing contains a high speed Impeller that can amputate fingers grab loose clothing and long hair and propel sawdust at high velocities NEVER operate t...

Page 5: ...prong from the plug Do not use the tool if the power cord or plug is damaged If damaged have it repaired by a service facility before use If the plug will not fit the outlet have a proper outlet installed by a qualified electrician Grounded Tools Tools with Three Prong Plugs 3 Prong Plug and Outlet 1 Tools marked with Grounding Required have a three wire cord and three prong grounding plug The plu...

Page 6: ...re than one tool add the nameplate amperes and use the sum to determine the required minimum cord size See Table A 6 If you are using an extension cord outdoors make sure it is marked with the suffix W A W in Canada to indicate it is acceptable for outdoor use 7 Make sure the extension cord is properly wired and in good electrical condition Always replace a damaged extension cord or have it repair...

Page 7: ...ASSEMBLY INSTRUCTIONS NOTE For additional information regarding the parts mentioned in the following pages refer to the Assembly Diagram near the end of the manual 41 42 26 39 21 1 Remove the Lock Washers 21 and Nuts 26 from the Caster 42 Studs 2 Thread a Nut 26 back onto a Caster s stud securely 3 Insert the Caster s stud into a hole at the bottom of the Frame 41 4 Slide a Lock Washer 21 onto the...

Page 8: ... 120 volt grounded electrical outlet 2 Connect the Dust Collector to a woodworking machine s dust port using appropriate dust collection hoses and clamps sold separately then turn the Dust Collector on After turn on the machine NOTICE Only attach this dust collector to a woodworking machine 3 When finished using the Dust Collector turn it off Unplug the Power Cord Plug from its electrical outlet T...

Page 9: ...al condition of the Tool Check for loose screws misalignment or binding of moving parts cracked or broken parts damaged electrical wiring and any other condition that may affect its safe operation If abnormal noise or vibration occurs have the problem corrected before further use Do not use damaged equipment 2 Daily With a soft brush cloth or vacuum remove all dust and debris from the exterior of ...

Page 10: ...ARTS LIST Part Description Qty 1 Motor 1 2 Switch 1 3 Motor Label 1 4 Key 5 x 25 1 5 Washer 1 6 Screw M6 x 12 13 7 Housing Cover 1 8 Flat Washer 8 9 Star Washer 8 10 Hex Bolt M6 x 12 4 11 Seal Gasket 1 12 Hex Bolt M6 x 16 4 13 Spring Washer 5 14 Impeller 1 15 Fan Retainer 1 16 Flat Washer 1 17 Hex Nut 14 x 1 5 1 18 Flat Washer 9 19 Handle Cushion 1 20 Handle 1 21 Lock Washer 5 22 Phillips Screw M6...

Page 11: ...31810 For technical questions please call 1 888 866 5797 Page 11 ASSEMBLY DIAGRAM ...

Page 12: ...w the exclusion or limitation of incidental or consequential damages so the above limitation of exclusion may not apply to you THIS WARRANTY IS EXPRESSLY IN LIEU OF ALL OTHER WARRANTIES EXPRESS OR IMPLIED INCLUDING THE WARRANTIES OF MERCHANTABILITY AND FITNESS To take advantage of this warranty the product or part must be returned to us with transportation charges prepaid Proof of purchase date an...

Reviews: