background image

                        Additional Safety Rules for Mini  Lathe

1.  Before turning on the motor, make sure
that proper lubrication is included (see page
of this manual).
2.  Always dismount the chuck and lathe’s
face plate by hand.  Do not use power tools
to perform these tasks.
3.  After the chuck is installed, remove the
wrenches and tools to eliminate the possi-
bility of accident when the lathe is turned
on.
4.  Never adjust or fix workpieces or any
rotating parts when the lathe is on.  Never
use instruments to measure the workpiece

when the lathe is on.  Never check the
sharpness of the cutter by using your hand.
5.  Avoid accidents resulting from broken
workpieces.   Never use an excessively large
tool cutter to do feeding with a large
workpiece.

6.Never change the gear when the lathe is in
operation.
7.  Always keep a safe distance from the lathe
to minimize the risk of being struck by a
broken workpiece.

____________________________________________________________________________

Thank you for choosing a Harbor Freight Tools product!  For future reference, please
complete the owner’s record below:

Model:_______________  Serial Number:_________________  PurchaseDate:__________

SAVE THE RECEIPT, WARRANTY AND THESE INSTRUCTIONS.  It is important that you
read the entire manual to become familiar with the unit BEFORE you begin assembly.
____________________________________________________________________________

                                       Technical Specifications

Motor:

3/4 Horsepower

Power Source:

110V, Single Phase

Lathe Specifications:

Drive:  Gear and Belt
Swing Over Bed:  7”
Distance Between Centers:  10”
Spindle Bore:  3/4”
Quill Travel:  2”
Cross Slide Travel:  2 3/4”
Cross Slide Swing:  4 1/2”
Work Tolerance:  .005”
Bed Dimensions:  15 7/8” long, 3 1/4” wide
Saddle Travel:  6 7/8”
Compound Travel:  2 7/8”

SKU #33684

Page 4

Summary of Contents for 33684

Page 1: ...CA 93011 Copyright 2000 by Harbor FreightTools All rights reserved No portion of this manual or any artwork contained herein may be reproduced in any shape or form without the express written consent...

Page 2: ...g to contain longhair 10 Use eye and ear protection Always wear ANSI approved chemical splash goggles whenworkingwithchemicals ANSI approved impact safety goggles at othertimes ANSI approved dust mask...

Page 3: ...connect the green ear on the adapter to the outlet Unscrew the center screw of the outlet cover and put the screw through the green ear Plug the adapter s two prongs into the outlet and replace the ce...

Page 4: ...tion 7 Always keep a safe distance from the lathe tominimizetheriskofbeingstruckbya broken workpiece ____________________________________________________________________________ Thank you for choosing...

Page 5: ...materialuntiltheMiniLatheisfullyassembledandoperational If any parts are missing or broken please call Harbor FreightTools at 1 800 444 3353 Be sure you have all parts described in the parts listing o...

Page 6: ...stock 12 Tailstock QuillAdjust Handwheel 13 Tailstock Set Screw 14 Compound Rest Crank 1 15 Feeding Control Wheel 16 Cross Feeding Crank 17 Automatic Feeding Handle 18 Thread Dial Indicator 19 Bed Way...

Page 7: ...itch to the ON position and run the lathe for 3 minutes When the lathe is on the Power Lamp 2 will remain on Check to see that the lathe operates normally 7 Check the Compound Rest Crank and the Cross...

Page 8: ...figure 7 If the jaws do not fit well together you will need to reassemblethemagain Whenmountingaworkpiece itisrecommended that all three jaws are loosened at the same time Thiswillprotectthethreadsin...

Page 9: ...Threading Select the feeding direction selector to the thread direction desired Then press down handle A infigure12bymatchingtheright calibrationsonthethreaddialindicator B andcontinuewiththeautomatic...

Page 10: ...ing figure 16 Set Up Instructions for Threading Gears By changing the gear set up it is possible to cut any thread size The factory set up for Mini Lathe gearsisasfollows seeillustrationbelow To chang...

Page 11: ...4 20 40 20 40 22 40 55 72 20 45 20 40 24 40 60 76 20 50 30 57 26 40 65 80 20 50 20 40 28 20 35 88 20 55 20 40 32 20 40 96 20 60 20 40 36 20 45 104 20 65 20 40 Example To cut 12 threads per inch see il...

Page 12: ...SKU 33684 Page 13...

Page 13: ...SKU 33684 Page 14...

Page 14: ...SKU 33684 Page 15 Parts Diagram...

Page 15: ...tor before operation Move the cutting blade to the proper position and adjust theThread Dial Indicator to the desired mark PulldowntheHandleandtheMiniLathestartsthreadingautomatically Remember After t...

Page 16: ...SKU 33684 Page 16...

Page 17: ...5 Gear Z 30 35 40 40 45 50 55 57 60 65 10 pieces 6 Double head wrench 8 10 14 17 2 pieces 7 Inside six horn wrench S 3 4 5 6 4 pieces 8 Oilcan 1 piece 9 Center MT 2 1 piece 143 10 Rubber 4 pieces 125...

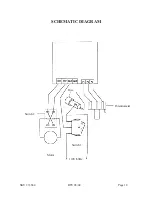
Page 18: ...SKU 33684 Page 18 Potentiometer Switch2 Motor Switch1 110V 60Hz Fuse SCHEMATIC DIAGRAM REV 08 04...

Reviews:

Related manuals for 33684