MainTEnancE
WARNING: Before Performing Any Maintenance, Unplug the Tool from the Power Source!
Changing the Hydraulic Oil
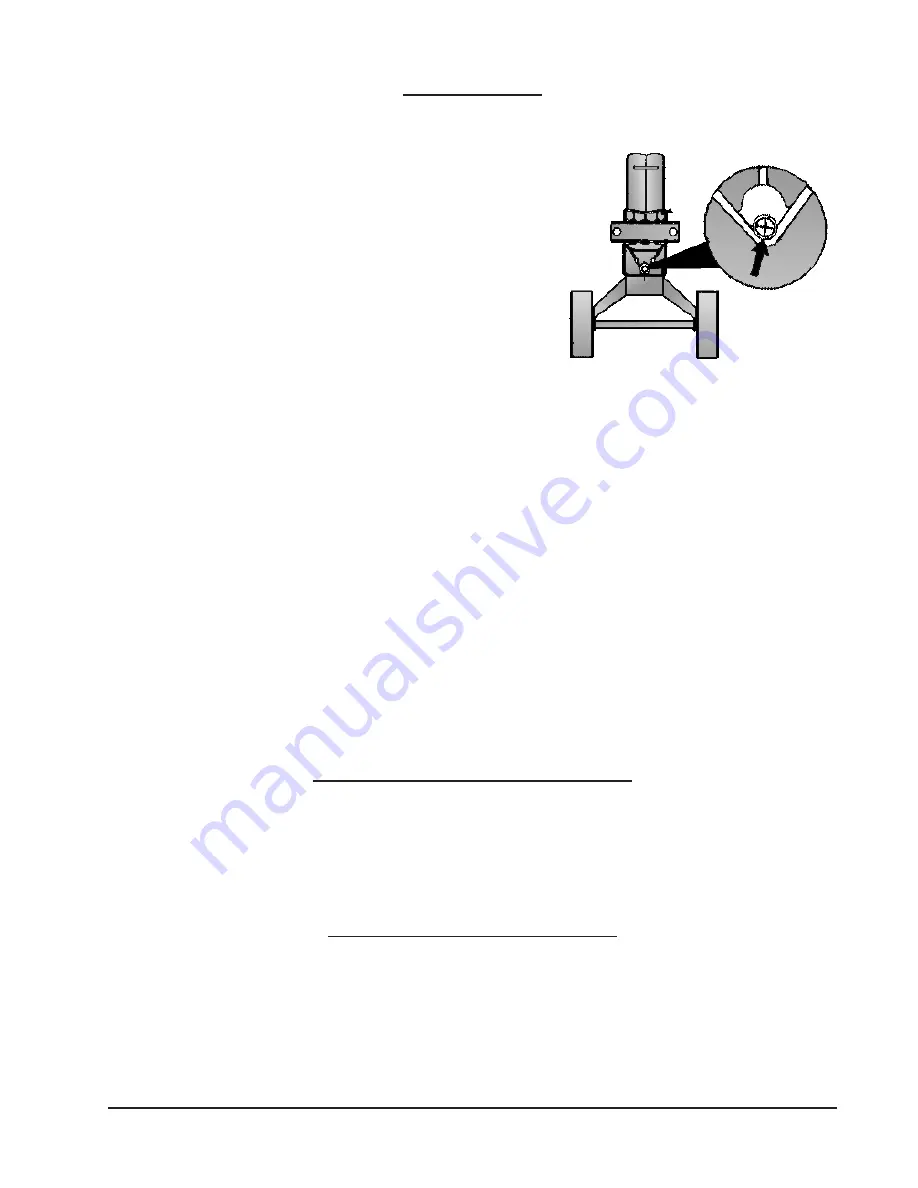
Please refer to Figure 3 on this page, and Parts Diagram on
page 10.
Make sure the LOG PUSHER (#49) is fully
retracted.
Carefully unscrew the OIL GAUGE (#10) and
remove it completely.
Position a container under the log splitter that will
hold at least 8 quarts of oil. Then tilt the machine to
empty the oil into the container.
Tilt the Log Splitter the other way, with the Oil Fill /
Drain Port up. Using a clean funnel, pour in 3 quarts
of Hydraulic Oil.
(Be sure to use only clean, high quality hydraulic oil specifically made for
this purpose.)
Clean the OIL GAUGE (#10) , and carefully insert it to make sure the oil level is between the
two marks on the dipstick.
Clean the OIL GAUGE (#10), OIL SEAL (#12), and O RING OIL SEAL (#11) thoroughly,
and re-install. Be careful not to damage the threads of the aluminum FRONT COVER (#15).
Warning: Be sure to dispose of the dirty oil properly. Take it to your local waste oil recycling
center. Never dump it on the ground or mix it with trash.
Refilling the Hydraulic Oil
Periodically check the level of the oil. It must be between the two notches on the Dip Stick.
If the oil level is low, refill using a recommended oil.
Sharpening the Wedge
After long periods of operation, and when required; sharpen the wedge using a fine-toothed
file and carefully removing any burrs or flat spots on the edge.
HoW To FREE a JaMMED Log
Release both controls, so that the LOG PUSHER (#49) will be fully retracted.
Insert a triangular wedge of wood under the log, and activate the log pusher to push the
wedge under the jammed log.
Repeat this process using progressively larger wedges, until the jammed log is freed.
Warning: Never hammer on the jammed log, or place your hands near the log when attempt-
ing to free it.
PLEASE READ THE FOLLOWING CAREFULLY
THE MANUFACTURER AND/OR DISTRIBUTOR HAS PROVIDED THE PARTS DIAGRAM IN THIS MANUAL AS A
REFERENCE TOOL ONLY. NEITHER THE MANUFACTURER NOR DISTRIBUTOR MAKES ANY REPRESENTATION OR
WARRANTY OF ANY KIND TO THE BUYER THAT HE OR SHE IS QUALIFIED TO MAKE ANY REPAIRS TO THE PRODUCT
OR THAT HE OR SHE IS QUALIFIED TO REPLACE ANY PARTS OF THE PRODUCT. IN FACT, THE MANUFACTURER
AND/OR DISTRIBUTOR EXPRESSLY STATES THAT ALL REPAIRS AND PARTS REPLACEMENTS SHOULD BE
UNDERTAKEN BY CERTIFIED AND LICENSED TECHNICIANS AND NOT BY THE BUYER. THE BUYER ASSUMES ALL
RISK AND LIABILITY ARISING OUT OF HIS OR HER REPAIRS TO THE ORIGINAL PRODUCT OR REPLACEMENT PARTS
THERETO, OR ARISING OUT OF HIS OR HER INSTALLATION OF REPLACEMENT PARTS THERETO.
1.
2.
3.
4.
5.
6.
1.
2.
3.
Page 8 SKU # 40318


