background image

Page 11

For technical questions, please call 1-800-444-3353.

Item 60238 


General Operating Instructions

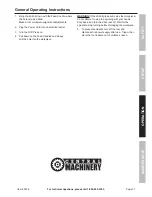
1.  Bring the drill bit down with the Feed Knob to where 

the hole is to be drilled. 

Make minor workpiece alignment adjustments.

2.  Plug the Power Cord into an electrical outlet.

3.  Turn the Drill Press on.

4.  Pull down on the Feed Handles and slowly 

drill the hole into the workpiece.

WARNING!

 If the drill bit grabs and spins the workpiece, 

do not attempt to stop the spinning with your hands. 

Step back, and turn the drill press off. Wait for the 

spindle to stop turning before dislodging the workpiece.

5.  To prevent accidents, turn off the tool and 

disconnect its power supply after use.  Clean, then 

store the tool indoors out of children’s reach.

SAFETY

OPERA

TION

MAINTENANCE

SETUP

Summary of Contents for 60238

Page 1: ......

Page 2: ...nings Read all safety warnings and instructions Failure to follow the warnings and instructions may result in electric shock fire and or serious injury Save all warnings and instructions for future reference 1 KEEP GUARDS IN PLACE and in working order 2 REMOVE ADJUSTING KEYS AND WRENCHES Form habit of checking to see that keys and adjusting wrenches are removed from tool before turning it on 3 KEE...

Page 3: ... frees both hands to operate tool 13 DON T OVERREACH Keep proper footing and balance at all times 14 MAINTAIN TOOLS WITH CARE Keep tools sharp and clean for best and safest performance Follow instructions for lubricating and changing accessories 15 DISCONNECT TOOLS before servicing when changing accessories such as blades bits cutters and the like 16 REDUCE THE RISK OF UNINTENTIONAL STARTING Make ...

Page 4: ...t the tool s plug 6 Repair or replace damaged or worn cord immediately 125 V 3 Prong Plug and Outlet for up to 125 V and up to 15 A Grounding Pin 7 This tool is intended for use on a circuit that has an outlet that looks like the one illustrated above in 125 V 3 Prong Plug and Outlet The tool has a grounding plug that looks like the plug illustrated above in 125 V 3 Prong Plug and Outlet 8 The out...

Page 5: ...ng the cord on this product will expose you to lead a chemical known to the State of California to cause cancer and birth defects or other reproductive harm Wash hands after handling California Health Safety Code 25249 5 et seq 18 The warnings precautions and instructions discussed in this instruction manual cannot cover all possible conditions and situations that may occur It must be understood b...

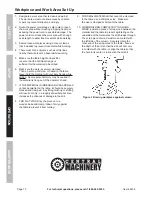
Page 6: ...m its electrical outlet before performing any procedure in this section Note For additional information regarding the parts listed in the following pages refer to the Assembly Diagram near the end of this manual Mounting Secure the tool to a supporting structure before use Before assembly bolt the Base to a flat level solid workbench capable of supporting the weight of the drill press and any work...

Page 7: ...rews 9 Headstock 42 Feed Seat 7 Figure C Installing Headstock and Feed Handles Installing the Chuck 1 Loosen the Pivot Lever and slide the Table up the Column to within 6 of the Spindle 71 Tighten the Pivot Lever 2 Open the jaws of the Chuck 72 to their maximum using the supplied Chuck Key 3 Put a piece of scrap wood on the table to protect the Chuck nose 4 Ensuring all parts are thoroughly clean ...

Page 8: ...e read using the Angle Scale 53 3 TO ENSURE THAT THE DRILL IS ENTIRELY PERPENDICULAR TO THE TABLE insert a straight round bar not included in the Chuck 72 place a square on the Table 54 and bring it up to the round bar Adjust the angle as needed CAUTION To prevent injury from unexpected Table movement tighten Angle Bolt 56 and Pivot Lever 51 after adjustment Column 8 Table Support 52 Pivot Lever 5...

Page 9: ...is too long to be properly tensioned it must be replaced 760 RPM Spindle Motor 1150 RPM Spindle Motor 1630 RPM Spindle Motor 2180 RPM Spindle Motor 3070 RPM Spindle Motor Figure H Drill Speed Table The table above shows the belt arrangements for given drill speeds A full chart is also located on the inside of the pulley cover Light Bulb Installation 1 To prevent injury allow the old Light Bulb 73 ...

Page 10: ...vere personal injury may be caused if the material is flung out of the operator s hand 7 IF THE MATERIAL IS IRREGULARLY SHAPED and cannot be laid flat on the table it should be securely blocked and clamped Any tilting twisting or shifting will result not only in a roughly drilled hole but also increases the chances of damage to the drill 8 FOR FLAT WORK lay the piece on to a wooden base and clamp ...

Page 11: ...e Drill Press on 4 Pull down on the Feed Handles and slowly drill the hole into the workpiece WARNING If the drill bit grabs and spins the workpiece do not attempt to stop the spinning with your hands Step back and turn the drill press off Wait for the spindle to stop turning before dislodging the workpiece 5 To prevent accidents turn off the tool and disconnect its power supply after use Clean th...

Page 12: ...oblem corrected before further use Cleaning Maintenance and Lubrication 1 BEFORE EACH USE inspect the general condition of the tool Check for loose hardware misalignment or binding of moving parts cracked or broken parts damaged electrical wiring and any other condition that may affect its safe operation 2 AFTER USE wipe external surfaces of the tool with clean cloth 3 WARNING If the supply cord o...

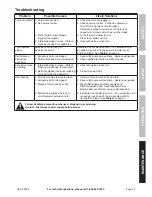
Page 13: ...ime 1 Accessory dull or damaged 2 Carbon brushes worn or damaged 1 Keep cutting accessories sharp Replace as needed 2 Have qualified technician replace brushes Excessive noise or rattling 1 Internal damage or wear Carbon brushes or bearings for example 2 Belt if equipped too loose slipping or too tight bearing damage 1 Have technician service tool 2 Properly tension belt Overheating 1 Forcing mach...

Page 14: ... Switch 1 49 Nut M8 1 50 Set Screw 1 51 Pivot Lever 1 52 Table Support 1 53 Angle Scale 1 54 Table 1 55 Spring Washer 12 1 56 Angle Bolt M12 25 1 57 Pointer 1 58 Pointer Stud 1 59 V Belt K 660 1 60 Spindle Pulley 1 61 Retaining Ring 22 1 62 Internal Spindle Sleeve 1 63 Retaining Ring 40 2 64 Ball Bearing 6203 2 65 Retaining Ring 12 1 66 Ball Bearing 6201 2 67 Gasket 1 68 Spindle Sleeve 1 69 Bolt M...

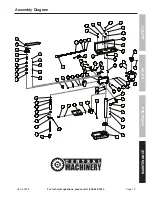
Page 15: ...gram 1 2 3 4 8 7 6 9 10 11 13 14 15 16 12 3 17 18 21 25 24 27 26 28 29 23 22 30 31 20 35 19 37 27 36 41 40 39 39 38 34 43 44 45 46 47 48 57 39 39 58 24 59 60 61 63 64 64 63 65 66 67 68 66 70 69 35 71 72 51 52 53 54 55 56 15 62 50 49 33 33 32 5 42 73 SAFETY OPERATION MAINTENANCE SETUP ...

Page 16: ... so the above limitation of exclusion may not apply to you THIS WARRANTY IS EXPRESSLY IN LIEU OF ALL OTHER WARRANTIES EXPRESS OR IMPLIED INCLUDING THE WARRANTIES OF MERCHANTABILITY AND FITNESS To take advantage of this warranty the product or part must be returned to us with transportation charges prepaid Proof of purchase date and an explanation of the complaint must accompany the merchandise If ...

Reviews: