background image

15.

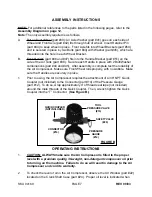
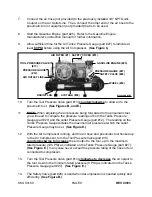
In the event fast decompression of the Air Tanks (part #39) is required, immedi-
ately turn off the Gasoline Engine (part #25) and pull out on the 

Pull Ring

 of the

Safety Valve (part #29) until both Air Tanks have fully decompressed.

(See Figures B, and E.)

16.

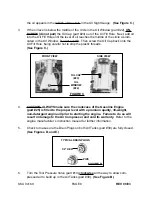
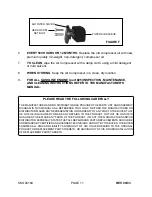
Pull out on the Safety Valve (part #29) to immediately release air pressure in the
Air Tanks (part #39).  

(See Figure I.)

SKU 04169

PAGE 10

REV 09/03

17.

When finished using the Air Compressor, turn off the Gasoline Engine
(part #25), and pull out on the Pull Ring of the Safety Valve (part #29) until both
Air Tanks (part #39) have fully decompressed.  

(See Figures B, and E.)

INSPECTION, MAINTENANCE, AND CLEANING

1.

CAUTION!

 Aways 

release all pressure from the system and disconnect all

tools

 from the Air Compressor before performing any inspection, maintenance,

or cleaning.  Be aware that the sudden release of air from any valve or air tool can
present a danger to one’s ears.

2.

BEFORE EACH USE,

 inspect the general condition of the Air Compressor.

Check all air fittings for leaks.  Check for loose screws, misalignment or binding
of moving parts, cracked or broken parts, damaged, and any other condition that
may affect the safe operation of this tool.  If abnormal noise or vibration occurs,
immediately  release all pressure from the system and have the problem cor-
rected before further use.  

Do not use damaged equipment.

The Drain Plugs are  located underneath each Air Tank, and should be used daily
to release all trapped moisture that may cause Air Tank corrosion.  Slowly and
carefully unscrew

 (no more than four threads)

 the Drain Plugs until the  con-

densation begins to be released from the Air Tanks.  Allow sufficient time for all of
the condensation to escape from the Air Tanks.  Then, firmly re-tighten the Drain
Plugs.  

(See Figure E.)

3.

DAILY: EMPTY CONDENSATION FROM THE AIR TANKS (part #39).

4.

DAILY:

 Check the Air Compressor oil level.  If necessary, fill with a premium

quality, 30-weight, non-detergent, compressor oil.  

NOTE:

 When checking the Air

Compressor oil level, make sure to 

unscrew

 (do not pull) the Oil Cap (part #23).

5.

EVERY 100 HOURS OF USE:

 Clean the Air Filter Sleeve (part #1) with a mild

solvent.  Then, dry and re-attach the Air Filter Sleeve.  (Replace the Air Filter
Sleeve if it is too dirty to properly clean.)  To clean or replace the Air Filter Sleeve,
remove the two Hex Socket Set Bolts.  Remove the Air Filter Cover.  Remove the
Air Filter Sleeve and clean.  Then, replace the Air Filter Sleeve and two Hex
Socket Set Bolts.  

(See Figures E, and F.)

Summary of Contents for 04169

Page 1: ...o CA 93011 Visit our Web site at http www harborfreight com Copyright 2003 by Harbor Freight Tools All rights reserved No portion of this manual or any artwork contained herein may be reproduced in any shape or form without the express written consent of Harbor Freight Tools For technical questions please call 1 800 444 3353 ...

Page 2: ...r wet work areas invite injuries 2 KEEP CHILDREN AWAY FROM WORK AREA Do not allow children to handle this product 3 STORE IDLE EQUIPMENT When not in use tools and equipment should be stored in a dry location to inhibit rust Always lock up tools and equipment and keep out of reach of children 4 DO NOT USE THIS PRODUCT IF UNDER THE INFLUENCE OF ALCOHOL OR DRUGS Read warning labels on prescriptions t...

Page 3: ...acement parts Only use accessories intended for use with this product Approved accessories are available from Harbor Freight Tools 12 MAINTAIN THIS PRODUCT WITH CARE Keep this product clean and dry for better and safer performance 13 MAINTENANCE For your safety service and maintenance should be performed regularly by a qualified technician 14 USE THE RIGHT TOOL FOR THE JOB Do not attempt to force ...

Page 4: ...VER ATTEMPT TO REPAIR OR MODIFY THE AIR COMPRESSOR TANKS part 39 Welding drilling or any other modification will weaken the Tanks resulting in damage from rupture or explosion Always replace worn cracked or damage Tanks 10 NEVER OPERATE THE AIR COMPRESSOR WITHOUT ITS SAFETY COVER part 31 ATTACHED AND IN GOOD WORKING ORDER Air Compressor scan start automatically without warning Personal injury and ...

Page 5: ...RESSOR WITH KNOWN LEAKS IN THE FUEL SYSTEM 19 NEVER STORE FUEL OR OTHER FLAMMABLE MATERIALS NEAR THE AIR COMPRESSOR 20 WARNING CARBON MONOXIDE CAN CAUSE SEVERE NAUSEA FAINTING OR DEATH DO NOT OPERATE THE AIR COMPRESSOR INSIDE A CLOSED BUILDING OR A POORLY VENTILATED AREA 21 FIRE AND EXPLOSION DANGER AVOID CONTACT WITH HOT FUEL OIL AND EXHAUST FUMES 22 PROLONGED EXPOSURE TO NOISE LEVELS ABOVE 85 dB...

Page 6: ...LY COOL BEFORE PERFORMING ANY INSPECTION MAINTENANCE OR CLEANING PROCEDURES ON THE UNIT 30 WARNING This product contains or produces a chemical known to the State of California to cause cancer and birth defects or other reproductive harm California Health Safety Code 25249 5 et seq SKU 04169 PAGE 6 REV 09 03 TO PNEUMATIC TOOL EQUIPMENT TO AIR COMPRESSOR OUTLET LINE OILER WATER FILTER NOTINCLUDED F...

Page 7: ...e Air Compressor Make sure Front Wheel rolls properly with no wobble Make sure the Handles are securely in place OPERATING INSTRUCTIONS 1 CAUTION ALWAYS make sure the Air Compressor is filled to the proper level with a premium quality 30 weight non detergent compressor oil prior to turning on the machine Failure to do so will result in damage to the Air Compressor and void its warranty 2 To check ...

Page 8: ... REV 09 03 OIL WINDOW 22 OIL CAP 23 FRONT VIEW SIDE VIEW FIGURE C 4 CAUTION ALWAYS make sure the crankcase of the Gasoline Engine part 25 is filled to the proper level with a premium quality 30 weight non detergent engine oil prior to starting the engine Failure to do so will result in damage to the Air Compressor and void its warranty Refer to the engine manufacturer s instruction manual for furt...

Page 9: ...e air pressure being forwarded to the pneumatic tool you will need to compare the pressure readings of both the Tanks Pressure Gauge part 27 and the outlet Pressure Gauge part 12 The reading on the Tanks Pressure Gauge dictates the maximum air pressure at which the outlet Pressure Gauge may be set See Figure E 12 With the Air Compressor running and the air hose and pneumatic tool hooked up to the ...

Page 10: ...t may affect the safe operation of this tool If abnormal noise or vibration occurs immediately release all pressure from the system and have the problem cor rected before further use Do not use damaged equipment The Drain Plugs are located underneath each Air Tank and should be used daily to release all trapped moisture that may cause Air Tank corrosion Slowly and carefully unscrew no more than fo...

Page 11: ... MANUFACTURER AND OR DISTRIBUTOR HAS PROVIDED THE PARTS LIST AND ASSEMBLY DIAGRAM IN THIS MANUAL AS A REFERENCE TOOL ONLY NEITHER THE MANUFACTURER OR DISTRIBUTOR MAKES ANY REPRESENTATION OR WARRANTY OF ANY KIND TO THE BUYER THAT HE OR SHE IS QUALIFIED TO MAKE ANY REPAIRS TO THE PRODUCT OR THAT HE OR SHE IS QUALIFIED TO REPLACE ANY PARTS OF THE PRODUCT IN FACT THE MANUFACTUER AND OR DISTRIBUTOR EXP...

Page 12: ...SKU 04169 PAGE 12 REV 09 03 PARTS LIST Z 5 5 Z 5 X Z 8 Z Q Q Q Z See Briggs Stratton Engine Parts List and Assembly Diagram for available replacement parts ASSEMBLY DIAGRAM 1 2 3 4 5 6 7 8 9 10 11 12 13 14 15 16 17 18 19 20 21 22 23 24 25 26 27 28 29 30 31 32 33 34 35 36 37 38 39 40 50 45 44 42 41 41 43 51 44 45 47 45 44 46 ...

Reviews: