VOLTAGE WARNING
Before connecting the tool to a power source (receptacle, outlet, etc.) be sure the voltage
supplied is about the same as that specified on the nameplate of the tool. If one says 120V and the
other says 110V then there will be no complications. Never try to plug a 110V tool into a 220V outlet,
or the other way around. The plug and outlet have completely different shapes. This is because a
power source with a voltage greater than that specified on the tool can result in a SERIOUS
INJURY to the user— as well as damage to the tool. If in doubt, DO NOT PLUG IN THE TOOL.
Using a power source with voltage (110V) less than the nameplate rating (220V) is harmful to the
motor.
EXTENSION CORDS
If your tool is double insulated and has a two-prong plug, you may use either a two- or
three-prong extension cord. If your tool has a grounded, three-prong plug, you must use a three-
prong extension cord with three-prong receptacles. Only use rounded jacket extension cords,
preferably listed by the Underwriters Laboratories (UL). Make sure the cord is rated for outdoor use
if you plan on using the tool outside; if you plan on indoor use, you may also use an outdoor rated
cord. Extension cords rated for outdoor use have the letters “WA” on the cord jacket.
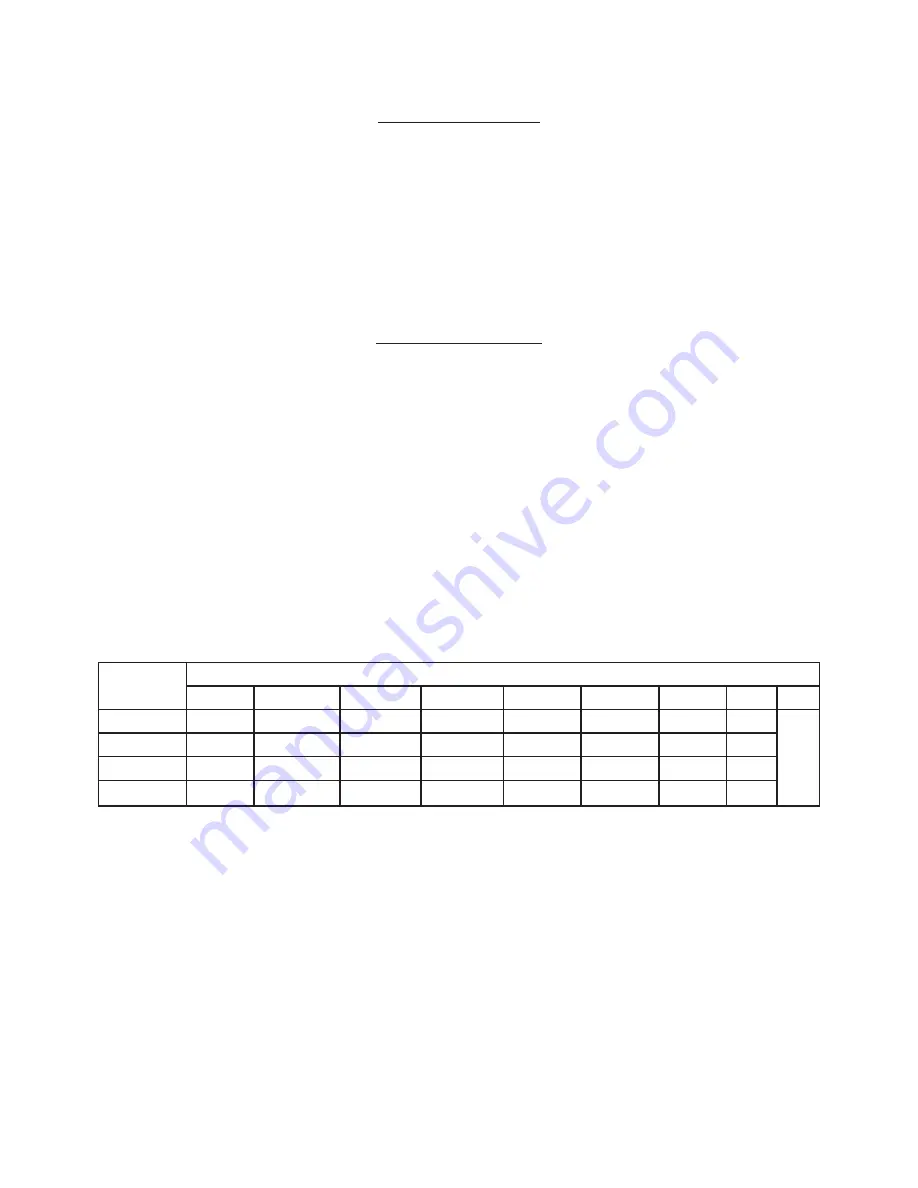
The extension cord must have a minimum wire size depending on the amperage of the tool
and the length of the extension cord. This size is signified by its AWG (American Wire Gauge)
rating; the smaller the gauge, the greater the cable’s capacity. If you are using two or more cords,
the total length of the combined cords must be used to determine the minimum AWG rating. Each
of the cords used must meet this rating.
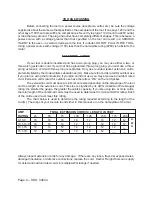
The chart below is used to determine the rating required according to the length of the
cord(s). The amps of your tool are found either in this manual, or on the nameplate of the tool.
AMP
RATING
25
50
75
100
125
150
175
200
0-10.0
18
18
16
16
14
14
12
12
10.1-13.0
16
16
14
14
14
12
12
12
13.1-15
14
14
12
12
12
12
12
__
15.1-18
12
12
12
12
12
12
__
__
Always inspect extension cords for any damage. If there are any loose, frayed or exposed wires,
damaged insulation, or defective connections, replace the cord. Harbor Freight Tools can supply
UL listed and outdoor rated cords in multiple AWG ratings if needed.
TOTAL EXTENSION CORD(S) LENGTH IN FEET
A
W
G
Page 4 -- SKU: 34844

