background image

Page 6

SKU 40115

Note:  Have the following problems repaired by an authorized service technician.

1.  Problem:  Air leaking at trigger valve area.
Probable Cause:  Damaged 0-rings in trigger valve housing.
Solution:  Replace 0-rings.  Then re-check contact safety trip mechanism.
2.  Problem:  Air leaking  between housing and nose.
Probable Cause:  Loose screws in housing, damaged 0-rings or bumper.
Solution:  Tighten screws or replace 0-rings or bumper.
3.  Problem:  Air leaking between housing and End Cap.
Probable Cause: Loose screws or damaged gasket.
Solution:  Tighten Screws or replace gasket.
4.  Problem:  Runs slowly or has power loss.
Probable Cause:  Nailer/Stapler insufficiently oiled, broken spring in cylinder cap, exhaust
port in cap is blocked.
Solution:  Lubricate as instructed, install new spring, Replace damaged internal parts.
5.  Problem:  Nailer/Stapler skips driving nail or staple.
Probable Cause:  Worn or dirty bumper, damaged pusher spring, inadequate air flow, worn
or dry 0-ring on piston, damaged 0-ring on trigger valve, cap gasket leaking.
Solution:  Replace bumper or pusher spring, clean bumper and drive channel, check fittings,
replace or lubricate 0-rings, replace gasket.
6.  Problem:  Nails or staples are jammed in Nailer/Stapler or nose.
Probable Cause:  Guide on driver is worn.  Wrong size or damaged nails or staples, loose
magazine or nose screws, damaged driver.
Solution:  Replace guide, use recommended / undamaged nails or staples, tighten screws,
replace driver.
7.  Problem:  Nailer/Stapler will not drive down tight.
Probable Cause:  Rounded driver blade causing slippage, power loss, slow cycling and
power loss.
Solution:  Replace blade, adjust air pressure, check spring under cap for broken coils or
reduce length, check if cap in exhaust port is restricted.
8.  Problem:  Blade driving nail or staple too deeply.
Probable Cause:  Worn bumper or piston spacer.
Solution:  Replace either or both parts.

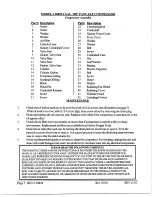
Maintenance

Warning!  Always disconnect the tool from the air compressor and then empty the magazine
of nails or staples before attempting to inspect or perform maintenance to the Nailer/Stapler.
1.  Inspect all of the nuts and screws and make sure they are securely fastened.
2.  Periodically lubricate the driving mechanism and magazine with a light oil.  Wipe down with
a clean cloth.  Never use gasoline or flammable solvents to clean the tool.
3.  Inspect your air compressor according to manufacturer’s instructions.
Warning!  If you detect any air leaks, power loss, the Nailer/Stapler skips driving, drives too
deep, or not deep enough, take the Nailer/Stapler to a qualified service technician.

Warning!  If you detect any air leaks, power loss, the Nailer/Stapler skips driving, drives too
deep, or not deep enough, take the Nailer/Stapler to an authorized service technician for
repair.

Troubleshooting

Summary of Contents for 38898

Page 1: ......

Page 2: ......

Page 3: ......

Page 4: ......

Page 5: ......

Page 6: ......

Page 7: ......

Page 8: ......

Page 9: ......

Page 10: ......

Page 11: ......

Page 12: ...hnical questions and replacement parts please call 1 800 444 3353 Model 40115 Copyright 2002 by Harbor Freight Tools All rights reserved No portion of this manual or any artwork contained herein may be reproduced in any shape or form without the express written consent of Harbor Freight Tools ASSEMBLY and OPERATING INSTRUCTIONS ...

Page 13: ... Do not attempt to force a small tool or attachment to do the work of a larger industrial tool There are certain applications for which this tool was designed It will do the job better and more safely at the rate for which it was intended Do not modify this tool and do not use this tool for a purpose for which it was not intended 6 Dress properly Do not wear loose clothing or jewelry as they can b...

Page 14: ...tool if any switch does not turn On and Off properly 15 Guard against electric shock Prevent body contact with grounded surfaces such as pipes radiators ranges and refrigerator enclosures 16 Replacement parts and accessories When servicing use only identical replacement parts Use of any other parts will void the warranty Only use accessories intended for use with this tool Approved accessories are...

Page 15: ...rom the compressor whenever loading or servicing WARNING Some dust created by power sanding sawing grinding drilling and other construction activites contain chemicals known to the State of California to cause cancer birth defects or other reproductive harm Some examples of these chemicals are Lead from lead based paints Crystalline cilica from bricks and cement or other masonry products Arsenic a...

Page 16: ...workpiece The Safety 37 or nose of the tool should return to its original position Squeeze the Trigger 30 The tool should not cycle fire If it cycles fires stop immediately and take the tool to an authorized service technician 8 Depress the Safety 37 on the nose of the tool against the workpiece and squeeze the Trigger 30 The tool must cycle fire If it fails to cycle fire take it to an authorized ...

Page 17: ...amaged nails or staples loose magazine or nose screws damaged driver Solution Replace guide use recommended undamaged nails or staples tighten screws replace driver 7 Problem Nailer Stapler will not drive down tight Probable Cause Rounded driver blade causing slippage power loss slow cycling and power loss Solution Replace blade adjust air pressure check spring under cap for broken coils or reduce...

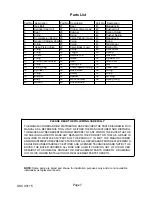
Page 18: ...IRS TO THE ORIGINAL PRODUCT OR REPLACEMENT PARTS THERETO OR ARISING OUT OF HIS OR HER INSTALLATION OF REPLACEMENT PARTS THERETO Parts List Part No Description Part No Description Part No Description 1 Hex Bolt 21 Seal 41 Magazine B 2 Cylinder Cap Unit 22 Trigger Valve Head 42 Pusher Unit 3 Seal 23 Comper 43 Spring Holder 4 0 ring 24 0 ring 44 Pusher Spring 5 Compression Spring 25 Valve Plunger Low...

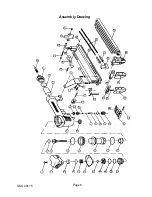
Page 19: ...Page 8 SKU 40115 Assembly Drawing ...

Reviews: