background image

Page 12

For technical questions, please call 1-888-866-5797.
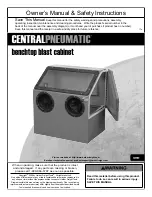
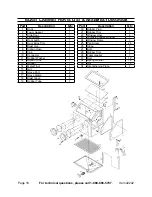
Item 42202

can easily move your hands and grip 
objects.

4. 

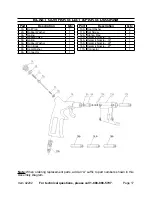
Grip the gun with one hand. Point the 
nozzle at the bottom of the Cabinet 
and operate the Gun for a moment 
to ensure everything is working 
correctly. If leaking is detected, or 
blasting material dust is escaping 
the side door seals, disconnect the 
air hose and have it repaired before 
using.

5. 

Hold the object you are working with 
in your other hand. Position your 
fingers so the Blast Glove (18) is 
not in the way of the area you are 
blasting. You may have to re-position 
your fingers many times during the 
blasting to ensure that you reach 
every area of your object.

6. 

Squeeze the Trigger on the Blast 
Gun to begin operation. Release the 
Trigger to stop.

Aim the nozzle directly at the surface 
of the material. Bring the nozzle 
to within 2 inches of the material if 
necessary. Move the Gun in a side-
to-side or circular motion, always 
making sure that your fingers are not 
in the way. 

Use even passes of the Gun to 
remove rust, body filler, or other soft 
materials. 

7. 

To check on the progress of your 
blasting, remove your hand from 
the gun first and pull your hand 
from the Glove. Remove your other 
hand. Once the gun is off, open the 
door and inspect your material. If 
additional blasting is required, follow 
steps 1 through 7 as needed.

Note:

 Use caution when sandblasting 

unfamiliar material. Test the tool on 
a small area before proceeding. This 
will ensure you will not damage or pit 
the material you wish to sandblast.
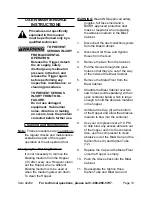
WARNING:

 Do not aim the gun at your 

fingers or the Blast Gloves. Do not 
operate the gun with the Side Door 
open or outside of the Blast Cabinet.

8. 

If the tool requires more force to 
accomplish the task, verify that the 
tool receives sufficient, unobstructed 
airflow (CFM) and increase the 
pressure (PSI) output of the regulator 
up to the maximum air pressure 
rating of this tool. 

CAUTION!  TO PREVENT TOOL 
AND ACCESSORY FAILURE, 
RESULTING IN INJURY: 
Do not exceed the tool’s maximum 
air pressure rating.


If the tool still does not have sufficient 
force at maximum pressure and 
sufficient airflow, then a larger tool 
may be required.

9. 

Once  completed, remove your hands 
from the Gloves and shut off the 
compressor. Open the Side Door and 
remove your material from the Blast 
Cabinet. 

10.  To prevent accidents, turn off the 

tool, detach the air supply, safely 
discharge any residual air pressure in 
the tool, and release the Trigger after 
use.  Clean external surfaces of the 
tool with a clean, dry cloth, and apply 
a thin coat of tool oil.  Then store the 
tool indoors out of children’s reach.

Summary of Contents for 42202

Page 1: ...broken please call 1 888 866 5797 as soon as possible Copyright 2000 by Harbor Freight Tools All rights reserved No portion of this manual or any artwork contained herein may be reproduced in any sha...

Page 2: ...ETY INSTRUCTIONS 5 SYMBOL DEFINITIONS 5 FUNCTIONAL DESCRIPTION 8 SPECIFICATIONS 8 COMPONENTS AND CONTROLS 8 INITIAL TOOL SET UP ASSEMBLY 9 UNPACKING 9 AIR SUPPLY 9 OPERATING INSTRUCTIONS 10 TOOL SET U...

Page 3: ...ion which if not avoided could result in death or serious injury CAUTION used with the safety alert symbol indicates a hazardous situation which if not avoided could result in minor or moderate injury...

Page 4: ...exposure to high intensity noise is able to cause hearing loss Tool use and care a Do not force the tool Use the correct tool for the application The correct tool will do the job better and safer at t...

Page 5: ...adjusted to the rated air pressure or within the rated air pressure range b Never use oxygen carbon dioxide combustible gases or any bottled gas as an air source for the tool Such gases are capable of...

Page 6: ...o power this tool 11 Install an in line shutoff valve to allow immediate control over the air supply in an emergency even if a hose is ruptured Silicosis and Aluminum Oxide Warnings Warning Abrasive b...

Page 7: ...yone using vibrating tools regularly or for an extended period should first be examined by a doctor and then have regular medical check ups to ensure medical problems are not being caused or worsened...

Page 8: ...ad the ENTIRE IMPORTANT SAFETY INFORMATION section at the beginning of this manual including all text under subheadings therein before set up or use of this product Note For additional information reg...

Page 9: ...ool Such a coupler contains an air valve that will allow the air tool to retain pressure and operate accidentally after the air supply is disconnected Note Air flow and therefore tool performance can...

Page 10: ...re or other serious hazards 1 Cap 9 underneath unit Dust Collection Outlet Metal Floor 14 Air Hose Inlet Vent Siphon Gun Assembly Hole in Metal Floor for Siphon Tube 12 Blast Gloves 18 Hopper 13 Door...

Page 11: ...Attach the vacuum hose through the Dust Collection Outlet When using a vacuum dust collector clean the filter periodically to maintain good suction and effectiveness of the vacuum Use the appropriate...

Page 12: ...our other hand Once the gun is off open the door and inspect your material If additional blasting is required follow steps 1 through 7 as needed Note Use caution when sandblasting unfamiliar material...

Page 13: ...when the medium gets worn down To clean the Hopper WARNING Wear ANSI approved safety goggles full face shield and a NIOSH approved protective dust mask or respirator when replacing the abrasive mediu...

Page 14: ...ischarge any residual air from the line and the Gun Seals Sandblasting is a damaging operation In time the internal parts of the Blast Gun 7 will become worn When performance of the Blast Gun decrease...

Page 15: ...e air leakage Slight air leakage is normal especially on older tools 1 Cross threaded housing components 2 Damaged valve or housing 3 Dirty worn or damaged valve 1 Check for incorrect alignment and un...

Page 16: ...Rubber Washer 1 12 Siphon Tube 1 13 Hopper 1 14 Metal Floor 1 15 Nut 1 16 Glove Port 2 17 Glove Clamp 2 18 Blast Glove 2 19 Rubber Tube 1 Part Description Qty 20 Rubber Plug 1 21 Rubber Trim 1 22 Win...

Page 17: ...1 7A Gun Body 1 8A Seal Washer 1 9A Connector 1 Part Description Qty 10A Seal Washer 2 11A Set Screw 2 12A Siphon Pipe 1 13A Ceramic Nozzle 18 1 14A Ceramic Nozzle 19 1 15A Ceramic Nozzle 22 1 16A Cer...

Page 18: ...5797 Item 42202 Record Product s Serial Number Here Note If product has no serial number record month and year of purchase instead Note Some parts are listed and shown for illustration purposes only a...

Page 19: ...the exclusion or limitation of incidental or consequential damages so the above limitation of exclusion may not apply to you THIS WARRANTY IS EXPRESSLY IN LIEU OF ALL OTHER WARRANTIES EXPRESS OR IMPL...

Page 20: ...3491 Mission Oaks Blvd PO Box 6009 Camarillo CA 93011 1 888 866 5797...

Page 21: ...broken please call 1 888 866 5797 as soon as possible Copyright 2000 by Harbor Freight Tools All rights reserved No portion of this manual or any artwork contained herein may be reproduced in any sha...

Page 22: ...ETY INSTRUCTIONS 5 SYMBOL DEFINITIONS 5 FUNCTIONAL DESCRIPTION 8 SPECIFICATIONS 8 COMPONENTS AND CONTROLS 8 INITIAL TOOL SET UP ASSEMBLY 9 UNPACKING 9 AIR SUPPLY 9 OPERATING INSTRUCTIONS 10 TOOL SET U...

Page 23: ...ion which if not avoided could result in death or serious injury CAUTION used with the safety alert symbol indicates a hazardous situation which if not avoided could result in minor or moderate injury...

Page 24: ...exposure to high intensity noise is able to cause hearing loss Tool use and care a Do not force the tool Use the correct tool for the application The correct tool will do the job better and safer at t...

Page 25: ...adjusted to the rated air pressure or within the rated air pressure range b Never use oxygen carbon dioxide combustible gases or any bottled gas as an air source for the tool Such gases are capable of...

Page 26: ...o power this tool 11 Install an in line shutoff valve to allow immediate control over the air supply in an emergency even if a hose is ruptured Silicosis and Aluminum Oxide Warnings Warning Abrasive b...

Page 27: ...yone using vibrating tools regularly or for an extended period should first be examined by a doctor and then have regular medical check ups to ensure medical problems are not being caused or worsened...

Page 28: ...ad the ENTIRE IMPORTANT SAFETY INFORMATION section at the beginning of this manual including all text under subheadings therein before set up or use of this product Note For additional information reg...

Page 29: ...ool Such a coupler contains an air valve that will allow the air tool to retain pressure and operate accidentally after the air supply is disconnected Note Air flow and therefore tool performance can...

Page 30: ...re or other serious hazards 1 Cap 9 underneath unit Dust Collection Outlet Metal Floor 14 Air Hose Inlet Vent Siphon Gun Assembly Hole in Metal Floor for Siphon Tube 12 Blast Gloves 18 Hopper 13 Door...

Page 31: ...Attach the vacuum hose through the Dust Collection Outlet When using a vacuum dust collector clean the filter periodically to maintain good suction and effectiveness of the vacuum Use the appropriate...

Page 32: ...our other hand Once the gun is off open the door and inspect your material If additional blasting is required follow steps 1 through 7 as needed Note Use caution when sandblasting unfamiliar material...

Page 33: ...when the medium gets worn down To clean the Hopper WARNING Wear ANSI approved safety goggles full face shield and a NIOSH approved protective dust mask or respirator when replacing the abrasive mediu...

Page 34: ...ischarge any residual air from the line and the Gun Seals Sandblasting is a damaging operation In time the internal parts of the Blast Gun 7 will become worn When performance of the Blast Gun decrease...

Page 35: ...e air leakage Slight air leakage is normal especially on older tools 1 Cross threaded housing components 2 Damaged valve or housing 3 Dirty worn or damaged valve 1 Check for incorrect alignment and un...

Page 36: ...Rubber Washer 1 12 Siphon Tube 1 13 Hopper 1 14 Metal Floor 1 15 Nut 1 16 Glove Port 2 17 Glove Clamp 2 18 Blast Glove 2 19 Rubber Tube 1 Part Description Qty 20 Rubber Plug 1 21 Rubber Trim 1 22 Win...

Page 37: ...1 7A Gun Body 1 8A Seal Washer 1 9A Connector 1 Part Description Qty 10A Seal Washer 2 11A Set Screw 2 12A Siphon Pipe 1 13A Ceramic Nozzle 18 1 14A Ceramic Nozzle 19 1 15A Ceramic Nozzle 22 1 16A Cer...

Page 38: ...5797 Item 42202 Record Product s Serial Number Here Note If product has no serial number record month and year of purchase instead Note Some parts are listed and shown for illustration purposes only a...

Page 39: ...the exclusion or limitation of incidental or consequential damages so the above limitation of exclusion may not apply to you THIS WARRANTY IS EXPRESSLY IN LIEU OF ALL OTHER WARRANTIES EXPRESS OR IMPL...

Page 40: ...3491 Mission Oaks Blvd PO Box 6009 Camarillo CA 93011 1 888 866 5797...

Reviews: