background image

Page 13

For technical questions, please call 1-800-444-3353.

Item 60754 


SAFET

y

M

AINTENAN

c

E

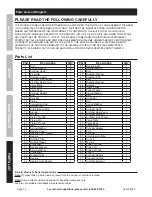
PARTS LIST

SETUP

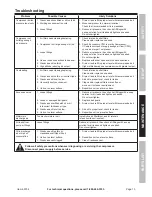
Troubleshooting

Problem

Possible causes

Likely Solutions

Compressor builds 

pressure too slowly

1.  Crankcase oil overfilled or oil too thick.
2.  Working environment too cold. 

3.  Loose fittings.

1.  Drain oil and refill to proper level with recommended oil.
2.  Move compressor to a warmer location.   

Check that recommended oil is in crankcase.

3.  Reduce air pressure, then check all fittings with 

a soap solution for air leaks and tighten as needed.   

Do not overtighten.

Compressor not 

building enough 

air pressure

1.  Air filters need cleaning/replacing. 

2.  Compressor not large enough for job. 


3.  Loose fittings. 


4.  Hose or hose connections too narrow.
5.  Crankcase oil too thick.  
6.  High altitude reducing air output.

1.  Check inlet and outlet filters.   

Clean and/or replace as needed.

2.  Check if accessory CFM is met by Compressor.  

If Compressor cannot supply enough air flow (CFM),  

you need a larger Compressor.

3.  Reduce air pressure, then check all fittings with 

a soap solution for air leaks and tighten as needed.   

Do not overtighten.

4.  Replace with wider hose and/or hose connections.
5.  Drain oil and refill to proper level with recommended oil.
6.  Higher altitudes require compressors with greater output.

Overheating

1.  Air filters need cleaning/replacing. 

2.  Crankcase oil too thin or incorrect type.
3.  Crankcase oil level too low.
4.  Unusually dusty environment. 

5.  Unit not on level surface.

1.  Check inlet and outlet filters.   

Clean and/or replace as needed.

2.  Drain oil and refill to proper level with recommended oil.
3.  Add oil to proper level, check for leaks.
4.  Clean and/or replace filters more often or 

move unit to cleaner environment.

5.  Reposition unit on a level surface.

Excessive noise

1.  Loose fittings. 


2.  Loose or damaged belt guard.
3.  Crankcase overfilled with oil or oil 

is incorrect thickness or type.

4.  Crankcase oil level too low.
5.  Unit not on level surface.

1.  Reduce air pressure, then check all fittings with a soap 

solution for air leaks and tighten as needed.   

Do not overtighten.

2.  Replace belt guard.
3.  Drain oil and refill to proper level with recommended oil. 

4.  Add oil to proper level, check for leaks.
5.  Reposition unit on a level surface.

Moisture in 

discharge air

Too much moisture in air.

Install inline air filter/dryer, and/or relocate 

to less humid environment.

Air leaks from 

pump or fittings

Loose fittings.

Reduce air pressure, then check all fittings with a soap 

solution for air leaks and tighten as needed.   

Do not overtighten.

Oil in discharge 

air or high oil 

consumption

1.  Crankcase oil too thin or 

crankcase overfilled with oil.

2.  Unit not on level surface.
3.  Crankcase vent clogged.

1.  Drain oil and refill to proper level with recommended oil. 

2.  Reposition unit on a level surface.
3.  Clean Crankcase vent.

  Follow all safety precautions whenever diagnosing or servicing the compressor.   

Disconnect power supply before service.

Summary of Contents for 60754

Page 1: ......

Page 2: ...fire and or serious injury Save all warnings and instructions for future reference The warnings precautions and instructions discussed in this instruction manual cannot cover all possible conditions a...

Page 3: ...milarly rated pump on an existing compressor that includes all other needed components Constructing a new compressor using this pump is not covered by this manual 2 Use Safety Guard for Pulleys The Ai...

Page 4: ...ose to move the compressor 12 Release the pressure in the storage tank before moving 13 The use of accessories or attachments not recommended by the manufacturer may result in a risk of injury to pers...

Page 5: ...h of pressure CFM Cubic Feet per Minute flow SCFM Cubic Feet per Minute flow at standard conditions NPT National pipe thread tapered NPS National pipe thread straight Double Insulated Canadian Standar...

Page 6: ...DEATH FROM IMPROPER INSTALLATION ONLY a qualified engineer with appropriate certifications may attempt designing a new compressor to ensure that all required safety and control elements are in place a...

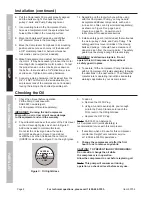
Page 7: ...or engine and related hardware and equipment It must also be capable of withstanding the vibration and tension of the drive belt 1 Place the Air Compressor Pump on the mounting surface at the same lev...

Page 8: ...ave a clearance of about one inch from the moving parts The safety guard must be sturdy enough to prevent injury WARNING Avoid serious injuries Do not operate this Air Compressor Pump without a safety...

Page 9: ...ir Hose Connects air to tool B Filter Prevents dirt and condensation from damaging tool or workpiece C Regulator Adjusts air pressure to tool D Lubricator optional For air tool lubrication E Coupler a...

Page 10: ...ibration reduction E Main Air Line 3 4 minimum recommended Distributes air to branch lines F Ball Valve To drain moisture from system G Branch Air Line 1 2 minimum recommended Brings air to point of u...

Page 11: ...r condition that may affect its safe operation 2 AFTER USE wipe external surfaces of the compressor with a clean cloth Maintenance Schedule Following are general guidelines for maintenance checks of t...

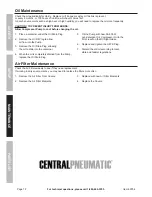
Page 12: ...2 Remove the Oil Fill Plug to allow air flow into the Pump 3 Remove the Oil Drain Plug allowing the oil to drain into the container 4 When the oil is completely drained from the Pump replace the Oil...

Page 13: ...or incorrect type 3 Crankcase oil level too low 4 Unusually dusty environment 5 Unit not on level surface 1 Check inlet and outlet filters Clean and or replace as needed 2 Drain oil and refill to pro...

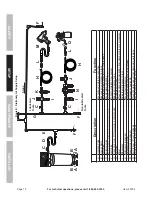
Page 14: ...er 1 57 Valve Plate 2 58 Valve Seat 1 59 Valve Plate 1 60 Cylinder Gasket 1 61 Bolt 4 62 Cylinder 1 63 Compression Ring 1 64 Air ring 1 65 Oil ring 1 66 Piston Pin Clip 1 67 Piston Pin 1 68 Piston Pin...

Page 15: ...0754 Safety Maintenance PARTS LIST Setup Assembly Diagram 1 2 3 4 5 6 7 8 9 10 11 12 13 14 15 16 17 18 19 20 21 22 23 24 25 26 27 28 29 30 31 32 33 34 35 36 37 38 39 40 41 42 43 44 45 46 47 48 49 50 5...

Page 16: ...so the above limitation of exclusion may not apply to you THIS WARRANTY IS EXPRESSLY IN LIEU OF ALL OTHER WARRANTIES EXPRESS OR IMPLIED INCLUDING THE WARRANTIES OF MERCHANTABILITY AND FITNESS To take...

Reviews: