background image

Page 3

For technical questions, please call 1-800-444-3353.

SKU 68027

Personal safety

a. 

Stay alert. Watch what you are doing and 

use common sense when operating the tool.  

Do not use the tool while tired or under the 

influence of drugs, alcohol, or medication. 

A moment of inattention while operating the 

tool increases the risk of injury to persons.

b. 

Dress properly. Do not wear loose clothing or 

jewelry. Contain long hair. Keep hair, clothing, and 

gloves away from moving parts. 

Loose clothes, 

jewelry, or long hair increases the risk of injury to 

persons as a result of being caught in moving parts.

c. 

Do not overreach. Keep proper footing 

and balance at all times. 

Proper footing 

and balance enables better control of 

the tool in unexpected situations.

d. 

Use safety equipment.

  A dust mask, 

non-skid safety shoes and a hard hat 

must be used for the applicable 

conditions.  Wear heavy-duty work 

gloves during use.

e. 

Always wear eye protection.


Wear ANSI-approved safety goggles 

with side shields.

f. 

Always wear hearing protection when 

using the tool.

 Prolonged exposure to 

high intensity noise is able to cause 

hearing loss.

g. 

Do not attach the hose or tool to your body.


Attach the hose to the structure to reduce the 

risk of loss of balance if the hose shifts.

Tool use and care

a. 

Use clamps or another practical way to secure 

and support the workpiece to a stable platform.


Holding the work by hand or against the body 

is unstable and can lead to loss of control.

b. 

Do not force the tool.

 Use the correct tool for the 

application. The correct tool will do the job better 

and safer at the rate for which the tool is designed.

c. 

Disconnect the tool from the air source 

before making adjustments, doing tool 

maintenance, clearing jams, touching the 

safety nosepiece, leaving work area, loading, 

or unloading the tool.

 Such precautionary 

measures reduce the risk of injury to persons.

d. 

Store the tool when it is idle out of reach 

of children and other untrained persons.


A tool is dangerous in the hands of untrained users.

e. 

Maintain the tool with care.


A properly maintained tool reduces the risk 

of binding and is easier to control.

f. 

Check for misalignment or binding of moving 

parts, breakage of parts, and any other condition 

that affects the tool’s operation.

 If damaged, 

have the tool serviced before using.  Many accidents 

are caused by poorly maintained tools. 

There is a risk of bursting if the tool is damaged.

g. 

Use only accessories that are identified by the 

manufacturer for the specific tool model.

 Use of 

an accessory not intended for use with the specific 

tool model, increases the risk of injury to persons.

h. 

Use only those fasteners listed in the 

Specifications chart of this manual.


Fasteners


not identified for use with this tool by 

the tool manufacturer run the risk of injury to 

persons or tool damage when used in this tool.

Service

a. 

Tool service must be performed only 

by qualified repair personnel.

b. 

When servicing a tool, use only identical 

replacement parts. Use only authorized parts.

c. 

Use only the lubricants supplied with the 

tool or specified by the manufacturer.

Air source

a. 

Never connect to an air source that is 

capable of exceeding 200 PSI.


Over pressurizing the tool may cause 

bursting, abnormal operation, breakage 

of the tool or serious injury to persons. 

Use only clean, dry, regulated compressed air at the 

rated pressure or within the rated pressure range as 

marked on the tool. Always verify prior to using the 

tool that the air source has been adjusted to the rated 

air pressure or within the rated air-pressure range.

b. 

Never use oxygen, carbon dioxide, combustible 

gases or any bottled gas as an air source 

for the tool. 

Such gases are capable of 

explosion and serious injury to persons.

  SAVE THESE 

INSTRUCTIONS.

Palm Nailer Specific Instructions

1. 

Operators and others in work area MUST 

wear ANSI-approved safety goggles with 

side shields during use.  

The employer is 

responsible to enforce the use of eye protection 

by the operator and others in the work area.

Summary of Contents for 68027

Page 1: ... website at http www harborfreight com Copyright 2010 by Harbor Freight Tools All rights reserved No portion of this manual or any artwork contained herein may be reproduced in any shape or form without the express written consent of Harbor Freight Tools Diagrams within this manual may not be drawn proportionally Due to continuing improvements actual product may differ slightly from the product de...

Page 2: ...ent PSI Pounds per square inch of pressure CFM Cubic Feet per Minute flow SCFM Cubic Feet per Minute flow at standard conditions NPT National pipe thread tapered Chart continued in next column Symbol Property or statement BPM Blows per minute WARNING marking concerning Risk of Eye Injury Wear ANSI approved safety goggles with side shields Warning marking concerning Risk of Puncture Injury Wear hea...

Page 3: ... is idle out of reach of children and other untrained persons A tool is dangerous in the hands of untrained users e Maintain the tool with care A properly maintained tool reduces the risk of binding and is easier to control f Check for misalignment or binding of moving parts breakage of parts and any other condition that affects the tool s operation If damaged have the tool serviced before using M...

Page 4: ...own to the State of California to cause cancer birth defects or other reproductive harm Some examples of these chemicals are Lead from lead based paints Crystalline silica from bricks and cement or other masonry products Arsenic and chromium from chemically treated lumber Your risk from these exposures varies depending on how often you do this type of work To reduce your exposure to these chemical...

Page 5: ...ration Add a few more drops after each hour of continual use 2 Attach air hose to compressor s air outlet Connect air hose to air inlet Other components such as coupler plug and quick coupler will make operation more efficient but are not required WARNING TO PREVENT SERIOUS INJURY FROM ACCIDENTAL OPERATION Do not install a quick coupler on the tool A coupler contains an air valve that will allow t...

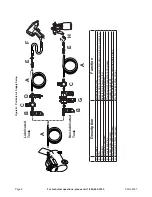
Page 6: ...r to tool B Filter Prevents dirt and condensation from damaging tool or work piece C Regulator Adjusts air pressure to tool D Lubricator optional For air tool lubrication E Coupler and Plug Provides quick connection and release F Leader Hose optional Increases coupler life G Air Cleaner Dryer optional Prevents water vapor from damaging work piece H Air Adjusting Valve optional For fine tuning airf...

Page 7: ...E Main Air Line 3 4 minimum recommended Distributes air to branch lines F Ball Valve To drain moisture from system G Branch Air Line 1 2 minimum recommended Brings air to point of use H Air Hose Connects air to tool I Filter Prevents dirt and condensation from damaging tool or work piece J Regulator Adjusts air pressure to tool K Lubricator optional For air tool lubrication L Coupler and Plug Prov...

Page 8: ...ountersink depth turn the Depth Sleeve 21 see Figure A on page 5 CAUTION Do not loosen the Depth Sleeve too much or the tool may come apart 3 Grip the base of the tool in one hand Note that there is a hand strap and thumb strap on the Leather Cover 22 to help hold the tool 4 When ready to work hold a nail by the shaft and place the flat head into the Nail Guide 20 The nail will be held in place by...

Page 9: ... use damaged equipment If abnormal noise vibration or leaking air is detected have the problem corrected before further use TO PREVENT EXPLOSION Lubricate only with specified lubricants Lubricate the air inlet using only pneumatic tool oil Lubricate the internal mechanism using only white lithium grease Other lubricants may damage the mechanism and may be highly flammable causing an explosion Note...

Page 10: ...leakage is normal especially on older tools 1 Cross threaded housing components 2 Loose housing 3 Damaged valve or housing 4 Dirty worn or damaged valve 1 Check for incorrect alignment and uneven gaps If cross threaded disassemble and replace damaged parts before use 2 Tighten housing assembly If housing cannot tighten properly internal parts may be misaligned 3 Replace damaged components 4 Clean ...

Page 11: ...6 Cylinder Cap Seal 1 7 Slide Sleeve 1 8 O Ring M46 x 2 2 9 Sealing Ring 1 10 Cylinder Sleeve Assembly 1 11 O Ring M43 x 65 2 Part Description Qty 12 Piston Assembly 1 13 O Ring M61 4 x 2 6 1 14 Bumper 1 15 Axis Sleeve 1 16 Housing 1 17 Air Inlet 1 18 Washer 1 19 Position Sleeve Spring 1 20 Nail Guide with magnet 1 21 Depth Sleeve 1 22 Leather Cover not shown 1 Parts List Assembly Diagram ...

Page 12: ... or limitation of incidental or consequential damages so the above limitation of exclusion may not apply to you THIS WARRANTY IS EXPRESSLY IN LIEU OF ALL OTHER WARRANTIES EXPRESS OR IMPLIED INCLUDING THE WARRANTIES OF MERCHANTABILITY AND FITNESS To take advantage of this warranty the product or part must be returned to us with transportation charges prepaid Proof of purchase date and an explanatio...

Reviews: