background image

Problem

Possible Causes

Likely Solutions

Compressor does 

not start or restart

1.  Tank(s) already pressurized.
2.  Power cord not plugged in properly.
3.  Incorrect power supply.
4.  No power at outlet.
5.  Thermal overload switch tripped. 

6.  Building power supply circuit tripped or 

blown fuse. 

7.  Cord wire size is too small or cord is too 

long to properly power compressor.

8.  Compressor needs service.

1.  No problem.  Compressor will start when needed.
2.  Check that cord is plugged in securely.
3.  Check that circuit matches compressor requirements.
4.  Reset circuit breaker, or have outlet serviced by a qualified technician.
5.  Turn off Compressor and wait for it to cool down.  

Press reset button.  Resume operation.

6.  Reset circuit or replace fuse.  Check for low voltage conditions.  

It may be necessary to disconnect other electrical appliances 

from the circuit or move the compressor to its own circuit.

7.  Use larger diameter or shorter extension cord or eliminate extension cord.  

See Recommended Wire Gauge for Extension Cords in Safety section.

8.  Have unit inspected by a qualified technician.

Compressor builds 

pressure too slowly

1.  Incorrect power supply.
2.  Working environment too cold.
3.  Safety valve leaking. 


4.  Loose fittings.

1.  Check that circuit matches compressor requirements.
2.  Move compressor to a warmer location.
3.  Listen for air leaking from valve.   

If leaking, replace with identical valve with same rating.   

DO NOT SEAL OR TAMPER WITH SAFETY VALVE.

4.  Reduce air pressure, then check all fittings with a soap solution 

for air leaks and tighten as needed.  Do not overtighten.

Compressor not 

building enough 

air pressure

1.  Air filters need cleaning/replacing. 

2.  Check Valve needs service.
3.  Compressor not large enough for job. 


4.  Loose fittings. 

5.  Hose or hose connections too narrow.
6.  High altitude reducing air output.

1.  Check inlet and outlet filters.   

Clean and/or replace as needed.

2.  Have technician clean or replace, as needed.
3.  Check if accessory CFM is met by Compressor.  If Compressor cannot 

supply enough air flow (CFM),  

you need a larger Compressor.

4.  Reduce air pressure, then check all fittings with a soap solution 

for air leaks and tighten as needed.  Do not overtighten.

5.  Replace with wider hose and/or hose connections.
6.  Higher altitudes require compressors with greater output.

Overheating

1.  Air filters need cleaning/replacing. 

2.  Unusually dusty environment. 

3.  Extension cord used.
4.  Unit not on level surface.

1.  Check inlet and outlet filters.   

Clean and/or replace as needed.

2.  Clean and/or replace filters more often or 

move unit to cleaner environment.

3.  Eliminate extension cord.
4.  Reposition unit on a level surface.

Compressor 

starts and stops 

excessively

1.  Loose fittings. 

2.  Compressor not large enough for job.

1.  Reduce air pressure, then check all fittings with a soap solution 

for air leaks and tighten as needed.  Do not overtighten.

2.  Check if accessory CFM is met by Compressor.  If Compressor 

doesn’t reach accessory CFM, you need a larger Compressor.

Excessive noise

1.  Loose fittings. 

2.  Unit not on level surface.

1.  Reduce air pressure, then check all fittings with a soap solution 

for air leaks and tighten as needed.  Do not overtighten.

2.  Reposition unit on a level surface.

Moisture in 

discharge air

Too much moisture in air.

Install inline air filter/dryer, and/or relocate to less humid environment.

Safety Valve “pops”

Safety valve needs service.

Pull on test ring of safety valve.  If it still pops, replace.

Air leaks from 

pump or fittings

Loose fittings.

Reduce air pressure, then check all fittings with a soap solution 

for air leaks and tighten as needed.  Do not overtighten.

Air leaks from tank

Defective or rusted tank.

Have tank replaced by a qualified technician.   

Drain moisture from tank daily to prevent future corrosion.

 Follow all safety precautions whenever diagnosing or servicing the compressor.   

Disconnect power supply before service.

TROUBLESHOOTING

Page 15

For technical questions, please call 1-888-866-5797.

Item 68066 

Summary of Contents for 68066

Page 1: ......

Page 2: ...your product Retain a copy of your receipt with purchase date for reference NOTICE This tool has many features for making its use more pleasant and enjoyable Safety performance and dependability have...

Page 3: ...quired in some environments For example the working area may include exposure to a noise level which can lead to hearing damage The employer and user must ensure that any necessary hearing protection...

Page 4: ...ect power supply open drain valve to decompress tank and allow water to drain and allow air compressor to become cool to the touch before servicing Turn pressure regulator knob fully counter clockwise...

Page 5: ...mpressor without guards belt guard and never touch moving parts Always follow all safety rules recommended by the manufacturer of your tool in addition to all safety rules for the air compressor Follo...

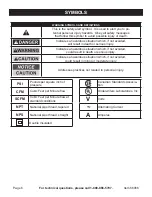
Page 6: ...could result in death or serious injury Indicates a hazardous situation which if not avoided could result in minor or moderate injury Addresses practices not related to personal injury PSI Pounds per...

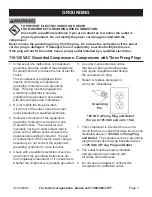
Page 7: ...Improper connection of the equipment grounding conductor can result in a risk of electric shock The conductor with insulation having an outer surface that is green with or without yellow stripes is t...

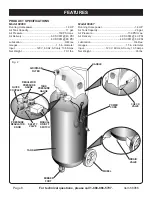
Page 8: ...Horsepower 1 8 HP Air Tank Capacity 26 gal Air Pressure 150 PSI max Air Delivery 6 0 SCFM 40 PSI 4 0 SCFM 90 PSI Lubrication Oil Free Gauges 1 5 in diameter Input 120 V 60 Hz AC only 13 5 Amps Net Wei...

Page 9: ...shipped completely assembled Carefully remove the compressor from the box Make sure that all items listed in the packing list are included Inspect the compressor carefully to make sure no breakage or...

Page 10: ...nch not included to secure the wheels in position Fig 3 WHEEL WASHER SCREW SCREW RUBBER FOOT NUT WASHER NUT WASHER FITTING THE AIR FILTER See Figures 4 5 6 Remove the transportation stop with a screwd...

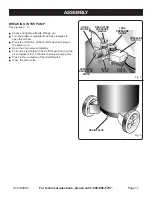
Page 11: ...pen the drain valve completely Pull out the red button of the On Off switch and run the air compressor for 10 minutes to break in pump parts Press in the red button of the On Off switch Close the drai...

Page 12: ...or risk of personal injury manufacturer s instructions in the air tool manual you may now proceed to use your air powered tool If using an inflation accessory control the amount of air flow with the p...

Page 13: ...closed CHECKING THE SAFETY VALVE See Figure 11 The safety valve will automatically release air if the air receiver pressure exceeds the preset maximum The valve should be checked before each day of u...

Page 14: ...re lubricated with a sufficient amount of high grade lubricant for the life of the unit under normal operating conditions Therefore no further lubrication of the bearings is required CLEANING THE INTA...

Page 15: ...ded 2 Have technician clean or replace as needed 3 Check if accessory CFM is met by Compressor If Compressor cannot supply enough air flow CFM you need a larger Compressor 4 Reduce air pressure then c...

Page 16: ...duct Some states do not allow the exclusion or limitation of incidental or consequential damages so the above limitation of exclusion may not apply to you THIS WARRANTY IS EXPRESSLY IN LIEU OF ALL OTH...

Page 17: ...producto Algunos estados no permiten la exclusi n o limitaci n de da os incidentales o consecuentes por lo cual es posible que la anterior limitaci n de exclusi n no sea aplicable a usted ESTA GARANT...

Page 18: ...2 Solicite a un t cnico que efect e una limpieza o un reemplazo seg n sea necesario 3 Verifique si el compresor es compatible con los CFM del accesorio Si el compresor no puede suministrar suficiente...

Page 19: ...r da ados si se utilizan dichos solventes Utilice pa os limpios para eliminar suciedad polvo aceite grasa etc LUBRICACI N Todos los cojinetes de esta herramienta est n lubricados con una cantidad sufi...

Page 20: ...pleto la v lvula de drenaje INSPECCI N DE LA V LVULA DE SEGURIDAD Consulte la Figura 11 La v lvula de seguridad liberar aire autom ticamente si la presi n de aire del receptor excede el m ximo predete...

Page 21: ...erramienta necesite mayor consumo de aire del que este compresor de aire es capaz de proporcionar Consulte el manual de la herramienta para evitar da os a la herramienta y lesiones personales aire Con...

Page 22: ...ido apagado y enchufe el cable de suministro el ctrico Abra por completo la v lvula de drenaje Extraiga hacia afuera el bot n rojo del interruptor de encendido apagado y haga funcionar el compresor de...

Page 23: ...as como se muestra en la figura Aj stelas firmemente con una llave plana no incluida para fijarlas en su posici n Fig 3 RUEDA ARANDELA TORNILLO TORNILLO PATA DE GOMA TUERCA ARANDELA TUERCA ARANDELA IN...

Page 24: ...que existe en el tanque DESEMBALAJE Este producto fue enviado completamente ensamblado Extraiga el compresor de la caja cuidadosamente Aseg rese de que todos los elementos enumerados en la lista de e...

Page 25: ...Peso neto 70 1 lbs Modelo 68067 Caballos de fuerza efectivos 1 8 HP Capacidad del tanque de aire 26 gal Presi n de aire 150 PSI m x Suministro de aire 6 0 SCFM a 40 PSI 4 0 SCFM a 90 PSI Lubricaci n S...

Page 26: ...no entra en el tomacorriente solicite a un electricista calificado que instale un tomacorriente adecuado 3 La incorrecta conexi n del conductor de conexi n a tierra del equipo puede generar un riesgo...

Page 27: ...raves ADVERTENCIA Indica una situaci n peligrosa que de no evitarse podr a provocar la muerte o lesiones graves PRECAUCI N Indica una situaci n peligrosa que de no evitarse podr a provocar lesiones me...

Page 28: ...ecesite mayor consumo de aire del que este compresor de aire es capaz de proporcionar Nunca utilice el compresor sin los protectores cubrecorrea y nunca toque las piezas m viles Siga siempre todas las...

Page 29: ...usted o hacia otras personas Mantenga seco limpio y libre de aceite y grasa el exterior del compresor de aire Al limpiar utilice siempre un pa o limpio Para la limpieza de la unidad no utilice nunca l...

Page 30: ...oculares son necesarios para protegerse contra remaches y fragmentos que pueden salir despedidos y causar graves lesiones en los ojos El empleador y o el usuario deben asegurarse de que se utilicen l...

Page 31: ...vor tenga a mano su n mero de modelo y n mero de serie Estos se encuentran en la etiqueta de datos colocada en su producto Para referencia conserve una copia de su recibo con la fecha de compra AVISO...

Page 32: ......

Reviews: