SKU 90385
For technical questions, please call 1-800-444-3353.
Page 8
Figure C
(79)
Figure D
REV 04/04
ASSEMBLY INSTRUCTIONS
Warning: Fill compressor with oil before using; running without oil, or with low oil voids
warranty. Do not plug in the Air Compressor until you are ready to use it, as set forth
below.
Adding Oil
1.
Unscrew
(do not pull) the Oil Plug (79). (See Figure C.)
2.
Check the level of the oil by viewing the Oil Leveler
(72) window (below the Oil Plug).
Note: Fill the oil tank with approximately 25 ounces of oil.
3.
Add 30-weight, non-detergent oil through the fill hole
as necessary, but do not overfill. Screw in the Oil Plug,
being careful not to strip the plastic threads.
Hose Connections
1.
Close the Air Control Valve (69), right or left.
2.
Connect the high pressure air hose to the air outlet.
The outlet is 1/4” NPT. For easy connection or removal, a quick coupler (not supplied)
should be installed on the end of the outlet.
To extend the life of your air tools, it is recommended to install an oiler and water filter
in series with the air output line of the Air Compressor as shown below.
3.
Connect the high pressure air hose to the air tool.
4.
Turn the Air Control Valve to the middle position to allow the air to pass.
Warning: Do not remove the factory sealed Air Control Valve (69); removal voids war-
ranty.
Air Filter
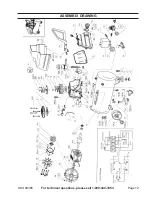
If not already attached, mount the Air Filter (85) to the Cylinder Head (2) before using the
air compressor.


