Page 11
For technical questions, please call 1-800-444-3353.
SKU 92359
7. Press the Safety Nosepiece against
the workpiece and squeeze the
Trigger.
The tool must cycle (fire)
only once.
Release the Trigger and
squeeze it again.
The tool must
not cycle (fire).
With the Trigger
held, carefully lift the tool and press
it against the workpiece again.
The
tool must not cycle (fire).
If it fails
to perform in the manner explained in
bold, have it repaired by a qualified
service technician.
Loading the Tool
TO PREVENT
SERIOUS INJURY
FROM ACCIDENTAL
OPERATION, BEFORE
LOADING:
• Wear ANSI-approved safety
goggles with side shields.
Other people in the work area
must also wear ANSI-approved
safety goggles with side shields.
• Release the trigger.
• Detach the air supply.
• Attempt to fire the Tool into
a piece of scrap wood to
ensure that it is disconnected
and is incapable of firing any
fasteners.
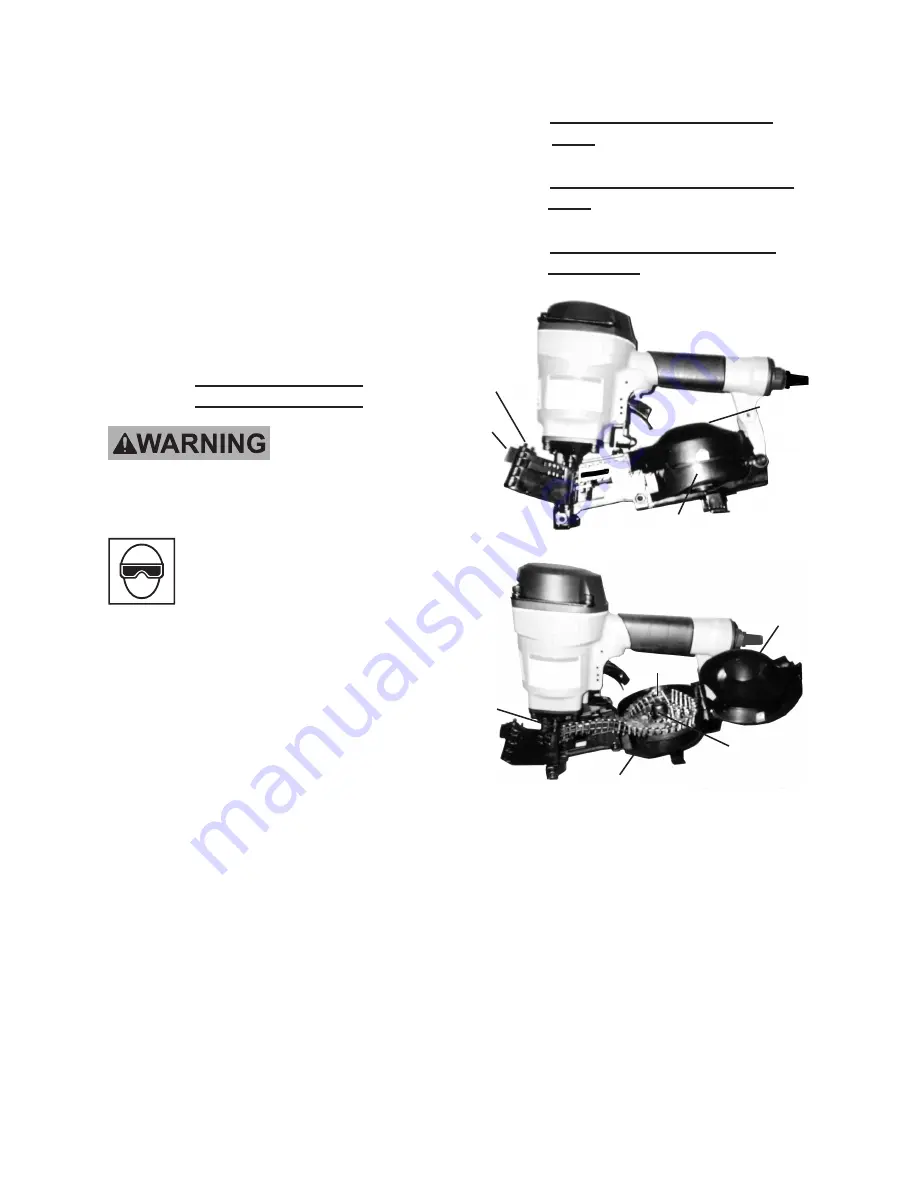
1. To open the Canister (82), push down
on the Latch (68) and swing the catch
(64) and the Canister Cover (89)
open. See photos above right.
2. Check the Adjuster Plate (86) inside
the Canister (82). The Platform can
be adjusted up and down to use
various lengths of nails from
3
/
4
” to
1-
3
/
4
”:
A. Between 3/4” and 1” Long
Nails
(Use top setting).
B. Between 1” and 1-1/4” Long
Nails
(Use middle setting).
C. Between 1-1/4” and 1-3/4”
Long Nails
(Use bottom setting).
3. Turn the Adjuster (88) clockwise to
raise the Turntable (86) until its edge
aligns with the embossed nail size
markings on the inside wall of the
Cannister.
4. Place a coil of Nails around the
Adjuster Plate (86) in the Nail
Canister (82). See photo, above.
5. Swing the Canister Cover (89)
closed. Then, close the Catch Latch
Latch (68)
Catch
(64)
Canister
Cover
(89)
Canister
(82)
Canister
Cover
(89)
Adjuster Plate
(86)
Canister
(82)
Feed
Hook
(50)
Nails


