background image

Page 7

SKU 92403

for technical questions, please call 1-800-444-3353

nOte

: Some parts are listed and shown for illustration purposes only and are not available 

individually as replacement parts.

PleAse ReAd tHe fOllOwing CARefUlly

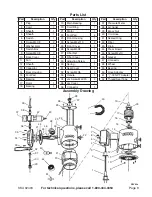
THE MANUFACTURER AND/OR DISTRIBUTOR HAS PROVIDED THE PARTS DIAGRAM IN THIS 
MANUAL AS A REFERENCE TOOL ONLY.  NEITHER THE MANUFACTURER NOR DISTRIBUTOR 
MAKES ANY REPRESENTATION OR WARRANTY OF ANY KIND TO THE BUYER THAT HE OR 
SHE IS QUALIFIED TO MAKE ANY REPAIRS TO THE PRODUCT OR THAT HE OR SHE IS QUALI-
FIED TO REPLACE ANY PARTS OF THE PRODUCT.  IN FACT, THE MANUFACTURER AND/OR 
DISTRIBUTOR EXPRESSLY STATES THAT ALL REPAIRS AND PARTS REPLACEMENTS SHOULD 
BE UNDERTAKEN BY CERTIFIED AND LICENSED TECHNICIANS AND NOT BY THE BUYER. THE 
BUYER ASSUMES ALL RISK AND LIABILITY ARISING OUT OF HIS OR HER REPAIRS TO THE 
ORIGINAL PRODUCT OR REPLACEMENT PARTS THERETO, OR ARISING OUT OF HIS OR HER 
INSTALLATION OF REPLACEMENT PARTS THERETO.

Maintenance

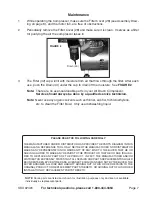
While operating the Compressor, make sure the Filter Cover (28) (see Assembly Draw-
ing on page 8), and the motor fan, are free of obstructions.

Periodically remove the Filter Cover (28) and make sure it is clean.  It serves as a filter 
for purifying the air the compressor takes in.

figURe 2

Drain (43)

The Filter (42) cup will fill with moisture from air that flows through the filter.  After each 

use, push the Drain (43) under the cup to drain off the moisture.  See 

figURe 2

.

note: 

 There are no user-serviceable parts in your Air Brush Compressor. 

service should always be done by a qualified service technician.

note: 

 Never use any organic solvents such as thinner, alcohol, trichloroethylene, 

etc. to clean the Filter Bowl.  Only use dishwashing liquid.

1.

2.

3.

Summary of Contents for 92403

Page 1: ...website at http www harborfreight com To prevent serious injury read and understand all warnings and instructions before use Copyright 2005 by Harbor Freight Tools All rights reserved No portion of th...

Page 2: ...ered areas invite injuries 2 Observe work area conditions Do not use machines or power tools in damp or wet locations Don t expose to rain Keep work area well lighted Do not use electrically powered t...

Page 3: ...ould be carefully checked to determine that it will operate properly and perform its intended function Check for alignment and binding of moving parts any broken parts or mounting fixtures and any oth...

Page 4: ...t must be supplied by the operator WARNING The brass components of this product contain lead a chemical known to the State of California to cause birth defects or other reproductive harm California He...

Page 5: ...rong receptacles Only use rounded jacket extension cords preferably listed by the Underwriters Laboratory UL Make sure the cord is rated for outdoor use if you plan on using the tool outside if you pl...

Page 6: ...ly ready turn on the Compressor by moving the rocker Switch 5 Air pressure is regulated using the Adjusting Screw 29 Loosening the Adjusting Screw allows excess pressure to escape through the valve in...

Page 7: ...YER THE BUYER ASSUMES ALL RISK AND LIABILITY ARISING OUT OF HIS OR HER REPAIRS TO THE ORIGINAL PRODUCT OR REPLACEMENT PARTS THERETO OR ARISING OUT OF HIS OR HER INSTALLATION OF REPLACEMENT PARTS THERE...

Page 8: ...ing 1 15 Foot Pad 1 16 Bearing 1 17 Rotor 1 18 Bearing 1 Part Description Q ty 19 Main Bearing 1 20 Cord Ring 1 21 Stator 1 22 Foot Pad 4 23 Front Housing 1 24 Screw M4x110 2 25 Front Cover 1 26 Screw...

Reviews: