background image

Page 5

SKU 92622

For technical questions, please call 1-800-444-3353

Assembly

The Air Hammer comes completely assembled, except for the air inlet fitting and handle.

Note: Use pipe thread seal or Teflon tape on all threaded connections.

Caution: The compressor must be off and all the air bled out before making any con-
nections.

Mount Handle

1.

Using Cap Screws (50), and the supplied Allen Wrench, mount the D-type Handle
(49) to the Hammer Case (43).

2.

Securely tighten all Cap Screws.

Air Connection

1.

Attach the Air Hose Fitting (56) into the Air Inlet (10) fitting. Securely tighten.

2.

Optionally, for easy connection or removal, attach an Air Quick Coupler (not supplied)
to a Union fitting (not supplied), if quick-coupling is desired.

3.

Attach the 1/2 inch air hose (not supplied) to the Air Hose Fitting (56), or Union fitting,
if used.

4.

Attach the other end of the air hose to the compressor (not supplied) regulator-filter
with oiler.

5.

Retighten all couplings and fittings.

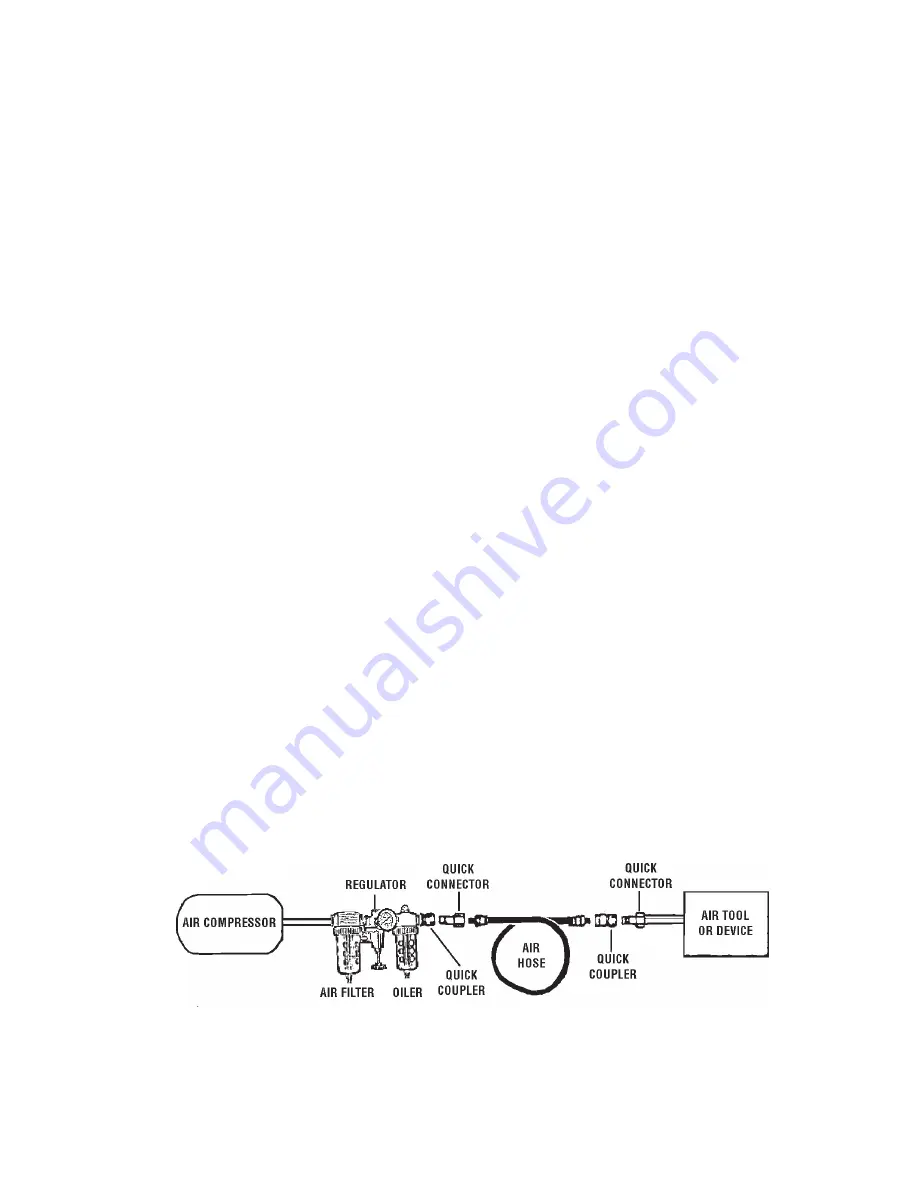
Oiler and Filter Connection

Dirt, water, and the lack of pneumatic tool oil are major causes for tool wear. It is recom-
mended to install an optional oiler-filter, as illustrated below for better performance.

Connect the air tool, air hoses, filter, and oiler to the Compressor Air Outlet as illustrated
below. The filter and oiler (not supplied) are recommended but not mandatory for operation.

A few drops of pneumatic tool oil must be added through the air line before each use if an
oiler is not used.

Summary of Contents for 92622

Page 1: ...STRUCTIONS 3491 Mission Oaks Blvd Camarillo CA 93011 Visit our Web site at http www harborfreight com Copyright 2004 by Harbor Freight Tools All rights reserved No portion of this manual or any artwork contained herein may be reproduced in any shape or form without the express written consent of Harbor Freight Tools For technical questions and replacement parts please call 1 800 444 3353 92622 ...

Page 2: ...ea conditions Do not use machines or power tools in damp or wet locations Don t expose to rain Keep work area well lighted Do not use electrically powered tools in the presence of flammable gases or liquids 3 Keep children away Children must never be allowed in the work area Do not let them handle machines tools or extension cords 4 Store idle equipment When not in use tools must be stored in a dr...

Page 3: ... any tool any part that appears damaged should be carefully checked to determine that it will operate properly and perform its intended function Check for alignment and binding of moving parts any broken parts or mounting fixtures and any other condition that may affect proper operation Any part that is damaged should be properly repaired or replaced by a qualified technician Do not use the tool i...

Page 4: ...m air supply when moving tool in the workplace Carry tool only by the handle without drawing the trigger 6 OSHA Guidelines Industrial applications must follow OSHA guidelines 7 Air Compressor Read and adhere to all warnings and instructions of the Air Compressor Instruction Manual Warning The warnings cautions and instructions discussed in this instruction manual cannot cover all possible conditio...

Page 5: ...n Air Quick Coupler not supplied to a Union fitting not supplied if quick coupling is desired 3 Attach the 1 2 inch air hose not supplied to the Air Hose Fitting 56 or Union fitting if used 4 Attach the other end of the air hose to the compressor not supplied regulator filter with oiler 5 Retighten all couplings and fittings Oiler and Filter Connection Dirt water and the lack of pneumatic tool oil...

Page 6: ...r counterclockwise R right or clockwise and the torque setting 1 Low 2 Medium 3 High 7 While holding the Impact Wrench with both hands place the Anvil 41 with socket squarely over the nut or bolt 8 Squeeze the Trigger 2 to begin loosening or tightening Be prepared for great torque on the Handles Let the Impact Wrench do the work Do not lay into it with great force If necessary turn the Regulator 1...

Page 7: ...umatic tool oil to the air line or Air Inlet before each use Or install the automatic oiler filter system as illustrated on page 5 3 Before each use drain water out of the air compressor tank and condensation from the air lines Refer to the Air Compressor Operation Manual 4 Store the Impact Wrench in a clean and dry location Parts List NOTE Some parts are listed and shown for illustration purposes...

Page 8: ...O THE BUYER THAT HE OR SHE IS QUALIFIED TO MAKE ANY REPAIRS TO THE PRODUCT OR THAT HE OR SHE IS QUALIFIED TO REPLACE ANY PARTS OF THE PRODUCT IN FACT THE MANUFACTURER AND OR DISTRIBUTOR EXPRESSLY STATESTHAT ALL REPAIRS AND PARTS REPLACEMENTS SHOULD BE UNDERTAKEN BY CERTIFIED AND LICENSED TECHNICIANS AND NOT BY THE BUYER THE BUYER ASSUMES ALL RISK AND LIABILITY ARISING OUT OF HIS OR HER REPAIRS TO ...

Reviews: