Page 11
SKU 95370
for technical questions, please call 1-800-444-3353.
INSPECTION, MAINTENANCE, ANd CLEANING
wARNING! Make sure the Pressure Switch (A29) of the tool is in its “Off” posi-
tion and that the tool is unplugged from its electrical outlet, and all air released from
the Tank before performing any inspection, maintenance, or cleaning procedures.
bEfORE EACH uSE,
inspect the general condition of the tool. Check for loose
screws, misalignment or binding of moving parts, cracked or broken parts, dam-
aged electrical wiring, and any other condition that may affect its safe operation. If
abnormal noise or vibration occurs, have the problem corrected before further use.
do not use damaged equipment.
Purge Tank daily of all air and condensation to prevent corrosion.
Store the Air Compressor in a clean and dry location.
Check all air fittings for leaks before using.
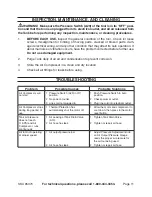
TROubLESHOOTING
Problem
Possible Causes
Probable Solutions
Air Compressor will
not start
Pressure Switch (A29) in Off
position.
No power at outlet.
Line cord not plugged in.
1�
2�
3�
Push Pressure Switch to Auto
position.
Check power at outlet.
Plug line cord into electrical outlet.
1�
2�
3�
Air Compressor stops
during long period of
use.
Thermal Protection has
automatically shut the motor off.
1�
Allow the motor and compressor to
cool down, then press in the motor
reset button.
1�
Tank air pressure
does not reach
115 PSI and Air
Compressor runs
continuously.
Air Leaking at Tank Drain Valve
(A13).
Air hose has leak.
1�
2�
Tighten Tank Drain Valve.
Tighten or repair air hose.
1�
2�
Air tool not operating
at proper speed.
Air output pressure low.
Air hose has leak.
1�
2�
Adjust Pressure Adjustment knob
so Air Output Pressure Gauge
reads the proper air pressure for
the air tool being used.
Tighten or repair air hose.
1�
2�
1.
2.
3.
4.

