Page 8
SKU 96068
For technical questions, please call 1-800-444-3353.
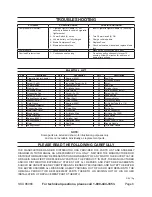
PartS liSt
Part
description
Part
description
Part
description
1
Cigarette Lighter Adapter
21
Bearing (608Z)
41
Seal Ring
2
Cord
22
End Cover
42
Air Exhaust Slice
3
Screw (3 x 25)
23
Inner Hex Screw (4 x 8)
43
Rivet
4
Power Switch
24
Shockproof Pad
44
Seal Ring
5
Rear Cover
25
Air Intake Cover
45
Cylinder Cover
6
Shockproof Pad
26
Filter Mesh
46
Spring Washer (4mm)
7
Connection Cap
27
Screw (3 x 10)
47
Screw (4 x 35)
8
Screw (4 x 10²)
28
Front Cover
48
Support Ring
9
Spring Washer (4mm)
29
Offset Shaft
49
Pressure Meter
10
Washer (4mm)
30
Offset Wheel
50
Protective Sleeve
11
Cord Sleeve
31
Bearing (626Z)
51
Air Outlet Tube (8 x 114)
12
Overload Protector
32
Crank
52
Handle
13
Connection Wire
33
Piston Ring
53
Air Outlet
14
Motor Rear Cover
34
Press Ring
54
Quick Connector
15
Brush Holder
35
Air Intake Slice
55
Air Hose (8 x 1500)
16
Motor Housing
36
Rivet
56
Lock Spring
17
Bearing (608Z)
37
Cylinder Liner
57
Air Nozzle
18
Spring Washer
38
Radiation Cover
58
Glass Fuse (15 Amp)
19
Rotor
39
Seal Ring
59
Needle Nozzle
20
Spring Washer
40
Cover
60
(2) Inflator Nozzle
note:
Some parts are listed and shown for illustration purposes only,
and are not available individually as replacement parts.
PleaSe read tHe FolloWing careFullY
THE MANUFACTURER AND/OR DISTRIBUTOR HAS PROVIDED THE PARTS LIST AND ASSEMBLY
DIAGRAM IN THIS MANUAL AS A REFERENCE TOOL ONLY. NEITHER THE MANUFACTURER OR
DISTRIBUTOR MAKES ANY REPRESENTATION OR WARRANTY OF ANY KIND TO THE BUYER THAT HE
OR SHE IS QUALIFIED TO REPLACE ANY PARTS OF THE PRODUCT. IN FACT, THE MANUFACTURER
AND/OR DISTRIBUTOR EXPRESSLY STATES THAT ALL REPAIRS AND PARTS REPLACEMENTS
SHOULD BE UNDERTAKEN BY CERTIFIED AND LICENSED TECHNICIANS, AND NOT BY THE BUYER.
THE BUYER ASSUMES ALL RISKS AND LIABILITY ARISING OUT OF HIS OR HER REPAIRS TO THE
ORIGINAL PRODUCT OR REPLACEMENT PARTS THERETO, OR ARISING OUT OF HIS OR HER
INSTALLATION OF REPLACEMENT PARTS THERETO.
trouBleSHooting
Problem
Possible cause
Possible Solution
Compressor will not start.
Cigarette Lighter Adapter (1) not
1.
securely inserted in vehicle’s cigarette
lighter socket.
Power Switch (4) not on.
2.
Vehicle battery not fully charged.
3.
Blown Compressor Fuse.
4.
Blown automotive fuse.
5.
Insert Cigarette Lighter Adapter (1) securely.
1.
Turn Power Switch (4) ON.
2.
Charge vehicle battery.
3.
Replace Fuse.
4.
Check automotive manual and replace blown
5.
fuse.
Low pressure.
Loose connection(s).
1.
Make sure all connections are tight.
1.
Overload Protector trips.
Continuous use too long.
1.
Do not use unit continuously for over 12
1.
minutes. Allow 30 minutes for unit to cool
down after each use.
REV 10g


