background image

16

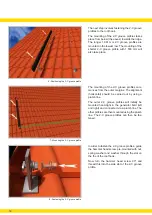
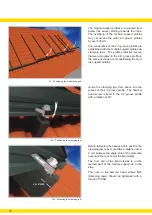
16 - Module support connection

The mounting of all further module supports 

take place in the same way. 
The horizontal connection of the module sup-

port  profiles  takes  place  via  connecting  links. 

The connecting link is to be inserted half way 

into the mounting profile and screwed in. 

Differences in height in the roof space should 

be  compensated  by  adjusting  the  2-C  groove 

profiles so that undesired tension in the module 

supports is to be kept as low as possible.

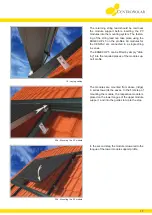
17 - Mounting module supports

The mounting of all further module supports 

take place in the same way.

Note: 

When using a CENPAC including the wind 

and snow extension package, snow load rails 

should also be installed according the mounting 

instructions for the extension package.

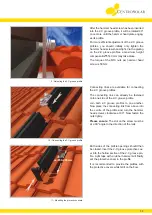
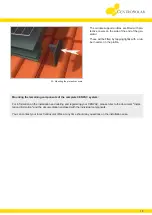
18 - Mounting the protective covers

Insert the module support protective cover into 

the  profile  ends  of  the  module  support  follow

-

ing the mounting of all module support profiles. 

Light taps with a rubber hammer will finally set 

the protective cover in the profile.
It is recommended to provide the profiles with 

the protective covers whilst still on the floor. 

Summary of Contents for CENPAC 3 Series

Page 1: ...www centrosolar com www centrosolar co uk CENPAC Mounting instructions CENPAC 3 x CENPAC 5 x...

Page 2: ......

Page 3: ...nting system 5 2 CENPAC components 6 3 Installation 8 3 1 Constructions 8 3 2 Preliminary planning for mounting the installation 9 3 3 Rules relating to individual rafter configuration 9 4 Mounting pr...

Page 4: ...4...

Page 5: ...mounting system The bearing capacity of the roof in connection with the as sembly of a Centrosolar photovoltaic installation and the arrangement of the fastening points are to be shown in a structura...

Page 6: ...NPAC 5 X 2 series of 12 mod ules 1X PV module S 54 Excellent 16 16 24 24 3E0000005 Module support profile 1 981 mm black 12 10 16 18 3E0000006 2 C groove profile 1 681 mm black 10 7 10 15 3E0000007 2...

Page 7: ...CENPAC 5 X 3 series of 8 mod ules CENPAC 5 X 2 series of 12 mod ules 200003300A Powerstocc 3 6 Excellent Powerstocc 5 5 Excellent 1 1 1 1 417522001 Adapter set H S 1 1 1 1 417522007 Adapter set LC4 1...

Page 8: ...214 mm width x height 7 932 x 3 214 mm width x height 5766 x 7 280 mm width x height 3966 x 6 280 mm width x height CENPAC 5 x 2 x 12 modules 3 x 8 modules Overall dimensions Generator field dimension...

Page 9: ...rafters P P Twice the number of roof hooks on the 2 C groove profiles in the border of the generator field to the ridge the eaves and the verges P P Module support profiles must be fixed on at least...

Page 10: ...ter distances Note Each rafter must be allocated when using a CENPAC including the wind and snow exten sion package Please observe the assembly in structions of the extension package 2a Positioning of...

Page 11: ...25 mm to the edges of the rafter 4 Modification of the roof tiles After the hook has been mounted the lower parts of the tiles where the support shaft comes from the roof are to be removed using a ri...

Page 12: ...om mences from the outer margins The alignment horizontal should be carried out by using a plumb line The outer 2 C groove profiles will initially be mounted hand tight in the generator field left and...

Page 13: ...2 C groove profiles The connecting link can already be fastened onto one side of the 2 C groove profile Join both 2 C groove profiles to one another Now place the connecting link from above into the c...

Page 14: ...positioning the mod ule support profiles 13a Positioning the clamping jaw Guide the clamping jaw from above into the groove of the 2 C groove profile The hammer head screw is fixed in the 2 C groove...

Page 15: ...mounting aids for the other module support profiles 15b Use of distance gauges When using the distance gauge the end faces of the longer angle stub of the profiles should lie on the upper reinforced...

Page 16: ...low as possible 17 Mounting module supports The mounting of all further module supports take place in the same way Note When using a CENPAC including the wind and snow extension package snow load rai...

Page 17: ...in series The EDGECLIP 5 can be fitted by simply click ing into the required places of the module sup port profile 20a Mounting the PV module The modules are mounted from above ridge in series towards...

Page 18: ...e modules can now be used for connecting the solar leads connection leads with plug and bushing For this connect the plus and minus lead of the neighbouring modules For information on laying the cable...

Page 19: ...b ber hammer in the profile Mounting the remaining components of the complete CENPAC system For information on the installation and cabling and registering your CENPAC please refer to the document Ins...

Page 20: ...ch P P PV generator open circuit voltage P P Voltage drop in fuses with PV installations with string fuses P P Insulation resistance of the PV generator P P Insulation resistance of the direct current...

Page 21: ...wind load P P Mounting defective components For information on guarantees and warranties please also read the warranty declaration by CENTROSOLAR AG available at www centrosolar com 7 Disclaimer Phot...

Page 22: ...Notes 22...

Page 23: ......

Page 24: ...Barcelona SPAIN Tel 34 93 3435048 info espana centrosolar com CENTROSOLAR ITALIA S R L V le del Lavoro 33 37036 S Martino B A Verona ITALY Tel 39 045 8781225 info italia centrosolar com CENTROSOLAR AG...

Reviews: