background image

page 81

www.centsys.com

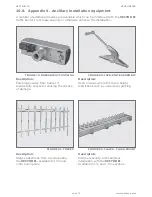
FIGURE 87. 33AH BATTERY KIT

Description:

A 33Ah battery can supplement or replace 

the 7Ah battery for exteded battery back-

up. Requires a bracket and harness to 

connect the 33Ah battery to the existing 

harness.

Other Ancillaries:

•   Keypad
•   SOLO
•   Lattice
•   G-SWITCH-22
• 

 SMARTGUARDair

•   G-SPEAK
•   SupaHelix
• 

NOVA Remote

• 

NOVA Receiver

Anciillary product documentation is available for download at www.centsys.com

APPENDICES

SECTION 10

Summary of Contents for SECTOR II

Page 1: ...SECTOR II TRAFFIC BARRIER INSTALLATION MANUAL TRAFFIC BARRIERS Centurion Systems Pty Ltd www centsys com...

Page 2: ...ice and without obligation to notify any persons of any such revisions or changes Additionally Centurion Systems Pty Ltd makes no representations or warranties with respect to this manual No part of t...

Page 3: ...e SECTOR II Traffic Barrier 4 4 Installing loop detectors 4 4 1 Installing a single FLUX SA loop detector 4 4 2 Installing dual FLUX SA loop detectors 5 Basic controller setup 5 1 Powering up the SECT...

Page 4: ...ion 1 10 6 3 Complex Mode Option 2 Ticket vendors 10 6 4 Uni directional traffic 10 6 5 Bi directional traffic 10 7 Factory Default Settings South Africa only 10 8 Terminal descriptions 10 9 Ancillary...

Page 5: ...nd its area of travel NEVER LET CHILDREN OPERATE OR PLAY WITH THE BARRIER CONTROLS Secure all easily accessed barrier controls in order to prevent unauthorised use of the barrier Do not in any way mod...

Page 6: ...h of children as such materials are potential sources of danger Dispose of all waste products like packing materials worn out batteries etc according to local regulations Always check the obstruction...

Page 7: ...in position CP84 SM 2A Charger Battery charger Camlock Cabinet type lock 60198 Keyed alike DIP switch Selectable binary switches two position Modes of Operation Selection that dictates how the SECTOR...

Page 8: ...assembly bolt 5 Spring washer 6 Spring assembly bush 7 Counterbalance assembly 8 Taper roller 9 Tension bar nut 10 Hold down bracket 11 AC Mains terminal block FIGURE 1 PRODUCT IDENTIFICATION INTERNA...

Page 9: ...ler 3 CP84 SM 2A charger 4 Wiring channels 5 FLUX SA loop detector single optional FLUX SA loop detector double optional 6 FLUX 11 Pin loop detector single optional FLUX 11 Pin loop detector double op...

Page 10: ...for the Hold Down Bracket 4 Hold down bracket 5 Boom pole retainer 6 6mm Allen key for manual override FIGURE 4 PRODUCT IDENTIFICATION HARDWARE 2 4 Hardware unpacking When unpacking the SECTOR II necc...

Page 11: ...s The door always faces the approaching vehicle If a left hand unit is required it may be necessary to convert the barrier to a left hand barrier see next point A left hand configured SECTOR II is ava...

Page 12: ...igure 6 and Figure 7 Allow to dry Ensure that 30mm of conduit protrudes above the concrete and that the mains wires will emerge within the cabinet at least 400mm in length Should a 33Ah battery need t...

Page 13: ...enclosure Hold the lid securely while pivoting it up and removing the lid The Controller Battery Charger Unit and Loop Detectors are all accessable once the lid of the SECTOR II has been removed 3 3...

Page 14: ...lace Refer to Appendix 2 Changing a unit to a left hand configuration FIGURE 11 FIGURE 12 Barrier hold down stud Nut Heavy duty Washer Supplied Hold down bracket PHYSICAL INSTALLATION SECTION 3 3 4 Fi...

Page 15: ...machine 8 5mm drill bit Boom pole Boom pole retainer Step 4 Drill two 8 5mm holes Holes must be drilled through only one wall of the boom pole PHYSICAL INSTALLATION SECTION 3 FIGURE 16 Step 6 Fasten t...

Page 16: ...ur Figure 17 shows a right hand configuration Although the left hand configuration looks different the levelling procedure remains the same PHYSICAL INSTALLATION SECTION 3 FIGURE 18 FIGURE 19 3 4 3 Co...

Page 17: ...strike or power surge it greatly reduces the likelihood of such damage occurring The earth return for the surge protection is provided via the mains power supply earth In order to ensure that the sur...

Page 18: ...ct the 220V AC Mains cable Figure 23 Mains supply 4 2 Earthing the unit Connect the earth spike Figure 21 to the designated earth point Figure 22 using 5mm2 copper weave conductor and the self tapping...

Page 19: ...stalling a single FLUX SA loop detector Step 1 Clip the FLUX SA into the electronics tray Step 2 Wire the FLUX SA to the controller using the supplied harness as per the wiring diagram Figure 27 Step...

Page 20: ...URE 27 WIRING A SINGLE FLUX SA AS A CLOSING SAFETY LOOP Closing safety loop Black Earth Yellow Red Earth point NOTE For safety loops Perm Presence must be turned ON www centsys com RELAY RELAY ONSITE...

Page 21: ...to the controller using the supplied harness as per the wiring diagram Figure 31 Step 3 Run the TWISTED loop wires up inside the enclosure through the wiring clips to the second FLUX SA Figure 30 Wire...

Page 22: ...xit Loop Closing Safety Loop Earth point To earth point To earth point If FLUX 11 pin loop detectors are prefered refer to Appendix 4 Section 10 4 for the installation instructions and wiring Black Ea...

Page 23: ...s and hold the oblong enter button for two seconds to enter Setup Mode If powering up for the first time ex factory select the required profile that will suit your specific region ZA for South Africa...

Page 24: ...he unit is out of programming mode Only tension the spring when the boom pole is in the raised position If the pole is not balanced refer to Figures 33 and 34 To refresh the display perform two comple...

Page 25: ...le collision shutdown is triggered This menu item configures the different alarm outputs 2 4 LCK input as ESTOP Allows the LCK Holiday Lockout input to be configured as an emergency stop input 1 Maxim...

Page 26: ...main activated while the closing loop is activated Presence time The time for which the closing loop must be continuously activated before the alarm is activated Break in alarm Activates an alarm if t...

Page 27: ...BARRIER Always keep people and objects away from the barrier NEVER LET CHILDREN OPERATE OR PLAY WITH THE BARRIER CONTROLS and do not allow children or pets near the barrier area Be careful with moving...

Page 28: ...a SECTOR II has been completed Should the installation require other adjustments to be made to the standard settings these can be found from Section 7 onwards We recommend that these menus be carefull...

Page 29: ...additional features all the stages that have to be followed are clearly provided via the display It is only necessary to note the following To get into Setup Mode press and hold the oblong enter butt...

Page 30: ...Autolower partly raised 3 4 3 Autolower partly lowered 4 Modes of Operation 4 1 Operating mode 5 Run Profile 5 1 Lock boom at endpoints 5 1 1 Lock when raised 5 1 2 Lock when lowered 5 1 3 Holding fo...

Page 31: ...level 8 Barrier Status 8 1 Barrier status 8 2 Function output 8 3 State configuration 8 3 1 Lowered indication 8 3 2 Raising indication 8 3 3 Partly Raised indication 8 3 4 Raised indication 8 3 5 Lo...

Page 32: ...perating standard 13 2 Controller type 13 3 Reset options 13 3 1 Factory defaults 13 3 2 Delete all remotes 13 3 3 Delete all time periods and exclusions 13 3 4 Reset all 13 4 Diagnostic screen status...

Page 33: ...selected Autolower fully raised Automatically lower the boom if boom pole is fully raised Autolower on partly raised Automatically lower the boom pole if it has been stopped partially raised Autolowe...

Page 34: ...ce Sets the ramp up distance in degrees 5 9 Ramp down distance Sets the ramp down distance in degrees of travel of the boom pole when stopping 5 10TRG stop distance Sets the angle over which a moving...

Page 35: ...n of the barrier 1 Please note that it should not be taken for granted that the traffic light feature will always be enabled by default Future statutory requirements may dictate that this feature is n...

Page 36: ...ured with respect to the horizontal 0 increasing in the opening or raising direction of the barrier 3 The output will transition to the active state as soon as the barrier transitions to the LOWERING...

Page 37: ...can be reversed in situations where the ticket vending equipment is not directly compatible in the standard configuration of the interlock signal Menu 10 Courtesy Light The courtesy light circuit on t...

Page 38: ...re empt movement pre open delay pre close delay Pre Flash B Profile PFB The light will flash while the barrier is moving and during any states that pre empt movement pre open delay pre close delay Pre...

Page 39: ...llation flow diagram pull out SECTOR II INSTALLATION FLOW DIAGRAM PULL OUT These two pages pull out and can be used for easy reference when installing your SECTOR II high volume traffic barrier PULL O...

Page 40: ...ion buyers guide Earth and mains Section 4 1 Install FLUX SA loop detector s Section 4 4 Install 11 pin loop detector s Section 10 4 AC and DC isolators Section 4 3 Changing orientation Section 10 2 I...

Page 41: ...peration wiring Section 10 3 Installation handover Section 6 Maintenance Section 8 Advanced controller setup Section 7 Troubleshooting Section 9 Optional enhancements Appendices Section 10 Ancilliary...

Page 42: ...llation flow diagram pull out These two pages pull out and can be used for easy reference when installing your SECTOR II high volume traffic barrier SECTOR II INSTALLATION FLOW DIAGRAM PULL OUT PULL O...

Page 43: ...pikes to start to lower Similarly the S Series Controller will lower the barrier at the same time raise signal is issued to the CLAWS Controller causing the spikes to start to raise DIR Direct Drive M...

Page 44: ...y Input MI Non memory Input NMI Barrier disable LCK The Time barring of code hopping transmitters is specified at the time of coding the transmitter into the system Once an RF input is defined as time...

Page 45: ...it Boom pole end of travel limits are not affected by any reset 13 4 Diagnostic screen Allows a diagnostic screen to be displayed 13 5 Round test button Disables or enables the operation of the round...

Page 46: ...necessary to have the remote present to delete the ID Delete remote button Clear operation of a button on a particular transmitter The transmitter has to be present Delete remote by button Delete a tr...

Page 47: ...drop below 10 5V Use the information screen to monitor the voltages Check the battery terminals for signs of acid leakage and if necessary clean the terminals and battery leads 3 Disconnect the batte...

Page 48: ...e two bolts on either side on the Adjustment Link and the nut on the Drive Arm to 45Nm Figure 38 Tighten both endstops or replace them if necessary Figure 39 Check that the barrier pole is level and a...

Page 49: ...e spring and the gearbox of the SECTOR II The loop wires must always be twisted After every 1 75M operations it is recommended to get the SECTOR II serviced Check all cables ensuring that they are rou...

Page 50: ...tailed information 8 3 2 Leveling the boom pole Use the level adjustment link together with a spirit level to level the boom pole 8 3 3 The endstops can be positively locked SECTION 8 MAINTENANCE FIGU...

Page 51: ...n the Aux input is not activated Lck Stp Green on When the Lck Stp input is not activated MI Red on When the memory input signal is present NMI Red on When the non memory input signal is present Raise...

Page 52: ...Autolower function Displays off if Autolower is not selected OVR if Autolower is overridden and the remaining Autolower time if Autolower is active 4 Pillar Light Ticket Vend Interlock TVI information...

Page 53: ...ically for 30 seconds Hardware No No Holiday Lockout 6 1 beep periodically for 30 seconds User No Yes Emergency stop 7 1 beep periodically for 30 seconds User No Yes Time barring 8 1 beep periodically...

Page 54: ...ll day6 30007 30007 Collision sensing Electronic Operating temperature range 20 C to 55 C Receiver code storage capacity 500 Transmitter buttons Receiver frequency 433 92 MHz 1 Can operate off a solar...

Page 55: ...76 2mm wall thickness 1 27mm Weight 800 kg m Surface Protection colour and markings Epoxy coated white with red reflective tape Mass of pole kg 2 4 kg 3 7 kg 4 9 kg Item Fuse type Rating Main controll...

Page 56: ...page 56 www centsys com 10 1 4 Certificate of compliance This page has been left blank intensionally APPENDICES SECTION 10...

Page 57: ...o Figure 16 Step 2 Use a 24mm socket 4 5 and 6M boom or a 17mm socket 3M boom and a ratchet spanner to relax the tension on the spring by unwinding the nut in an anti clockwise direction Continue unti...

Page 58: ...290 green thread locker on the bolt threads and use a torque wrench to tighten it to 45Nm See Figure 46 to see the new bolt position The unit is now ready for the spring assembly to be re installed E...

Page 59: ...back of cabinet Towards back of cabinet Ensuring the correct spring assembly orientation The orientation of the top coil of the spring is critical with regards to the operation of the barrier If it is...

Page 60: ...d to remove the boom pole coupler if the taper lock has locked in tightly on the coupler The coupler puller can be purchased from Centurion Systems Pty Ltd or a similar one can be fabricated as shown...

Page 61: ...hed through the middle hole in the coupler puller As the cap screw comes out it will push against the coupler puller and pull the coupling off of the output shaft Step 6 Remove the coupler puller comp...

Page 62: ...isely as possible even though there is some adjustment provided for it in the linkage Section 3 3 Step 8 Replace the washer and original cap screw in the centre of the shaft Step 9 Tighten the cap scr...

Page 63: ...needs to be in Locked Mode meaning that the boom pole cannot be raised or lowered by hand it will require use of the 6mm Allen key provided in the manual override slot to raise or lower the boom pole...

Page 64: ...IMIT ENDSTOP IN THE STANDARD FAIL SAFE POSITION FIGURE 61 BOTTOM LIMIT ENDSTOP IN THE STANDARD FAIL SAFE POSITION FIGURE 60 TOP LIMIT ENDSTOP MOVED DOWN LOCKED POSITION AT TOP FIGURE 62 BOTTOM LIMIT E...

Page 65: ...the gearbox in different positions indicated in Figure 63 For a right hand boom to be placed in Lock Mode in the lowered position position the top stopper as shown in Figure 64 similarly for the left...

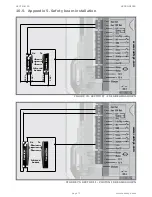
Page 66: ...ics tray Figure 67 and 68 Step 2 Run the TWISTED loop wires up the inside of the enclosure through the wiring clips to the FLUX 11 pin unit Step 3 Wire the loop wires into the FLUX 11 pin unit Step 4...

Page 67: ...ation as per Section 5 Basic controller setup Should a second FLUX 11 pin loop detector be required continue to the next step Black Red Yellow This wiring diagram assumes that a CENTURION FLUX loop de...

Page 68: ...ugh the wiring clips to the second FLUX 11 pin unit Take note of the channels provided to separate each of the twisted pairs for the relevant loop detector Figure 71 Step 3 Wire the loop wires into th...

Page 69: ...asic controller setup Red White Black Yellow This wiring diagram assumes that a CENTURION FLUX loop detector is being used If another brand of loop detector is being used please refer to the documenta...

Page 70: ...am installation 12V 12V 12V 12V Receiver Transmitter Infrared beams Infrared beams Rx Rx Tx Tx FIGURE 74 SECTOR II I5 IR BEAMS SHOWN FIGURE 75 SECTOR II PHOTON IR BEAMS SHOWN Receiver Transmitter www...

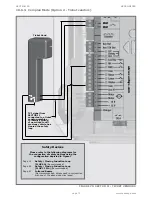
Page 71: ...OPTION 5 CENTURION transmitter with onboard receiver SMARTGUARD keypad SOLO or Lattice proximity access control system External CENTURION receiver Normally open Pushbutton COM 12V 12V 12V 12V 12V 12V...

Page 72: ...UX SA Recommended Page 66 Safety Closing Inductive Loop FLUX 11 Pin Recommended Page 70 Infrared Beams Not recommended unless used in conjunction with one of the above inductive loops 1 2 abc 3 abc 3...

Page 73: ...d in Figure 1 TVI signal from SECTOR II connected to a ticket vending machine to inhibit spitting of new ticket until previous vehicle has cleared the safety loop Page 19 Safety Closing Inductive Loop...

Page 74: ...s for traffic from both directions in a single lane In this case the same barrier provides access control for vehicles entering and free exit for vehicles exiting A triggering device can be used for t...

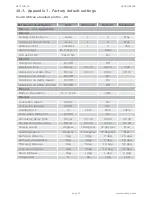
Page 75: ...On Off On Autolower on partly raised On Off On Autolower on partly lowered On Off Off Menu 4 Modes of Operation S C P SP CMX Menu 5 Lock when raised Yes No No Lock when lowered Yes No No Holding force...

Page 76: ...1 00 01 00 04 00 Break in alarm On Off Off Alarm output L X A T B LED Menu 7 TVI output function TVI or CUR TVI TVI output polarity N O or N C N C Light timer Hh mm ss 00 02 00 00 02 00 09 59 59 Menu...

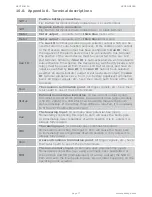
Page 77: ...ignals etc have their return path to one of the Com terminals Com The common termination point All trigger signals etc have their return path to one of the Com terminals Status External boom status in...

Page 78: ...ormally When this connection is broken i e a vehicle drives onto the inductive ground loop it will prevent the barrier from lowering if it is stationary and will stop and raise the barrier if it is lo...

Page 79: ...PEX FIGURE 80 JACK KNIFE ASSEMBLY FIGURE 82 CLAWS FLUSH MOUNT Description Pole hinges away from barrier if accidentally knocked reducing the chance of damage Description Stops pedestrians from circumv...

Page 80: ...integration with the SECTOR II Available in 1m and 1 5m sections Description Required to enable the free exit or the closing safety loop facilities Description Visually indicates when it is safe for...

Page 81: ...for exteded battery back up Requires a bracket and harness to connect the 33Ah battery to the existing harness Other Ancillaries Keypad SOLO Lattice G SWITCH 22 SMARTGUARDair G SPEAK SupaHelix NOVA R...

Page 82: ...page 82 www centsys com Notes...

Page 83: ...page 83 www centsys com Notes...

Page 84: ...ter Hours International Technical Support Call Centre 27 11 699 2481 16 00 to 02 00 Australian Eastern Time E OE Centurion Systems Pty Ltd reserves the right to change any product without prior notice...

Reviews: