background image

page 35

www.centsys.com

OPERA

TOR

 INS
TALLATION

S

ECTION

 6

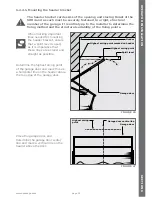
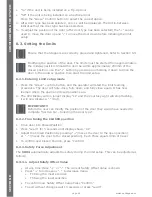
FIGURE 62

FIGURE 63

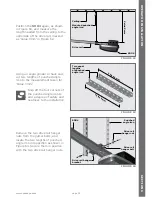
FIGURE 64

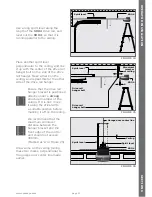
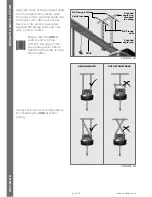
Position the 

SDO4

 again, as shown 

in Figure 60, and measure the 

length needed from the ceiling to the 

underside of the drive rail, marked 

as ‘Value Xmm’ in Figure 62.

Mounted punched 

angle iron

Ceiling

Value Xmm

SDO4

Drive rail

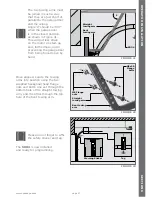
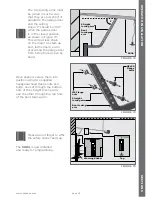
Remove the two drive rail hanger 

nuts from the gutter bolts, and 

locate the two lengths of punched 

angle iron into position as shown in 

Figure 64. Secure them in position 

with the two drive rail hanger nuts.

Two equal 

lengths 

of punched 

angle iron

Value Xmm

Value Xmm

Drive rail 

hanger nut

Drive rail 

hanger bolt

SDO4

Drive rail hanger 

bracket 

Punched 

angle iron

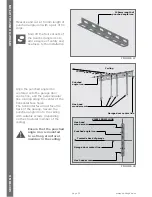
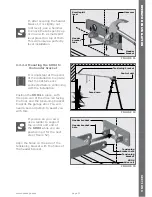
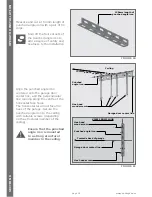
Using an angle grinder or hack saw, 

cut two lengths of punched angle 

iron to the measurement taken for 

‘Value Xmm’.

Snip off the four corners of 

the punched angle iron to 

add a degree of safety and 

neatness to the installation. 

Summary of Contents for SD04

Page 1: ...SDO4 GARAGE DOOR OPERATOR INSTALLATION MANUAL GARAGE DOOR OPERATORS Centurion Systems Pty Ltd www centsys com...

Page 2: ...on to notify any persons of any such revisions or changes Additionally Centurion Systems Pty Ltd makes no representations or warranties with respect to this manual No part of this document may be copi...

Page 3: ...ngaging and disengaging the motor 6 4 Positioning the opening and closing limit stoppers 6 5 The wireless wall switch 6 6 Safety beams 6 7 Connecting to a power supply 6 8 Defaulting the SDO4 7 Electr...

Page 4: ...page 59 page 60 CONTENTS Icons used in this manual This icon indicates tips and other information that could be useful during the installation This icon denotes variations and other aspects that shou...

Page 5: ...applied force should not exceed 100N 10kg Does not rise or fall more than 100mm when released at any point between the fully open and fully closed positions Does not rub on or incorrectly make contact...

Page 6: ...djustment the SDO4 must stop and reverse direction when it comes into contact with a 35mm high solid object placed on the floor under the garage door The correct function of the safety obstruction for...

Page 7: ...out of its view Adjustments to the safety stop reverse force settings must only be carried out by a technically qualified person Attempting to adjust the settings without suitable technical qualifica...

Page 8: ...ion the SDO4 s built in collision sensing circuitry makes it a very safe automation solution Kits are available for both sectional and tip up garage doors GENERAL DESCRIPTION SPECIFICATIONS FIGURE 1 O...

Page 9: ...ilure condition of batteries Operator travel speed Tip up 80mm sec Sectional 140mm sec with fully charged batteries Door travel adjustment Physical Endstops Automatic limit set Safety obstruction forc...

Page 10: ...5 Towing bracket 6 Bent towing arm 7 Header bracket 8 Tensioning nut and spring 9 Drive chain 10 End stop 11 Carriage 12 Chain bullet 13 Head unit brackets 14 Rail hanger 15 Battery housing FIGURE 2...

Page 11: ...illips Tin Snips 10mm 12mm and 13mm Sockets Socket wrench and extension 10mm Coach screws 13mm hex head and plugs Description QTY ST5 5 x 50 Self tapping Coach Screws 4 ST8 x 60 Self tapping Screws 3...

Page 12: ...s and or securing mechanisms have been removed The ceiling structure is adequate enough to support the weight of the SDO4 The garage door is in good working order meaning it opens freely it is well ba...

Page 13: ...be mounted on the front wall of the garage or on the ceiling adjacent to the front wall Tip Up doors Use a 2000mm one piece drive rail The SDO4 is supported by the drive rail hanger which is hung fro...

Page 14: ...Rail M8 Nut M8 Gutter bolts End A M8 Nut End A Operator still in packaging for support Motor Coupling Drive Rail Packaging used for support End B Terminal Bracket 3 Swing the track from side to side s...

Page 15: ...mm screws supplied Figure 10 The chain comes pre tensioned from the factory however ensure that the spaces between the spring windings are 0 5 1mm Use a 13mm socket wrench to tighten the drive should...

Page 16: ...stallation FIGURE 12 Floor to highrise level Opening height Travel path of the topmost section of the garage door Garage door track Garage door Lintel Header Highest arcing point Ceiling Floor Door tr...

Page 17: ...e garage door and determine the garage door center line and mark a vertical line on the header above the door Highest arcing point Highest arcing point marked on header Spirit level Garage door centre...

Page 18: ...5 Ensure that the bottom edge of the bracket is level and no more than 50mm above the highest arcing point of the garage door Mark the location of the four screw holes Hole A B C and D optional Drill...

Page 19: ...ing the SDO4 to the header bracket If you are on your own use a ladder to support the control unit end of the SDO4 while you are positioning it for the next step Figure 19 It is important at this poin...

Page 20: ...ng above the location of the drive rail hanger You can use the SDO4 drive rail as a gauge to assist you if needed Garage door center line SDO4 Ceiling 6 2 1 3 Mounting the SDO4 drive rail to the ceili...

Page 21: ...nother spirit level perpendicular to the ceiling and line it up with the center of the drive rail hanger bolt on the side of the drive rail hanger Make a mark on the ceiling and repeat this for the ot...

Page 22: ...zontal face holes The horizontal face must face the back of the garage Secure the punched angle iron to the ceiling with suitable screws depending on the structural member of the ceiling Ensure that t...

Page 23: ...ngle iron into position as shown in Figure 31 Secure them in position with the two drive rail hanger nuts Ensure that the punched angle iron does not protrude further than the SDO4 drive rail base as...

Page 24: ...ceiling with the holes on the punched angle iron mounted to the drive rail hanger Secure it into position using two supplied M8 flange bolts and nuts using a 13mm socket Spirit level SDO4 SDO4 M8 Fla...

Page 25: ...so that the center of the two holes on the protruding tabs are in line with the top edge of the top roller Place a small spirit level on the top edge of the towing bracket to ensure that it is level w...

Page 26: ...they do not align move the carriage up or down the drive rail in order to align the holes of the bent and straight towing arms Ensure that the two towing arms overlap by at least two holes This will e...

Page 27: ...ay that they are just short of parallel to the garage door and the ceiling Angle Z should be 80 when the garage door is in the closed position as shown in Figure 41 This will put less strain on the mo...

Page 28: ...topmost section of the garage door Garage door Lintel Header Highest arcing point Ceiling Floor Door traveling path The travel path of a garage door is determined by the path that the top section of...

Page 29: ...s Close the garage door and determine the garage door center line and mark a vertical line on the header above the door Highest arcing point Highest arcing point marked on header Spirit level Garage d...

Page 30: ...arage door may cause the drive rail to flex excessively Note the orientation of the header bracket Garage door center line Garage door center line Header bracket Note the orientation Hole B Hole C Hol...

Page 31: ...arage door You will need a second person to assist you with this 6 2 2 2 Mounting the SDO4 to the header bracket If you are on your own use a ladder to support the control unit end of the SDO4 while y...

Page 32: ...ter line of the garage door and mark it on the ceiling above the location of the drive rail hanger You can use the SDO4 drive rail as a gauge to assist you if necessary Garage door center line SDO4 Ce...

Page 33: ...ace a spirit level perpendicular to the ceiling and line it up with the center of the drive rail hanger bolt on the side of the drive rail hanger Make a mark on the ceiling and repeat this for the oth...

Page 34: ...e structural member of the ceiling Ensure that the punched angle iron is mounted to a strong structural member in the ceiling 150mm length of punched angle iron VIEW FROM FLOOR Towards back of garage...

Page 35: ...from the gutter bolts and locate the two lengths of punched angle iron into position as shown in Figure 64 Secure them in position with the two drive rail hanger nuts Two equal lengths of punched ang...

Page 36: ...ted to the ceiling with the holes on the punched angle iron mounted to the drive rail hanger Secure it into position using two supplied M8 flange bolts and nuts with a 13mm socket Ensure that the SDO4...

Page 37: ...on the top edge of the towing bracket to ensure that it is level when drilling holes The above method is for the purpose of wooden garage doors Should you have a garage door that is not constructed fr...

Page 38: ...towing arm Slot the bent towing arm into the straight towing arm and align the holes If they do not align move the carriage up or down the drive rail in order to align the holes of the bent and straig...

Page 39: ...a way that they are just short of parallel to the garage door and the ceiling Angle Z should be 80 when the garage door is in the closed position as shown in Figure 73 This will put less strain on the...

Page 40: ...hen tighten the two lock screws 6 3 Engaging and disengaging the motor The unique engage disengage mechanism provides positive garage door locking even during power outages Functionality TO DISENGAGE...

Page 41: ...configuration The wireless wall switch must be mounted within sight of the garage door and a reasonable distance away from moving parts It should be mounted at least 1500mm above the ground and the e...

Page 42: ...Beam is facing upwards Refer to installation instructions for further information FIGURE 78 Mounting The switch can be permanently screwed to the wall through the mounting holes provided or alternati...

Page 43: ...e the jumper onto 2W Refer to Section 7 Electrical setup of accessories 6 6 2 Four wire safety beams 6 6 2 1 Mounting 1 Mark the inside garage door framing so that the bottom edge of the beam sits 125...

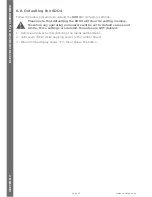
Page 44: ...ove all power by disconnecting the mains and batteries 2 Hold Learn RED while applying power to the control board 3 Wait until the display shows Fr then release the button Please note that defaulting...

Page 45: ...Trigger and Safety beams terminals are provided to support the connection of the most common external accessories The output terminals can be accessed by removing the screw above the control panel an...

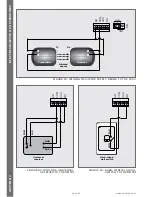
Page 46: ...D WIRING A WALL SWITCH TO THE SDO4 FIGURE 82 WIRING TWO WIRE SAFETY BEAMS TO THE SDO4 Receiver Transmitter Infrared beams Hard wired wall switch Universal receiver Rx Tx GND 24V COM N O N O COM SB SB...

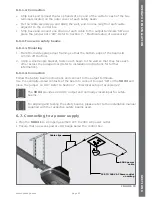
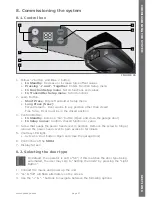
Page 47: ...as a Run button Open and close the garage door In Setup menus Confirm chosen function or value 4 Screw that keeps the power head cover in position Remove the screw to hinge remove the power head cover...

Page 48: ...on Press Learn for 5 seconds until display shows CL Adjust the Closed Position by pressing moves the door to the open position or moves the door to the closed position Each Press equals 3mm of travel...

Page 49: ...Place a 32mm thick block of wood under the line of the garage door approximately at the midpoint of the garage door so that the garage door will close onto the block of wood 4 Activate the SDO4 so tha...

Page 50: ...esy light will stop flashing to indicate a valid RF signal The remote is now learned into the system The number of beeps indicates the function that has been learned Any button can be set to control t...

Page 51: ...p When the door reaches the closed position the courtesy light will remain ON and time out as per normal Should a button which operates a function other than any of those associated with Holiday Locko...

Page 52: ...2 6 Open Only Function This function allows associated button to only open the door Operation Momentarily pressing the associated button will open the door from any position If the door was closing th...

Page 53: ...firm that the user is in the programming menu 3 Press and Hold green Confirm button until the Light Flashes when the screen displays dL all remotes have been successfully deleted 1 With an empty memor...

Page 54: ...trigger Door Type SE Sectional Door tu Tip up Door Slow stop Sh Short slow stop Lo Long slow stop Full power OF Standard Power On Full Power Courtesy Light time 01 1 minute 02 2 minute 03 3 minute Par...

Page 55: ...iggered While the door is opening the door will stop and retract 30mm 10 3 Back Jump bj Back jump will reverse the closed garage door by an incremental amount 1 5mm in order to reduce motor gear lock...

Page 56: ...nt to partial safety reverse the SDO4 will recommence movement in the open direction 10 4 2 Shutdown Mode In the event of a prolonged power outage the SDO4 will automatically shut down in order to con...

Page 57: ...arage door by logging the run time differential between open and close cycles The display will show E3 and the buzzer will short beep five times once the run time differential exceeds three seconds At...

Page 58: ...is selected SE Sectional tu Tip up E5 Current Sensor The door is too heavy for current force setting increase the force offset value Refer to 8 3 3 1 Adjust Safety Offset Value E6 Collision Check doo...

Page 59: ...he purchaser than the relevant provisions of the Consumer Protection Act Act 68 2008 of South Africa or any other applicable law as so required in different countries in which the product was sold Suc...

Page 60: ...ets or other obstructions NO ONE MAY CROSS THE PATH OF A MOVING GARAGE DOOR Always keep people and objects away from the gate and its area of travel NEVER LET CHILDREN OPERATE OR PLAY WITH THE GARAGE...

Page 61: ...page 61 www centsys com Notes NOTES...

Page 62: ...page 62 www centsys com Notes NOTES...

Page 63: ...page 63 www centsys com Notes NOTES...

Page 64: ...and or other countries in favour of Centurion Systems Pty Ltd South Africa The CENTURION and CENTSYS logos all product and brand names in this document that are accompanied by the TM symbol are trade...

Reviews: