page 48
www.centsys.com
8.3. Setting the limits
Ensure that the Stoppers are correctly placed and tightened. Refer to Section 6.3.
Modifying the position of the door. The limits must be started from approximately
the midway position. Should the door be within approximately 200mm of the
closed position, use the “+” button by pressing and holding it down to drive the
door to the midway position then start the limit setup.
8.3.1. Entering Limit setup mode
1.
Press the “Green“ confirm button, and the operator will start the limit learning
procedure. The door will fully close, fully open, and fully close again. It has now
learned where the open and closed positions are.
2.
The LED Display will no longer display “LL” and the Courtesy Light will stop flashing;
it will now display a “.” (Dot).
IMPORTANT!!
Before the user can modify the position of the door they would have needed to
complete “Section 8.2 - Selecting the door type”.
8.3.2. Fine tuning the CLOSED position
• Drive door into Closed Position
•
Press “Learn” for 5 seconds until display shows ‘‘CL”
•
Adjust the Closed Position by pressing “+”(moves the door to the open position);
or “-” (moves the door to the closed position). Each Press equals 3mm of travel
•
To confirm new Closed Position, press “Confirm”
8.3.3. Safety Force Adjustment
The
SDO4
automatically adjusts the safety during the limit setup. This can be adjusted as
follows:
8.3.3.1. Adjust Safety Offset Value
• At any time Press “+” or “-”. The current Safety Offset Value is shown.
• Press “+” to increase or “-” to decrease Value,
• F1 being the most sensitive
• F5 being the least sensitive
•
To confirm new Safety Offset Value Press “Confirm”
•
To exit without changes wait 10 seconds or press “Learn”
S
ECTION
8
COMMIS
S
IONING
TH
E
S
YS
TEM
•
“tu” if the unit is being installed on a Tip-Up door
•
“SE” if the unit is being installed on a Sectional door
Press the “Green” Confirm button to select the correct option.
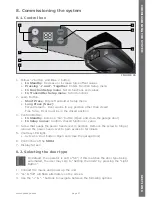
4. After door type has been selected, only L.L will be displayed. The dot in-between
indicates that the door type has been selected.
5.
To adjust the position of the door (after door type has been selected) the “+” can be
used to move the door up and “-” to move the door down before initiating the limit
setup.

